Skip to main content Skip to complementary content

Approving changes in master records

New master records which are created and approved are transitioned through two validation steps in the workflow to double check the accuracy and completeness of data.

The steward who is granted the Account validator role verifies master records and accept or reject the choices done on them. The steward who is granted the Account manager role revalidates master records and accept or reject the changes before marking them as resolved.

Procedure

  1. Log in as a data steward.
  2. On the Tasks page, click the Reconciling client data campaign to open a list of the tasks transitioned to the To verify state.
    More than one data stewards are granted the same role in this campaign. The tasks which arrive on your dashboards are unassigned. You should first assign the tasks among yourselves before you can start working on them.
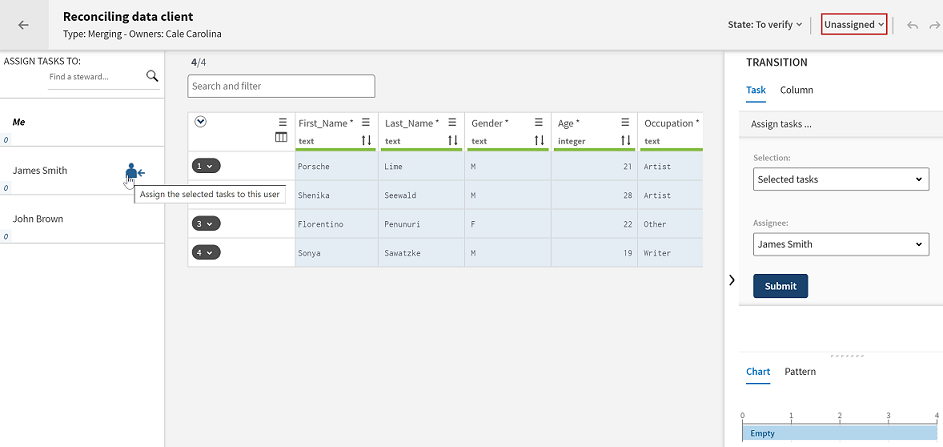
  3. On the menu bar, select Assignment > Unassigned.
  4. In the list of unassigned tasks, hold the Ctrl + Shift keys, select the tasks and assign them to yourself by doing one of the following:
    • In the left panel, point to the data steward to whom to assign the tasks and click next to his/her name.

    • In the right pane, click Assign tasks and from the Assignee list select to whom to assign the tasks.

    • Drop the selected tasks to a data steward in the left panel. Assign them to yourself in this example.

    The selected tasks are moved to your list. The number of tasks which show under your name in the left panel is the number of tasks assigned to you in the current campaign.
    Information noteTip: You can use the charts displayed next to the task list to filter data and list only the tasks you want to assign to a specific data steward.
  5. On the menu bar, select Assignment > Assigned to me to display the tasks for which you need to validate the choices of the initial data stewards.
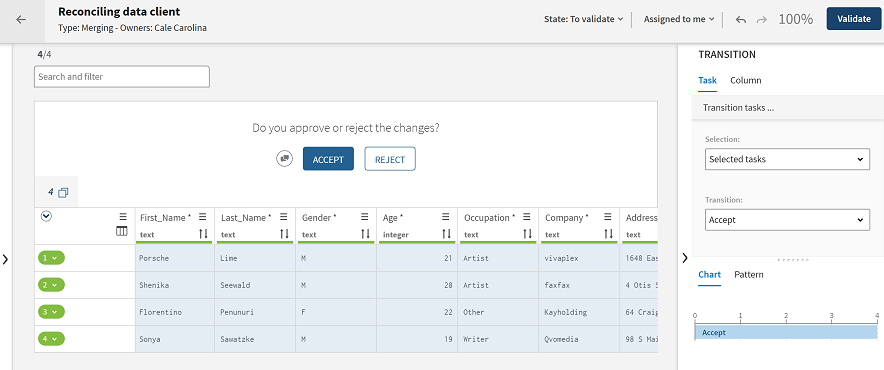
  6. Approve the changes on the master records:
    1. To accept the changes on the master records without any more modifications, select the task(s) and click Accept.
    2. To accept the changes on a master record after doing some more modifications, use any of the functions under Column in the right panel or enter completely new values in the fields and click Accept.
    The first fields of the approved task(s) are marked with green background and the Transition column is filled in with the decision text, Accept or Reject.
  7. To reject the changes done on the master records, select the records and click Reject.
  8. Click Validate in the top right corner.
    The approved tasks are transitioned and assigned to the steward who has the Account manager role.

    The steward with the Account manager role should follow the same steps to approve the records a second time and accept or reject the changes. The approved tasks are resolved and moved from the list. The rejected tasks are moved back to the initial list of unassigned tasks.

Did this page help you?

If you find any issues with this page or its content – a typo, a missing step, or a technical error – please let us know!