
If you need to load data with possible association problems, we recommend that you use the Add data option with data profiling enabled. This is the default option. You can verify this setting by clicking ¥ beside the Add data button in an app.
Qlik Sense profiles the data you want to load to assist you in fixing the table association. Existing good and bad associations, and potential good associations are highlighted, and you get advice about which fields to use for associations based on analysis of the data.
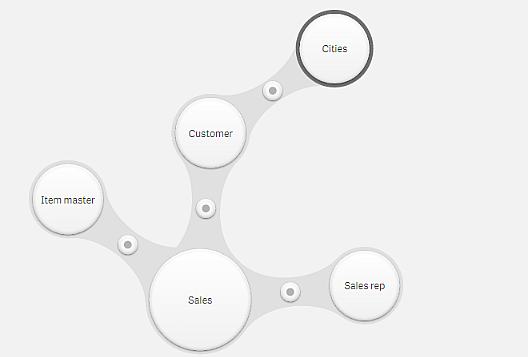
In the Associations view of the data manager your data is illustrated using bubbles, with each bubble representing a data table, and the size of the bubble representing the amount of data in the table. The links between the bubbles represent the associations between tables. If it's an association between two tables, you can select the button in the link to view or edit the association.
In most cases it is easier to edit table associations in the model view, but you can also edit single table associations using the Associate option in the table editor.
Associating all tables based on recommendations
In many cases, you can let Qlik Sense create associations between all added data tables according to recommendations based on data analysis.
Do the following:
- Click Ñ in the upper right corner of the associations view.
The tables are now associated according to recommendations.
Associating two tables
You can associate any two tables, but Qlik Sense recommends which associations are most likely to be successful.
Recommendations are highlighted when you click and press on a table. Highly recommended associations are marked with green, and medium recommendations are orange.
Do the following:
- Drag an unconnected table to one of the tables marked with green or orange.
The tables are now associated using the recommended fields.
I know I want to associate the table with a table that is not recommended
If you hold the table over an association that is not recommended , the table is marked with red. You can still associate the tables by creating a custom association:
-
Drag the table to a table that is marked with red.
The Associate tables editor opens.
- In the left table, select which fields to use in the association. You can use a single field or multiple fields. You can also add delimiter characters to make it easier to interpret the data, or to match a field that already exists. You can see what the association data looks like in the preview.
- In the right table, select which fields to use to match the selections you made in the left table.
-
Enter a name for the key field that will be created in Name.
It's not possible to use the same name as an existing field in either of the tables.
- Click Associate.
The tables are now associated using your custom association.
Breaking an association
You can break an existing association if it is not correct in the data model.
Do the following:
- Select one of the associated tables, preferably the most peripheral one with the fewest associations, and drag it away from the other table until the association breaks.
The two tables are now not associated anymore.
Editing an association
You can edit an existing association between two tables if you need to adjust the data model.
Do the following:
-
Select an association between a table pair.
The association panel opens with a preview of data in the associated fields.
-
Click @.
You will see one or more association buttons, each indicating with color the recommendation status according to data analysis. The current association is marked with grey.
-
Click one of the association buttons:
- Click a recommended association to select it.
- Click an existing custom association (@) to edit which fields to use in the association.
-
Click Custom association to create a new association. This button is only available if there is a recommended association for the table pair.
You can define the custom association using a single field in each table, or using more than one field in each table.
You have now changed the association between the table pair.
Previewing data
You can preview tables in the associations view to get a better understanding of the data.
Do the following:
- Select a table.
- Click j at the bottom of the view.
The preview pane is displayed with the data of the table.
Synthetic keys
When two or more data tables have two or more fields in common, this suggests a composite key relationship. Qlik Sense handles this by creating synthetic keys automatically. These keys are anonymous fields that represent all occurring combinations of the composite key.
See: Synthetic keys
If adding a table results in any of the following cases, you can only add data with profiling enabled.
- A synthetic key containing more than five fields is created.
- More than ten synthetic keys are created.
- Nested synthetic keys are created, that is, synthetic keys containing other synthetic keys.
These cases indicate that you need to adjust the data tables to resolve the issues.
Limitations
There are some cases where association recommendations are not provided, depending on the structure of the loaded tables and the data in the tables. In these cases you need to adjust the associations in the table editor.
- Many-to-many relationships.
- Field pairs with data does not match well in both directions. This may be the case when you have a small table with a few field values that match a field in a large table 100%, while the match in the other direction is significantly smaller.
- Compound key associations.
See: Managing associations to other tables
Additionally, the data manager will only analyze tables that were added with Add data. Tables added using the data load script are not included in the association recommendations unless they have been synchronized into Data manager.
See: Synchronizing scripted tables in Data manager