
Salesforce (v1)
Last updated: 9/15/2026This integration is powered by Singer's Salesforce tap and certified by Stitch. Check out and contribute to the repo on GitHub.
For support, contact Support.
Salesforce integration summary
Stitch’s Salesforce integration replicates data from your Salesforce account. When setting up a Salesforce integration in Stitch, you can select one of the following Salesforce APIs to replicate your data:
Each API has its own advantages and disadvantages, such as support for compound fields and specific objects. Learn more in the setup guide.
Salesforce feature snapshot
A high-level look at Stitch's Salesforce (v1) integration, including release status, useful links, and the features supported in Stitch.
| STITCH | |||
| Release status |
Deprecated on August 17, 2023 |
Supported by
|
|
|
Stitch plan
|
Standard |
API availability
|
Not available
|
| Singer GitHub repository | |||
| REPLICATION SETTINGS | |||
|
Anchor Scheduling
|
Supported
|
Advanced Scheduling
|
Supported
|
|
Table-level reset
|
Supported
|
Configurable Replication Methods
|
Supported
|
| DATA SELECTION | |||
|
Table selection
|
Supported
|
Column selection
|
Supported
|
|
Select all
|
Supported
|
||
| TRANSPARENCY | |||
|
Extraction Logs
|
Supported
|
Loading Reports
|
Supported
|
Connecting Salesforce
Salesforce setup requirements
To set up Salesforce in Stitch, you need:
-
To verify your object access. Stitch will only be able to access and replicate the objects that the user setting up the integration has access to. Before beginning, we recommend verifying that you have access to everything you want to replicate.
-
To verify your API access. To use Stitch’s Salesforce integration, your Salesforce account must have Web Service API access enabled.
Some editions of Salesforce include Web Service API access while others don’t. Info about this feature can be found on Salesforce’s plan details page in the Connect sales info to any app section, located near the bottom of the page.
Contact Salesforce support if you’re unsure about your Salesforce plan’s API access.
Step 1: Set trusted IPs in Salesforce
Depending on how your Salesforce instance is set up, you may need to whitelist Stitch’s IP addresses. In Salesforce, this is referred to as “setting trusted IPs”.
Complete this step before proceeding with the rest of the setup, or you may encounter connection issues.
Step 1.1: Verify your Stitch account's data pipeline region
The IP addresses you’ll whitelist depend on the Data pipeline region your account is in.
- Sign into your Stitch account, if you haven’t already.
- Click User menu (your icon) > Edit User Settings and locate the Data pipeline region section to verify your account’s region.
-
Locate the list of IP addresses for your region:
Keep this list handy - you’ll need it in the next step.
Step 1.2: Set Stitch's IP addresses as trusted IPs
Next, you’ll add the IP addresses you retrieved in the previous step to your Salesforce instance’s trusted IP list. The instructions in this Salesforce article will walk you through how to do this in Salesforce.
Note: Because Stitch’s IPs are exact IP addresses and not ranges, the same IP address must be entered in the Start IP Address and End IP Address fields in Salesforce.
Step 2: Add Salesforce as a Stitch data source
- Sign into your Stitch account.
-
On the Stitch Dashboard page, click the Add Integration button.
-
Click the Salesforce icon.
-
Enter a name for the integration. This is the name that will display on the Stitch Dashboard for the integration; it’ll also be used to create the schema in your destination.
For example, the name “Stitch Salesforce” would create a schema called
stitch_salesforcein the destination. Note: Schema names cannot be changed after you save the integration. - If the instance you want to connect to Stitch is a sandbox, check the Connect to a Sandbox Environment box.
Step 3: Configure Stitch's Salesforce API Usage
Usage of the Salesforce API depends on two factors:
- The type of API used for data extraction (Bulk vs REST), and
- The amount of standard API quota your account has. An API quota refers to the total number of API requests that can be made in a given period of time.
Stitch’s Salesforce integration allows you to control both of these settings so you can replicate data as you see fit.
Step 3.1: Select extraction API
If you’re not sure which API you should use, take a look at the brief comparison below. Consider how much data you need to replicate, how often you require updates, how many additional apps are connected to your Salesforce instance, and so on.
Once you’ve decided, click radio button next to the API you want to use.
| REST API | Bulk API | |
| Good for replicating |
Small data sets, more frequently Note: Due to the design of Salesforce’s REST API, tracking a large number of columns in a single object can lead to replication issues. See this guide for more info. |
Large data sets, less frequently While the Bulk API allows for a greater number of tracked fields, Salesforce only allows each batch to be 5MB. |
| API quota |
Total usage is calculated by your organization type, the type of licenses held, and the number of licenses. Refer to Salesforce’s documentation for more info. |
Limited to 10,000 batches per day, regardless of the standard API quota. Refer to Salesforce’s documentation for more info. |
|
Structure sync
|
Uses the REST API and standard API quota. |
Uses the Bulk API, REST API and standard API quota. |
|
Data extraction
|
Uses the REST API standard API quota. |
Uses the Bulk API and Bulk API quota. Each query to an object uses one (1) batch, even if no data is replicated from the object. If you have any other apps using the Salesforce API, you may consume your quota more quickly. |
|
Compound fields
|
Supported |
Tracking the individual fields that make up a compound field - such as |
|
Unsupported objects
|
The following objects require a querying strategy that Stitch doesn’t currently support. Read more here.
The following objects are incompatible with querying. Read more here.
|
In addition to the objects listed in the REST API column, the objects listed below are also unsupported by the Bulk API. Read more here.
|
Step 3.2: Define standard API quota usage limits
Next, you’ll define the percentage of your standard API quota Stitch is allowed to use. If these limits are reached, Stitch will pause replication and resume when additional quota becomes available.
Before defining these limits, we recommend reviewing your overall API usage in Salesforce to ensure Stitch or other apps won’t be negatively impacted. This Salesforce Salesforce topic can help you locate your current API quota and usage.
| Description | Example | |
|---|---|---|
|
Max Percentage of total standard API quota |
The percentage of your total API quota Stitch is allowed to use per 24 hour period. Note: This includes API usage from other apps. |
If set to 80% and the quota is 10,000 calls 24 hour period: 10,000 x .8 = 8,000 Stitch will replicate data up until 8,000 calls are used across all your connected apps. |
|
Max Percentage of standard API quota per job |
The percentage of your total standard API quota Stitch is allowed to use per replication job. |
If set to 10% and the quota is 10,000 calls: 10,000 x .1 = 1,000 Stitch will use up to 1,000 calls per replication job. |
Once you know what you want Stitch’s maximum allowed standard API percentages to be, enter them as whole numbers (ex: 80 for 80%) into their respective fields.
Step 4: Define new field selection
By default, when new fields are added to Salesforce objects, Stitch will automatically detect and begin replicating data from them.
If you prefer to track new fields manually, uncheck the Replicate new fields automatically checkbox. Note: This setting cannot be changed after the integration is saved.
Data for new fields in already-replicating tables
Data in new fields in already-replicating tables will only be available for records added or updated after the column is tracked, whether they’re tracked manually or automatically. This is only applicable to tables using Key-based Incremental Replication.
To backfill columns - or get data for a new field into existing rows - you’ll need to queue a full re-replication of the table by resetting its Replication Key values on the Table Settings page.
Step 5: Define the historical replication start date
The Sync Historical Data setting defines the starting date for your Salesforce integration. This means that data equal to or newer than this date will be replicated to your data warehouse.
Change this setting if you want to replicate data beyond Salesforce’s default setting of 1 year. For a detailed look at historical replication jobs, check out the Syncing Historical SaaS Data guide.
Step 6: Create a replication schedule
In the Replication Frequency section, you’ll create the integration’s replication schedule. An integration’s replication schedule determines how often Stitch runs a replication job, and the time that job begins.
Salesforce integrations support the following replication scheduling methods:
-
Advanced Scheduling using Cron (Advanced or Premium plans only)
To keep your row usage low, consider setting the integration to replicate less frequently. See the Understanding and Reducing Your Row Usage guide for tips on reducing your usage.
Step 7: Authorize Stitch to access Salesforce
- Next, you’ll be prompted to sign into your Salesforce account.
- A screen asking for authorization to Salesforce will display. Note that Stitch will only ever read your data.
- Click Allow.
- After the authorization process successfully completes, you’ll be redirected back to Stitch.
- Click All Done.
Step 8: Set objects to replicate
The last step is to select the tables and columns you want to replicate. Learn about the available tables for this integration.
Note: If a replication job is currently in progress, new selections won’t be used until the next job starts.
For Salesforce integrations, you can select:
-
Individual tables and columns
-
All tables and columns
Click the tabs to view instructions for each selection method.
- In the integration’s Tables to Replicate tab, locate a table you want to replicate.
-
To track a table, click the checkbox next to the table’s name. A blue checkmark means the table is set to replicate.
-
To track a column, click the checkbox next to the column’s name. A blue checkmark means the column is set to replicate.
-
Optional: To define a table’s Replication Method, click Table Settings on the right side of the page.
Whenever possible, Stitch will default to using Key-based Incremental Replication. In these cases, the table’s Replication Key will be automatically selected and cannot be changed.
To change the table’s Replication Method:
-
Select the Replication Method you want the table to use. Note: Some tables can only be replicated using Full Table Replication. Key-based Incremental Replication will be greyed out when this is applicable.
-
Click Update Settings.
-
- Repeat this process for all the tables and columns you want to replicate.
- When finished, click the Finalize Your Selections button at the bottom of the screen to save your selections.
- Click into the integration from the Stitch Dashboard page.
-
Click the Tables to Replicate tab.
- In the list of tables, click the box next to the Table Names column.
-
In the menu that displays, click Track all Tables and Fields:
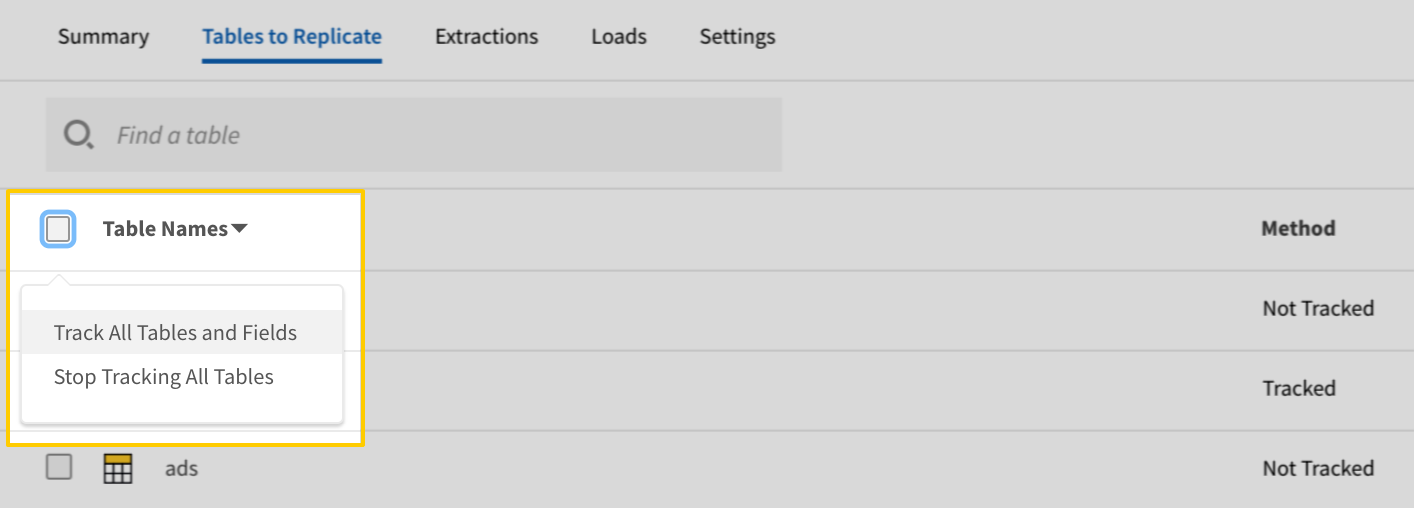
The Track all Tables and Fields menu in the Tables to Replicate tab - Click the Finalize Your Selections button at the bottom of the page to save your data selections.
Initial and historical replication jobs
After you finish setting up Salesforce, its Sync Status may show as Pending on either the Stitch Dashboard or in the Integration Details page.
For a new integration, a Pending status indicates that Stitch is in the process of scheduling the initial replication job for the integration. This may take some time to complete.
Initial replication jobs with Anchor Scheduling
If using Anchor Scheduling, an initial replication job may not kick off immediately. This depends on the selected Replication Frequency and Anchor Time. Refer to the Anchor Scheduling documentation for more information.
Free historical data loads
The first seven days of replication, beginning when data is first replicated, are free. Rows replicated from the new integration during this time won’t count towards your quota. Stitch offers this as a way of testing new integrations, measuring usage, and ensuring historical data volumes don’t quickly consume your quota.
Salesforce table reference
Schemas and versioning
Schemas and naming conventions can change from version to version, so we recommend verifying your integration’s version before continuing.
The schema and info displayed below is for version 1 of this integration.
Stitch currently supports the replication of the majority of Salesforce objects, with the exception of those listed in the Unsupported Objects row of this table.
To ensure we can provide you with up-to-date documentation, this section will only cover a few of the most popular tables Stitch’s Salesforce integration offers.
See the Salesforce Object Reference guide for info on objects not listed here, including the fields available in each object.
Custom Salesforce object and field replication
Stitch’s Salesforce integration supports the replication of custom objects and fields.
Custom object and field names are appended with __c to make identification easier. For example: AE_Assignment__c or Assignment_Group_Name__c
Table and column names in your destination
Depending on your destination, table and column names may not appear as they are outlined below.
For example: Object names are lowercased in Redshift (CusTomERs > customers), while case is maintained in PostgreSQL destinations (CusTomERs > CusTomERs). Refer to the Loading Guide for your destination for more info.
account
The account table contains info about the individual accounts (organizations and persons) involved with your business. This could be a customer, a competitor, a partner, and so on.
|
Key-based Incremental |
|
|
Primary Key |
id |
|
Replication Key |
systemModStamp |
| Useful links |


contact
The contact table contains info about your contacts, who are individuals associated with accounts in your Salesforce instance.
|
Key-based Incremental |
|
|
Primary Key |
id |
|
Replication Key |
systemModStamp |
| Useful links |
lead
The lead table contains info about your leads, who are prospects or potential Opportunities.
|
Key-based Incremental |
|
|
Primary Key |
id |
|
Replication Key |
systemModStamp |
| Useful links |
opportunity
The opportunity table contains info about your opportunities, which are sales or pending deals.
|
Key-based Incremental |
|
|
Primary Key |
id |
|
Replication Key |
systemModStamp |
| Useful links |
user
The user table contains info about the users in your organization.
|
Key-based Incremental |
|
|
Primary Key |
id |
|
Replication Key |
systemModStamp |
| Useful links |