
Creating a file share or shared folder is a prerequisite before you install Qlik Sense. The file share stores all binary app data, including the data models and dashboard sheets. It must be accessible to all nodes in your Qlik Sense site. You can create a file share either on the same server as the central node or on a separate server. If you have a large multi-node site we recommend that you configure the file share on a dedicated server for better resilience and performance.
If you create the file share on a separate server then you can follow the same steps as for a central node but you must ensure that the same Windows domain user that you use to run the Qlik services has read and write access to the file share folder.
To create a file share and share the folder with specific users:
- Create a local folder on your server computer. For example, create a folder called QlikShare on the C:\ drive.
- Right click the folder, and then click Properties.
- Click the Sharing tab, and then click Share.
- Enter the name of your Windows user, and click Add.
- In the Permission level column, select Read/Write, then click Share.
Ensure that permissions on the folder, subfolders, and files are set to full control for the user account you selected.
Do the following:
- Click the Security tab.
- Select the user account you want to use for the installation.
- Click Advanced and verify that your current user has full control, and that this permission applies to the folder, subfolders, and files.
- Click the Effective Access tab, then click Select a user and enter your user account name.
- Click View effective access, then check the Permission column that your user has full control.
Creating an NFS file share
You can host an NFS file share on a Microsoft Windows Server and map it to your Qlik Sense Enterprise on Windows installation.
To use an an NFS file share, you must also:
-
Enable the Server for NFS feature on the Windows server.
-
Modify the Settings.ini file to enable compatibility with your NFS file share.
1. Enable Server for NFS
Do the following:
- Open the Windows Server Manager.
- Click Manage.
- Click Add Roles and Features.
-
In the Add Roles and Features Wizard, select the following:
Configuration setting Instruction Installation Type Select Role-based or feature-based installation Server Selection Use the pre-selected server. Server Roles Under Files And Storage Services > File and iSCSI Services, select Server for NFS. Features Ensure that Client for NFS is selected. Confirmation Click Install. Results Verify the install is successful. You will need to restart the server.
2. Create an NFS file share
Do the following:
- Create a new folder on your Windows Server.
- Right-click the folder, then click Properties.
- Under the NFS Sharing tab, select Share this folder.
- Enter a Share name.
- Click Permissions.
- Click Add to add IP addresses or host names that can connect to the NFS file share, and set their Type of access as needed. Click OK
- Click Apply, then OK.
3. Configure Qlik Sense to work with the NFS share
To enable compatibility with your NFS file share, you must modify the Settings.ini file on each Qlik Sense node.
Do the following:
-
Stop the Qlik Sense Engine and Qlik Sense Service Dispatcher services on all nodes with engines.
-
For each node:
-
Open Notepad as Administrator.
-
Open the Settings.ini file.
The default location is: C:\ProgramData\Qlik\Sense\Engine\Settings.ini
-
-
Add the following line to the file under [Settings 7]:
[Settings 7] MapNetworkDrives=1Ensure that there is a blank line at the end of the file.
-
Save the file.
-
Restart Qlik Sense Engine and QSD services on each node to apply the changes.
See also: Qlik Community: How to modify Qlik Sense Engine's Settings.ini.
Changing the file share path
You can change the Qlik Sense file share path after installing Qlik Sense Enterprise on Windows by using the QlikSenseUtil.exe, which is included with the Qlik Sense installer.
To change the file share path, do the following:
-
On the file share server, create a new file share.
-
Copy the share path to a notepad. You need to add the new share path to the QlikSenseUtil.exe later.
-
Stop all Qlik services except the Qlik Sense Repository Service.
-
Move the Apps, ArchivedLogs, and StaticContent folders from your existing file share to your new file share.
-
Run the QlikSenseUtil.exe as administrator.
Information noteIf you used the default installation path for Qlik Sense, QlikSenseUtil.exe is located: %Program Files%\Qlik\Sense\Repository\Util\QlikSenseUtil\QlikSenseUtil.exe -
From the QlikSenseUtil window, click Connect to database.
-
On the Connect to database window, enter the Qlik Sense repository database username and password, then click OK.

-
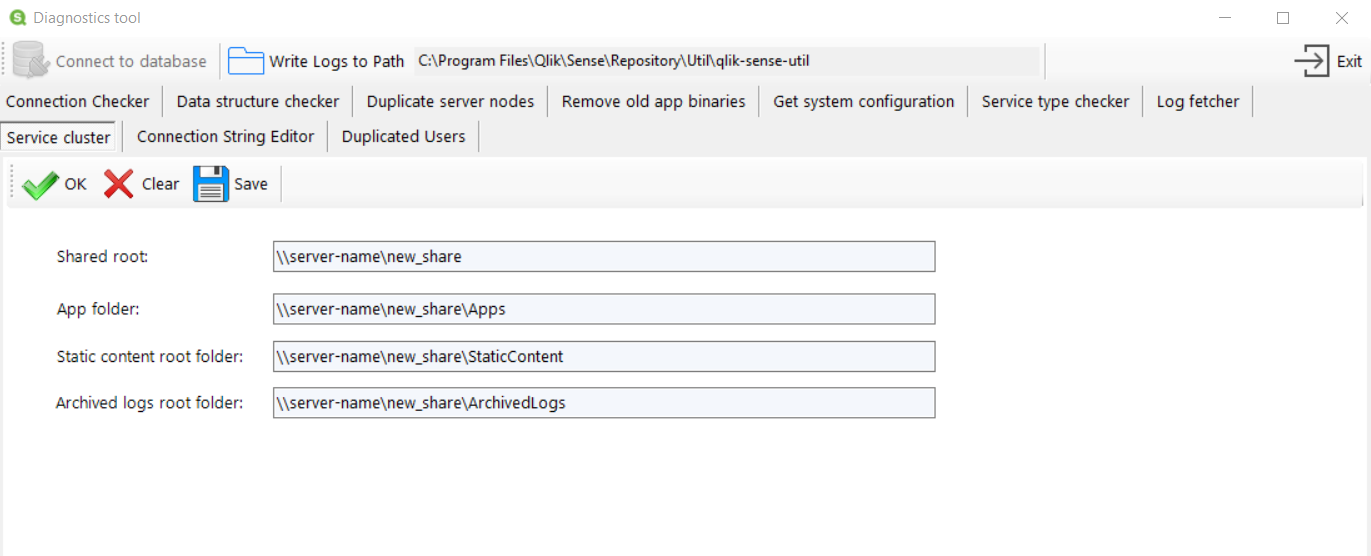
Select Service cluster, then click OK to retrieve the current file share path.
-
Replace the current file paths with the new file paths, then click Save.
-
Verify that the file share paths have been updated correctly by clicking Clear, and then OK. The fields should populate with the new file paths.
-
Restart the Qlik services that you closed.
-
Restart the QMC.