
Managing custom filters in table views
Custom filters help you easily find the content that you want to work with. For example, you might need to look at a specific set of tasks every day. Filter the tasks and then save the table view as a custom filter. Next time, use the custom filter to go directly to your set of tasks. An additional benefit is that only the items included in the filter are loaded, which reduces load time.
You can save the following settings in a custom filter:
- Search filters
- Column filters
- Sort order
- Sort column
- Column definition (which columns to show and the column width)
You create and manage custom filters for all resources from the Custom filters menu on the resource overview page.
Predefined custom filters
On the QMC start page you can use predefined custom filters. These are denoted by a number sign (#).
-
#My apps, #My app objects, and #My streams show objects that you own.
-
#My tasks shows tasks associated with apps that you own.
-
The Tasks overview has one custom filter for each stream. They show tasks that are connected to the apps that are published to that stream.
Predefined custom filters have no settings for column layout. They only define filters and sort order. Update a predefined custom filter if you want to save a specific layout.
You can temporarily delete a predefined custom filter, but it is re-created when you refresh the browser.
Applying custom filters
When you apply a custom filter, the custom filter icon is highlighted. The currently applied custom filter has a check mark in the Custom filters menu. This is reset once you make any changes to the table.
If the custom filter that you apply includes filters, only a subset of the table data is loaded.
Do the following:
- On the resource overview page, click
 to open the Custom filters menu.
 -
Click Use next to the custom filter you want to apply.
Tip noteFor apps, app objects, tasks, and streams, custom filters are available on the QMC start page.
Creating custom filters
You create a custom filter by first making the necessary edits to the table and then saving the result.
Do the following:
- Go to the resource overview page.
- Filter, sort, or make any column adjustments to save in a custom filter.
- Click to open the Custom filters menu.
- Type a name for the new custom filter and add a description.
- Click
 .
.
Deleting custom filters
Do the following:
- On the resource overview page, click to open the Custom filters menu.
- Click
 next to the custom filter you want to delete.
Updating custom filters
You can update any custom filter with the current layout, filters, and sort order.
Do the following:
- On the resource overview page, click to open the Custom filters menu.
- Click Update next to the custom filter you want to update.
The selected custom filter will be updated with the new settings.
The custom filters user interface
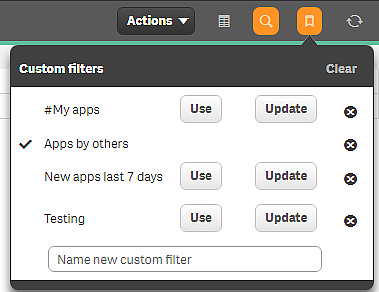
In the following user interface, the custom filter Apps by others is in use. Click Clear to clear the current filter. Nothing is deleted.
To apply a different filter, click Use for that filter. If you click Update that custom filter is updated with the current settings.
Delete a filter by clicking ![]() .
.
Example: Creating a custom filter for apps owned by others
This filter will only show apps created by other users.
Do the following:
-
On the QMC start page, click Apps.
The apps overview section is opened.
-
Click
 to open the search.
 -
In the first list, select Owner.
-
In the second list, select !=.
-
In the text box, enter your user name.
-
Click Search.
Now only apps owned by others are displayed.
-
Click
to open the Custom filters menu. -
Name the new custom filter Apps by others.
-
Click
.Your new custom filter is saved and a check mark indicates that it is currently in use.
Example: Updating a custom filter
In this example you will update the predefined custom filter #My apps to sort apps by size.
Do the following:
-
On the QMC start page, select the custom filter #My apps.
The apps section is opened and the custom filter is applied. Only your apps are shown.
-
Click
 to open the column selector and select File size (MB).
 -
Click the File size (MB) header to change the sorting order.
-
Click
to open the Custom filters menu. -
On the row for #My apps, click Update.
-
The #My apps filter is updated and a check mark indicates that it is currently in use.