
Connecting Qlik NPrinting with Qlik Sense
You must connect your Qlik NPrinting installation to one or more Qlik Sense servers if you want Qlik Sense charts in your reports. You can designate one Qlik Sense hub to receive Qlik NPrinting reports.
The Qlik NPrinting Server folder with the Qlik Sense certificates (C:\Program Files\NPrintingServer\Settings\SenseCertificates) is kept during upgrades, but is deleted if you uninstall Qlik NPrinting.
Requirements
For Qlik Sense version compatibility, see Qlik Sense compatibility.
- In the QMC, you must give RootAdmin authorization to the Windows user that runs the Qlik NPrinting Engine Windows service. That Windows user must also be a domain user. See: User accounts.
- Microsoft Windows NTML authentication on the Qlik Sense proxy. SAML and JWT are not supported. If your virtual proxy uses SAML or JWT authentication, you need to add a new virtual proxy with NTLM enabled for Qlik NPrinting connections. The following must be correctly set up:
-
A Qlik Sense proxy.
-
A Qlik Sense virtual proxy.
-
A link between the proxy and virtual proxy.
-
The Qlik Sense virtual proxy must be reachable from the Qlik NPrinting Engine machines to retrieve data to create reports. It must be reachable from the Qlik NPrinting Server to publish to the Qlik Sense hub.
Limitations
- Connecting additional Qlik Sense servers will have an impact on Qlik NPrinting Server system resources. You may need to increase the RAM and CPU usage on Qlik NPrinting Engine and Qlik NPrinting Server computers if you connect to multiple Qlik Sense servers. See: Performance.
- Publishing to multiple Qlik Sense hubs it is not supported.
- Qlik Sense Desktop is not supported.
Validating the connection to Qlik Sense
Qlik NPrinting must validate the connection to Qlik Sense using certificates.
Certificates must be installed on the Qlik NPrinting scheduler service computer in order to distribute reports from Qlik NPrinting to the Qlik Sense hub. Certificates must also be installed on all Qlik NPrinting Engine computers in order to create connections to Qlik Sense apps. If the Qlik NPrinting scheduler service and Qlik NPrinting Engine are installed on the same computer, you only need to install the certificates once.
Exporting the certificates from the QMC
Do the following:
-
Log into the QMC as a Qlik Sense administrator or a user with a RootAdmin access.
-
Select Certificates on the QMC start page or from the
 menu.
menu. The Export page for Certificates is displayed.
-
In the Machine name box, type the full computer name of the Qlik NPrinting Server computer that you are creating the certificates for: MYMACHINE.mydomain.com or the IP address.
-
Leave the Certificate password box empty.
-
Select .pfx file format in the Export file format for certificates drop-down list.
-
Click Export certificates in the action bar.
-
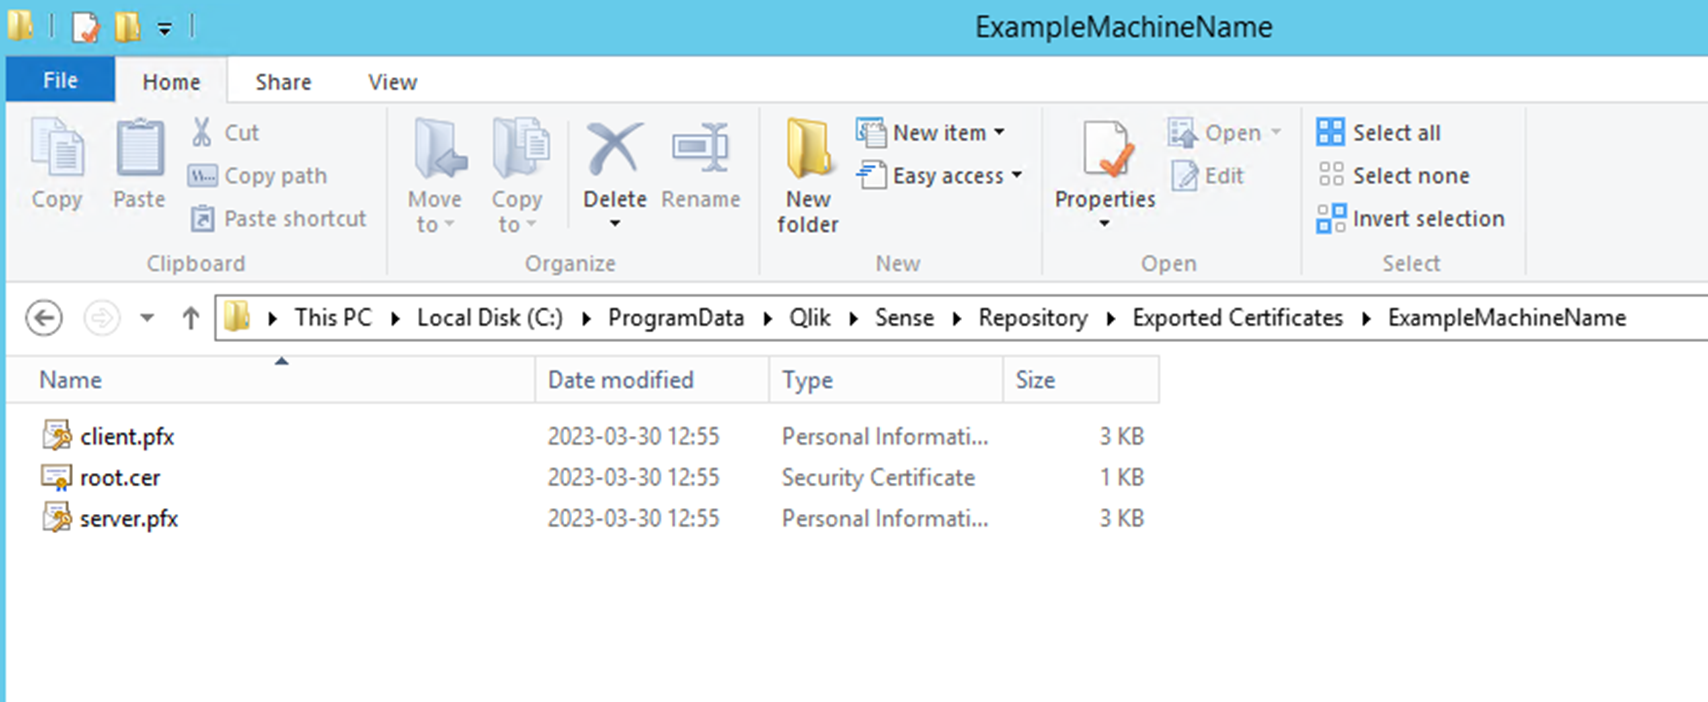
When the export is finished, the dialog Certificates exported is displayed. Certificates will be exported to this disk location displays the target directory.
The default is: C:\ProgramData\Qlik\Sense\Repository\Exported Certificates\QlikNPrintingServerName
-
Go to this directory. You should see three files: client.pfx, server.pfx, and root.cer. These are the files that need to be installed in your Qlik NPrinting deployment.
If you are connecting to multiple Qlik Sense servers, you will need to repeat the export process for each server, and rename the certificate files.
Installing Qlik Sense client certificates
You need the client.pfx file that was exported during Exporting the certificates from the QMC. If you are installing certificates from multiple Qlik Sense servers, the client.pfx file must be renamed with a unique name. For example: YourQlikNPrintingServerName.pfx. Repeat this process for each Qlik NPrinting Engine. Each different client.pfx must be given a unique name.
The certificate export process must be repeated on each Qlik Sense server you want to connect to Qlik NPrinting Server and Qlik NPrinting Engine.
Do the following:
-
Receive the exported and renamed Qlik Sense certificates from your Qlik Sense system administrator.
- Log into the Qlik NPrinting Server running the Qlik NPrinting scheduler service, as the Windows Qlik NPrinting Server services administrator.
-
Add the certificates to C:\Program Files\NPrintingServer\Settings\SenseCertificates. Qlik NPrinting will automatically identify the correct one to be used for each connection.
Information noteYou should only keep active Qlik Sense certificates used by Qlik NPrinting connections in the C:\Program Files\NPrintingServer\Settings\SenseCertificates folder.
We recommend that you remove any certificates that are not in use.
- Repeat this process on each Qlik NPrinting Engine running the Qlik NPrinting Engine service, using the Windows Qlik NPrinting Engine services administrator.
Additional user access allocation in Qlik Sense is not required for a user to view reports in the Qlik Sense hub.
Configuring server certificate validation for Qlik Sense connections
Server certificate validation ensures that Qlik NPrinting only connects to trusted Qlik Sense servers for data retrieval (getting data or images from a Qlik Sense app) and report publishing to Qlik Sense hubs. Installing these certificates allows Qlik NPrinting to validate the connection to Qlik Sense.
Requirements
-
Installation locations: The Qlik Sense root.cer file must be installed on Qlik NPrinting Server and Qlik NPrinting Engine machines, by someone logged in as the corresponding Windows Qlik NPrinting Server services administrator or Windows Qlik NPrinting Engine services administrator (if certificates are being installed for the Current user and not for Local machine).
-
Fully Qualified Domain Names (FQDN): When Apply Qlik Sense server certificate validation is enabled, only Fully Qualified Domain Names (FQDN) can be used to connect to Qlik Sense servers for both data retrieval and report publishing.
All Qlik Sense connections and Qlik Sense hub proxy addresses must contain the full address: http(s)://mysenseserver.mydomain.com/with_proxy_prefix_if_used.
The shorter address cannot be used: http(s)://mysenseserver/with_proxy_prefix_if_used. If a Qlik Sense connection does not use FQDN proxy addresses, it must be manually changed by a Qlik NPrinting Administrator.
Installing server certificates
You need the root.cer file that was exported during Exporting the certificates from the QMC. This is the file that you need to install on the Qlik NPrinting Server and your Qlik NPrinting Engine machines. Server certificates must be installed on:
-
The Qlik NPrinting Server computer when Qlik Sense hub is used as a report publishing destination.
-
Every Qlik NPrinting Engine machine if connections to Qlik Sense are used. Installing certificates on the Engine machines is not required if QlikView is used exclusively to fetch data
Do the following:
-
Log into a Qlik NPrinting Server or Qlik NPrinting Engine with the correct services administrator account.
-
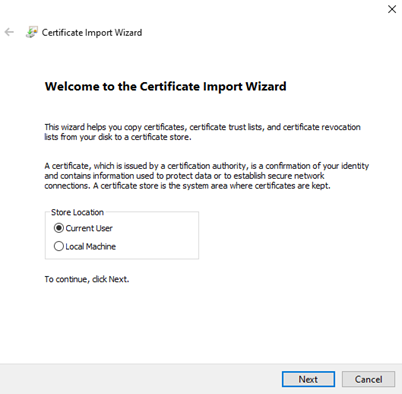
Double-click on the root.cer file you already copied and click Install Certificate….
This starts the Certificate Import Wizard.
-
The first dialog box will suggest that you install the certificate only for the Current User. This is either the Server or Engine Windows service user account. If you choose Local Machine, the certificate will be available to all users. Click Next.
-
Choose Place all certificates in the following store and then click Browse….
-
Select Trusted Root Certification Authorities and then click OK. Click Next.
-
Review your selections. They should match the image below, especially Certificate Store Selected by User: Trusted Root Certification Authorities.
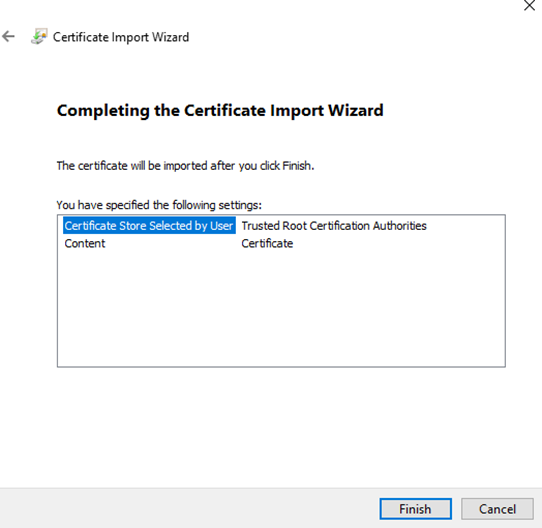
-
Click Finish.
-
A Security Warning dialogue may appear. If so, read it and click Yes.
You will see a message informing you that the import was successful. Ensure that all Qlik NPrinting connections and, if used, the Qlik Sense publish to hub proxy address, use FQDN. For more information, see Requirements.
Once you have installed the certificates on the required Qlik NPrinting Server and Qlik NPrinting Engine machines, you are ready to manually enable the feature.
Turning on server certificate validation
After you turn on server certificate validation, if the corresponding Qlik Sense root.cer certificate files were not properly installed on Qlik NPrinting Server and each Qlik NPrinting Engine machine, any configured task that uses a Qlik Sense connection will fail when executed.
Do the following:
-
Log into Qlik NPrinting web console as an Administrator.
-
In the top menu, go to Admin > Settings >Task.
-
In the Security section, click the Apply Qlik Sense server certificate validation checkbox.
-
Click the Update button.
Once this feature is turned on, a message will appear at the bottom of every Qlik Sense connection page and Qlik Sense hub destination setup page.
Sense hub destination setup page with note at the bottom explaining that server certificate validation will be applied.
