
Editing column mappings
The mappings show the current mapping between the landing zone tables and the logical entities. By default, the columns names and data in the source tables and the logical entities will be identical. However, you can manually change the mappings according to your needs, either by simply mapping a source column to a different data warehouse column and/or by using an expression.
To edit column mappings:
- Click the Manage button in the Data Warehouse panel.
-
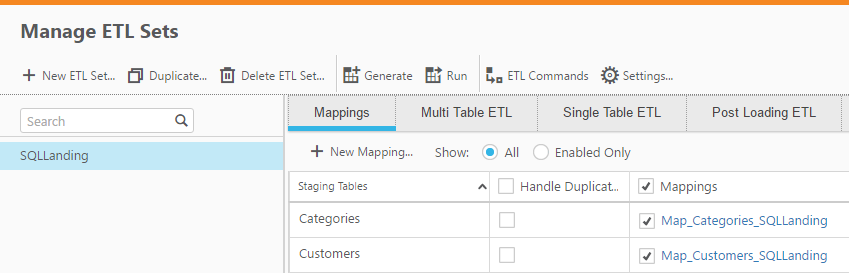
In the Manage Data Warehouse Tasks window, select the Mappings tab. Each of the logical entities has a corresponding mapping name.
-
In the Mappings column, click the mapping that you want to edit. The Edit Mapping: Name window opens.
-
Edit the mapping as described below.
Mapping a landing zone table column to a staging area table column
The mapping procedure differs depending on whether you are in Standard View or Compact View. For information on changing the view, see Changing the view.
In Standard View:
-
Hover the mouse cursor over the source column name as shown in the image below. A gray dot appears to the right of the column name.

-
Drag the mouse cursor from the gray dot to the desired column in the logical entity.

-
When the dotted line turns green (as shown below), release your mouse button.
Note that if the dotted line turns red (instead of a green), you will not be able to map the source column with the desired data warehouse column. A red dotted line indicates that the source and data warehouse column data types are incompatible with each other.
In Compact View:
- Switch to Compact View as described in Change the view.
- Drag the source column to the cell located to the left of the target data warehouse column.
Auto-generating mapping
Click the Auto-Map toolbar button.
Removing all mappings
Click the Reset toolbar button.
Changing the view
To change the view, click the Change View toolbar button.
Changing to a more compact view is recommended for sources tables that have numerous columns. In compact view, the table columns are organized in rows (instead of a single list), making it easier to locate source columns and map them to the desired data warehouse columns. You can also use the search box to filter out all columns that do not match the search string.
For information on creating mappings in Compact view, see Map a column in a landing zone table to a column in a staging area table.
Selecting a different source database
Select a database from the Landing Zone Database drop-down list on the left of the window.
Selecting a different source schema
Select a schema from the Schema drop-down list on the left of the window.
Changing the entity type
Select Table, View or Query on the left of the window. If you choose the Query option, see also Define a custom query.
Defining a custom query
When the entity type is set to Query, you can set a custom select query instead of using the existing source tables/views.
To set a query:
-
Click the Set Query button. The Edit Mapping Select Query: <Mapping Name> window opens.
-
Hover the mouse cursor over a table and/or a column and then click the arrow to the right of the highlighted table/column to add it to the Query.
-
Use the Select button at the top of the window to add select statements to your query.
Optionally use the Undo, Redo and Clear buttons as required.
-
Click OK to save your settings and close the window.
The query results will be displayed on the left of the Edit Mappings: <Name> window.
Selecting a different table
Select a table from the Table Name drop-down list on the left of the window.
Seeing the data of a selected table
Select a source table and then click the Show Source Data button on the left of the window.
Creating a table-level transformation (Filter)
-
Click the Filter toolbar button in the Edit Mappings:Name window. The Expression Builder opens.
-
Continue from Opening the expression builder.
Information noteWhen creating a filter for a table, the expression should return 1 for data that you want to include and 0 for data that you want to exclude.
Information noteThe filter will be applied after any Data Cleansing rules that are defined.
Warning noteUpdates to records excluded by a filter (even for records previously included by the filter) are not processed while the records are filtered out. Updating of filtered out records would only resume if the record(s) once again met the filter-in condition, but any changes made while the records were filtered out would be lost.
Creating a column-level transformation
-
Hover the mouse cursor over the data warehouse column for which you want to create a transformation and then click the fx button that appears to its right. The Expression Builder opens.
- Continue from Opening the expression builder.