
Transform
The Transform package modifies data by applying user defined functions and operators onto field data.
Example: Transform package

Once source entities are added to the canvas, the Transform package is brought onto the canvas by double-clicking or dragging the icon. When the square icon becomes a live controller on the canvas, double-click to reveal a field mapping panel where fields can be added, deleted, or converted. Custom expressions can be built and applied to each field.
Transform package

Add Field and adjust size of Transform control
Expand or shrink the field definition window by moving the  (size control) found in bottom right of Transform controller to create more space in which to Add Fields. The Add Field function is found in the lower left of the Transform controller.
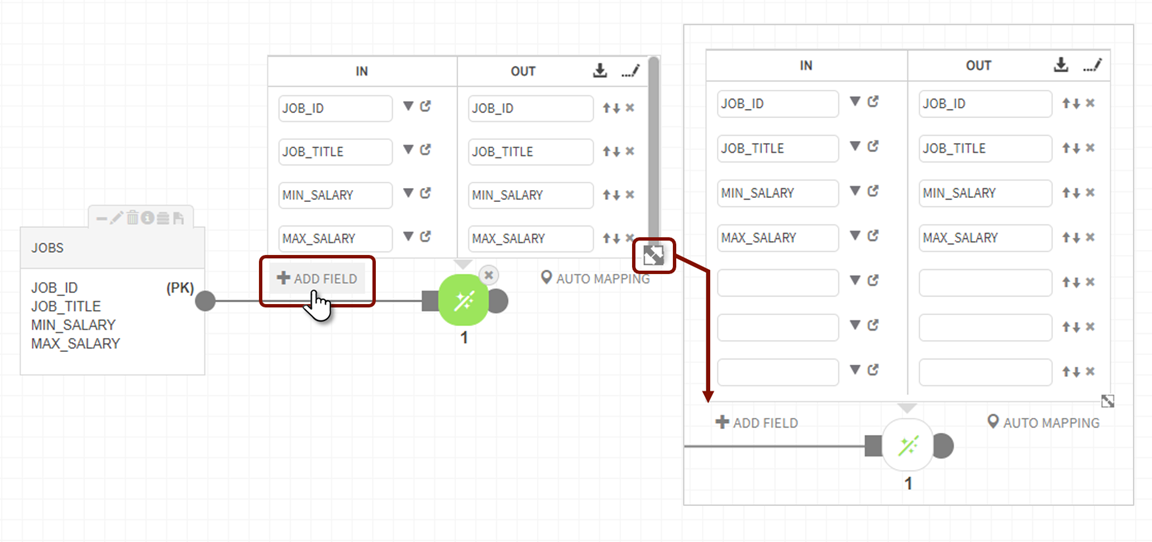
Auto Mapping: Once source and target entities are chosen/created, connect the source outport to the Transform package inport and the Transform package outport to the target entity inport. Select  Auto Mapping to generate a list of the fields. Auto Mapping populates IN and OUT fields.

Select the  (select fields) icon directly to the right of source fields to access a popup in which multiple fields can be selected for operations and functions.

Select and access the  (expression builder) icon to the right of each input field to define new conditions for target fields. For more information see Custom Expression Builder.
Build a custom expression for each field to be transformed, Validate each expression. Select OK. The function executes as a Pig script.
The following items are examples of Transform operations :
-
Field NAME is transformed with the UPPER Pig function to return the string with upper case letters.
-
The field 'MAJOR' is transformed with a Pig ternary operator to return 'Fine Art' if the value is 'Art', otherwise it returns 'Not Fine Art' with entry: (Major=='Art'?:'Fine Art':'Not Fine Art')
-
The field 'script' is transformed with the OBFUSCATE function to return an obfuscated string: ("script, 'Digest MD5 Upper x2'") in Transform input field will return obfuscated value like A5F9BC92C5BBF88E0CD9835FC795E84A.
Validate and Execute the transformation to save and apply the operations to the target entity).
Target entity: Sample data
The target entity tab provides sample data once the data has been loaded upon successful validation and execution. Target entities display in the discover module once created.
The below example shows sample data from the source entity (Student_Major) and target entity (Student_Major_Tr8) where the NAME field was transformed to UPPER case characters and the 'Major' field was transformed so that 'Art' values converted to'Fine Art' and other major display value 'Not Fine Art'.

OUTPUT target entity (Student_Major_Tr8)

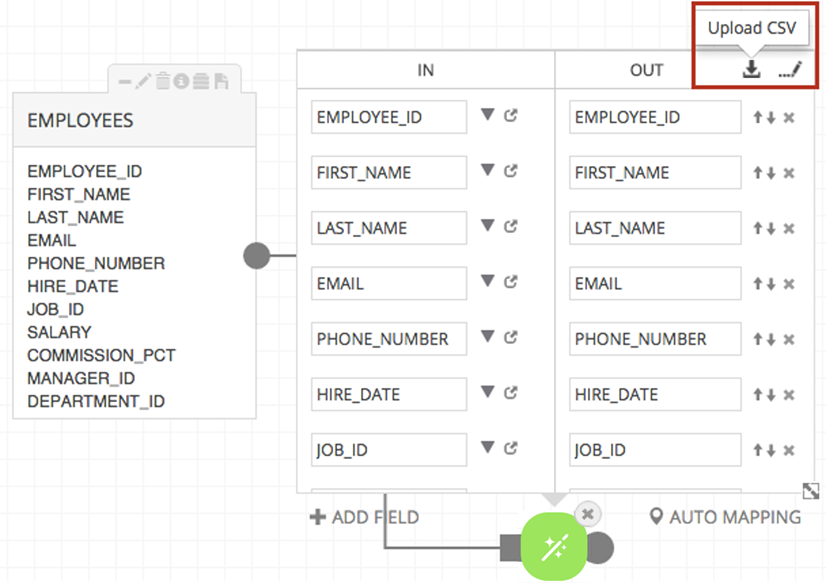
CSV Upload for Transform
Analysts may find the need to re-use Transform expression definitions across multiple dataflows. For these use cases, they are able to upload pre-built CSV files from their local machine to duplicate transforms. The following example illustrates an uploaded set of Transform expressions where source entity EMPLOYEES fields are transformed by expressions uploaded from a CSV file.
Select  (Upload CSV) icon
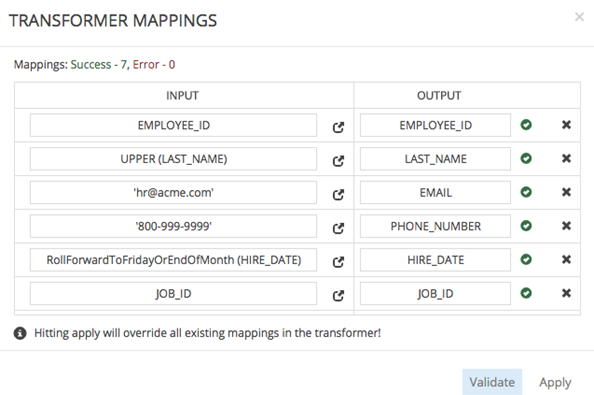
Select the CSV file on local machine for upload. CSVs are created by entering the function expression in the IN column (column A) and naming OUT Field (column B) exactly as they would be entered manually in Transform criteria fields.
The current example demonstrates application of the following Transforms:
- EMPLOYEE_ID: No Transform
- LAST_NAME: Converted to UPPER case
- EMAIL: One EMAIL ('hr@acme.com') displays for all records ('hr@acme.com')
- PHONE_NUMBER: One PHONE_NUMBER displays for all records ('800-999-9999')
- HIRE_DATE: Transformed date will be transformed by RollForwardToFridayOrEndOfMonth function so that value for that field will become the date for the first Friday of the week of the Hire Date or the last business day of the month, whichever comes first (RollForwardToFridayOrEndOfMonth (HIRE_DATE))
- JOB-ID: No Transform
- SALARY: All employee salaries increase by 500,000 dollars (SALARY + 500000)

The CSV populates the fields. If the application encounters mismatched fields or inaccuracies, errors will indicate which fields do not map correctly. Validate the mappings, select Apply.
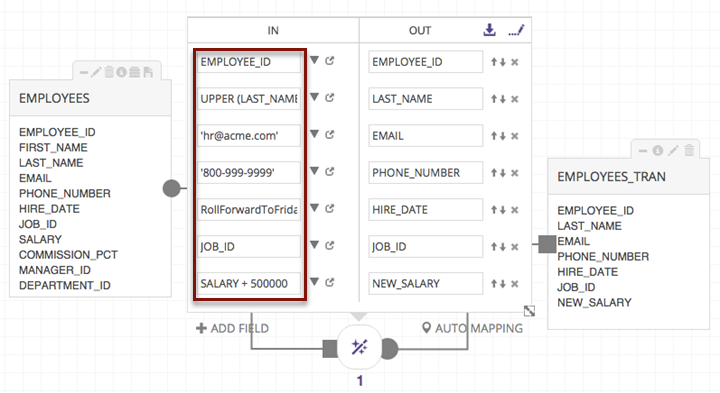
Once the target entity is added and the Transforms are executed, target entity fields are transformed identically as if the expressions had been created manually.
