
Installing Qlik Alerting in a multi-node environment
Last updated: 8/28/2026Qlik Alerting for Windows supports running as a multi-node environment. A multi-node setup is not applicable for every customer as it requires a little more knowledge on the part of the organization to setup and maintain. The key benefits are:
- Resilience: if one Qlik Alerting server node is offline the others in the cluster will take over the tasks and user interactions. Therefore there should be no loss of service due to downtime of a single machine.
- Scalability and performance: If you have a very large number of users with very large volumes of alerts being processed you may wish to separate the load across multiple servers to ensure there is no loss of performance for the users and for the alert delivery.
For a full walk-through example, see Multi Node Install Example for Qlik Alerting for Windows using Nginx as a Load Balancer.
What you need to set up a multi-node architecture
- Access details for a resilient MongoDB instance. For MongoDB to be considered resilient you would need to connect to a replica set, shared cluster, or MongoDB Atlas (cloud SaaS).
- Multiple Windows Servers to install the Qlik Alerting nodes.
- Active Directory domain membership for all servers in the multi-node deployment.
- An external load balancer to manage the user access to the different, accessible Qlik Alerting nodes.
- A shared network folder (UNC path) accessible from all Qlik Alerting nodes, for example \\Server1\qaw-keys. This folder holds the shared encryption master key used to secure channel credentials, Qlik Sense certificates, and the license record.
Multi-node architecture
Setting up Qlik Alerting for Windows in a multi-node environment is straightforward. The main complexity lies in configuring and maintaining a resilient MongoDB instance and an external load balancer to ensure front-end access for users.
Architecture diagram
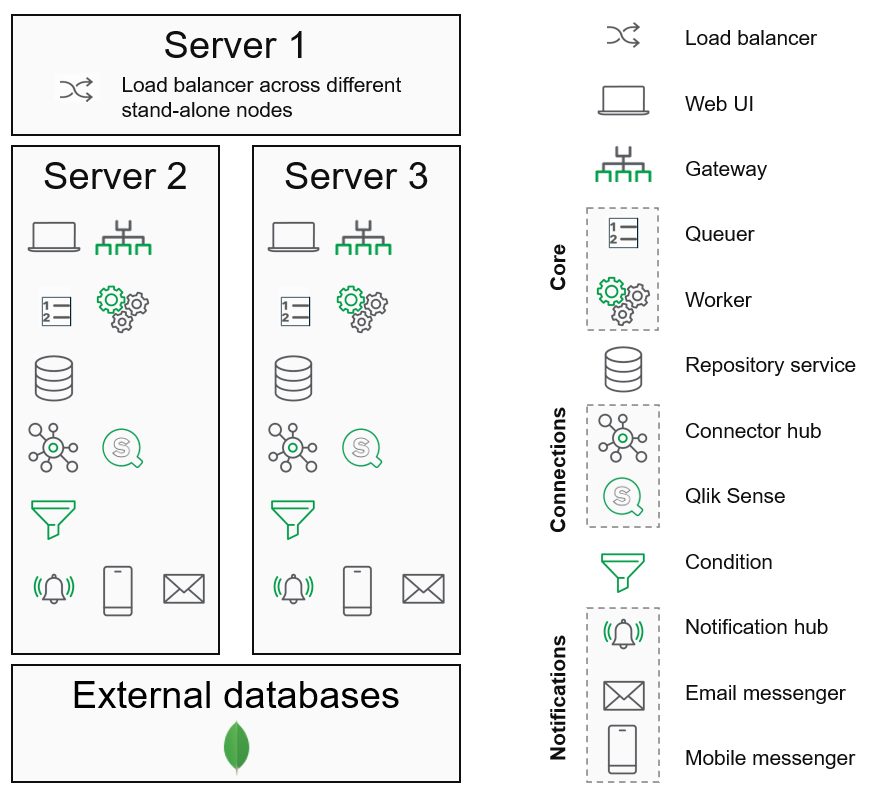
Components
- Server 1: Load balancer
The load balancer manages traffic and can be NGinx or any other load balancer your team is familiar with. The example below covers an NGinx deployment. -
Server 2, 3, ...: Qlik Alerting full stack installations
Install the Qlik Alerting stack on these servers using the provided installer.
-
External databases
Set up and configure a resilient MongoDB instance externally.
Role of the load balancer
The load balancer directs access to the web UI, extensions, and API calls to the most available server. It acts as the single entry point to the cluster and would typically be configured to be resilient on its own.
Backend task allocation
Backend tasks, such as scans and notifications, are added to a queue in MongoDB. Each node processes tasks from the queue as needed. Once a task is picked by a node, it is removed from the queue to prevent duplication.
Set up a multi-node Qlik Alerting for Windows site
Qlik Alerting encrypts channel credentials, Qlik Sense certificates, and the license record using a master key unique to each installation. In a multi-node setup, every node must use the same key. The installer handles this automatically, but the shared key path must be configured before the installer runs on each node.
Protect the key share in transit
Before you create the shared encryption key folder, use Set-SmbServerConfiguration to require SMB signing and encryption on the server that hosts the share.
Server 1: Create the shared encryption key folder
Run these steps on Server 1 before installing Qlik Alerting on any other node. Server 1 hosts the load balancer and does not run Qlik Alerting services, but is a convenient place to host the shared key folder because it is always on.
Do the following:
-
Open an administrator command prompt on Server 1 and create and share the folder:
mkdir C:\qaw-keys
net share qaw-keys=C:\qaw-keys /grant:"DOMAIN\Domain Admins",full
Information noteCreate the share with access limited to the installing administrators. The following commands grant the required access to each node's machine account. You can host this folder on any machine that is always on and network-accessible from all nodes. The UNC path format is \\hostname\sharename, for example \\Server1\qaw-keys. -
Open an administrator PowerShell and grant Full Control to each node's machine account and to the installing admin:
Information noteQlik Alerting Windows services run as Local System. Windows authenticates to the network share using each node's machine account, for example DOMAIN\SERVER2$. The installer, however, runs as the interactive admin — not as the machine account — so it also needs write access to generate the key files on the share.# NTFS: grant Full Control to each node's machine account # (OI)(CI) = Object Inherit + Container Inherit — ensures the grant applies # to files created inside the folder (not just the folder itself). icacls C:\qaw-keys /inheritance:r /grant:r "DOMAIN\SERVER2$:(OI)(CI)(F)" "DOMAIN\SERVER3$:(OI)(CI)(F)" # Share-level ACL: grant Full Control to machine accounts Grant-SmbShareAccess -Name qaw-keys -AccountName "DOMAIN\SERVER2$" -AccessRight Full -Force Grant-SmbShareAccess -Name qaw-keys -AccountName "DOMAIN\SERVER3$" -AccessRight Full -Force # Also grant the installing admin (or Domain Admins group) write access # so the installer can write master.key and master.entropy during install Grant-SmbShareAccess -Name qaw-keys -AccountName "DOMAIN\Domain Admins" -AccessRight Full -Force icacls C:\qaw-keys /grant:r "DOMAIN\Domain Admins:(F)"Information noteAdd one icacls line and one Grant-SmbShareAccess line for each Qlik Alerting node's machine account.
You are now done on Server 1. The key files (master.key and master.entropy) are created automatically when the installer runs on Server 2.
Server 2: Install and configure the first node
Run these steps on Server 2. Complete all steps before you install Server 3 or any additional node.
Do the following:
-
Install the latest NodeJS version.
For details, see Installation prerequisites. You do not need to install MongoDB.
-
Run the Qlik Alerting installer.
- On the License Agreement screen, accept the license agreement, and then click Next.
-
If you are upgrading an existing installation, the Database Backup Confirmation screen appears.
Warning noteUpgrading may include irreversible database migrations. Before you continue, make sure that you have a full backup of the Qlik Alerting database so that you can restore it if needed.Select I have backed up the Qlik Alerting database and I am ready to proceed, and then click Next.
- On the Select Destination Location screen, select the installation folder, and then click Next.
-
On the MongoDB Configuration screen, enter the hostname or IP address and port of the shared MongoDB instance.
The default port is 27017. All nodes must use the same MongoDB host.
-
On the Multi-Node Configuration (Optional) screen, enter the UNC path of the shared folder created on Server 1, for example \\Server1\qaw-keys.
The installer writes QAW_KEYS_DIR to the system registry and automatically generates the key files on the share.
Do not include a trailing backslash in the UNC path. Use \\Server1\qaw-keys, not \\Server1\qaw-keys\. The installer blocks progression if a trailing backslash is detected.Information noteTo verify, check the installer log at %TEMP%\Setup Log*.txt. On Server 2. The log should contain:
[provisionMasterKey] Keys directory: \\Server1\qaw-keys [masterKey] Multi-node mode: key stored with AES-GCM wrapping (shared path detected). [provisionMasterKey] Master key ready. -
On the Ready to Install screen, click Install.
- When the installation is finished, open Windows services and verify that all Qlik Alerting services are running. If any service is not running, start it.
-
Complete the Qlik Alerting configuration on Server 2.
Follow Qlik Sense connection configuration to configure the Qlik Sense data connection, the Qlik Alerting configuration, the email server, and the administration users.
The address you enter in the Qlik Alerting configuration should be the load balancer address. This address is used to create the connection strings in notifications.
Additional nodes use the same encrypted data from the shared MongoDB database.
Server 3 and later: Install each additional node
Repeat these steps on each additional node. Make sure Server 2 is fully installed and configured before you begin.
Do not run the Qlik Alerting configuration wizard on additional nodes. Each node automatically uses the configuration stored in the shared MongoDB database.
Do the following:
-
Install the latest NodeJS version.
For details, see Installation prerequisites. You do not need to install MongoDB.
-
Run the Qlik Alerting installer. On the wizard screens, enter the same values used for Server 2.
On the Multi-Node Configuration (Optional) screen, the installer detects and loads the existing key files and does not generate a new key.
Information noteTo verify, check the installer log at %TEMP%\Setup Log*.txt. The log should contain:
[provisionMasterKey] Keys directory: \\Server1\qaw-keys
[provisionMasterKey] Master key ready.
Also verify that the log does not contain [masterKey] Multi-node mode. This confirms that the key was loaded from the shared location.
Verify the shared encryption key
Run these checks on each Qlik Alerting node (Server 2, 3, and so on) after all nodes are installed.
-
On each node, open Registry Editor and navigate to:
HKEY_LOCAL_MACHINE\SYSTEM\CurrentControlSet\Services\QAWWorker\EnvironmentConfirm that QAW_KEYS_DIR shows the shared UNC path, for example \\Server1\qaw-keys. All nodes must show the same path.
-
On Server 1, confirm that exactly two files exist in the shared folder:
dir \\Server1\qaw-keysExpected: master.entropy and master.key, with no subfolders.
Information noteIf key files appear in each node's local C:\Program Files\Qlik Alerting\config\keys\ folder instead of only in the shared folder, QAW_KEYS_DIR was not set during installation. See the troubleshooting section below. -
On Server 1, check the permissions on the shared folder:
icacls "C:\qaw-keys"Confirm that each node's machine account, for example DOMAIN\SERVER2$, has Full Control (F) with Object Inherit (OI) and Container Inherit (CI).
- Send a test alert and confirm delivery from every node in the cluster.
Troubleshooting
Notifications or Qlik Sense connections fail after adding a node
Symptom: Notifications are not delivered, Qlik Sense connections fail, or service logs show decryption errors on a specific node.
Cause: That node generated its own independent encryption key because the shared key directory was not entered in the installer wizard.
Do the following to recover:
-
On Server 1, create the shared folder if it does not exist, using the same restricted share permissions as in the initial setup, and copy the correct key files from Server 2:
# Run on Server 1
mkdir C:\qaw-keys
net share qaw-keys=C:\qaw-keys /grant:"DOMAIN\Domain Admins",full

# NTFS + share-level ACL for machine accounts
# (OI)(CI) ensures the grant propagates to key files created by the installer
icacls C:\qaw-keys /inheritance:r /grant:r "DOMAIN\SERVER2$:(OI)(CI)(F)" "DOMAIN\SERVER3$:(OI)(CI)(F)"
Grant-SmbShareAccess -Name qaw-keys -AccountName "DOMAIN\SERVER2$" -AccessRight Full -Force
Grant-SmbShareAccess -Name qaw-keys -AccountName "DOMAIN\SERVER3$" -AccessRight Full -Force

# Also grant the installing admin write access for the re-install
Grant-SmbShareAccess -Name qaw-keys -AccountName "DOMAIN\Domain Admins" -AccessRight Full -Force
icacls C:\qaw-keys /grant:r "DOMAIN\Domain Admins:(F)"

# Copy keys FROM Server 2 — the node that originally encrypted the data
copy "\\Server2\C$\Program Files\Qlik Alerting\config\keys\master.key"     C:\qaw-keys\
copy "\\Server2\C$\Program Files\Qlik Alerting\config\keys\master.entropy" C:\qaw-keys\
Only copy key files from the node where channels, sources, and license were first configured (Server 2). Mixing key files from different nodes leaves data permanently unreadable. - On each node (Server 2, 3, and so on), re-run the Qlik Alerting installer. On the wizard screens, enter the shared MongoDB host and port, and enter \\Server1\qaw-keys as the multi-node key directory. The installer re-registers all services to use the shared key. All previously encrypted data remains readable.
- After completing on all nodes, verify that notifications and Qlik Sense connections work from each node.
Services cannot read the master key (EPERM) even though key files exist
Symptom: Services start but log errors similar to: KeyProviderError: Failed to stat master key file: EPERM: operation not permitted
Cause: The NTFS grant on the shared folder was set without Object Inherit ((OI)) and Container Inherit ((CI)) flags. Without these flags, the grant applies to the directory only and not to files created inside it. The key files were created by the installing admin, so the machine account (DOMAIN\SERVER2$) has no file-level access even though the directory grant exists.
On Server 1, open an administrator PowerShell and run:
# Apply (OI)(CI) so the grant propagates to existing and future files
# /T applies to all existing files in the folder immediately
icacls "C:\qaw-keys" /grant:r "DOMAIN\SERVER2$:(OI)(CI)(F)" /T
Then restart all Qlik Alerting services on the affected node.
Services use the wrong key path after a node install
Symptom: After adding a new node, that node's services start but all requests fail with Unsupported state or unable to authenticate data, or services on the new node decrypt data incorrectly.
Cause: The installer registered the services with an incorrect QAW_KEYS_DIR path (a local path instead of the UNC share). This can happen if an older installer version was used.
Do the following to diagnose and fix the path manually:
-
On the affected node, open an administrator command prompt and check the registered path:
findstr /i /s "QAW_KEYS_DIR" "C:\Program Files\Qlik Alerting\*.xml"If the output shows a local path such as C:\Program Files\Qlik Alerting\setup\config\keys instead of the UNC path, the service registrations need to be updated.
-
Open an administrator PowerShell on the affected node and update the path in the service registration files:
$oldVal = "C:\Program Files\Qlik Alerting\setup\config\keys" $newVal = "\\Server1\qaw-keys" # replace with your actual UNC path Get-ChildItem "C:\Program Files\Qlik Alerting\*\daemon\*.xml" | ForEach-Object { $content = Get-Content $_.FullName -Raw if ($content -match [regex]::Escape($oldVal)) { $content -replace [regex]::Escape($oldVal), $newVal | Set-Content $_.FullName -NoNewline Write-Host "Updated: $($_.FullName)" } } -
Restart all Qlik Alerting services on the affected node:
$services = @(
    "Qlik Alerting Condition", "Qlik Alerting Connector Hub",
    "Qlik Alerting Email Messenger", "Qlik Alerting Gateway",
    "Qlik Alerting Mobile Messenger", "Qlik Alerting Notification Hub",
    "Qlik Alerting Repository", "Qlik Alerting Qlik Connector",
    "Qlik Alerting Queuer", "Qlik Alerting Worker"
)
$services | ForEach-Object { Stop-Service $_ -Force -ErrorAction SilentlyContinue }
Start-Sleep -Seconds 5
$services | ForEach-Object { Start-Service $_ -ErrorAction SilentlyContinue }
$services | ForEach-Object { Get-Service $_ | Select-Object Name, Status }