Skip to main content Skip to complementary content

Managing connections in Talend Studio

Setting up a local connection in Talend Studio

Talend Studio allows you to create a local connection so that you can work on your projects locally.

Procedure

  1. Launch Talend Studio.
  2. In the Talend Studio login window, click Manage Connections to open the Connections window.
  3. In the Connections window, click the + button to create a new connection.
  4. Select Local from the Repository list.
  5. Enter the name for the connection in the Name field.
  6. If needed, enter the description for the connection in the Description field.
  7. Enter your user account in the User E-mail field.
  8. Specify the directory for your local workspace in the Workspace field.
    Information noteWarning: Make sure that the path of your workspace directory contains no space or special characters, which may cause Talend Studio to fail to work because of JVM compatibility issues.
  9. To import projects or project items exported from earlier versions of Talend Studio, click Set migration token and in the pop-up dialog box, enter your migration token.
    If you do not have a migration token, contact Talend support to request it.
  10. If needed, click Preferences and in the Preferences dialog box that opens, configure the network connections, the timeout settings, or the update settings for Talend Studio.
    For more information about the update settings, see Configuring update repositories.
  11. Click OK.
    You can now select the newly created connection from the On connection drop-down list in the Talend Studio login window, and then select an existing project, create a new project, or import a demo or existing project according to your needs.

Setting up a remote connection to Talend Management Console

You can set up a connection to Talend Management Console in Talend Studio.

Procedure

  1. Launch Talend Studio.
  2. In the Talend Studio login window, click Manage connection to open the Connections window.
  3. In the Connections window, click the + button to create a new connection.
  4. From the Repository list, select a Talend Cloud server or select Cloud - Custom if you want to set up a custom connection to Talend Management Console.
  5. Enter the name for the connection in the Name field.
  6. If needed, enter the description for the connection in the Description field.
  7. Enter your personal access token in the Token field.

    The login credential information is case sensitive.

    You can check your login name or generate a personal access token from your Profile Preferences in Talend Cloud. Note that for security reasons, you cannot use a token that is older than 60 days to connect to Talend Studio. For more information, see Generating a Personal Access Token.

  8. Specify the directory for your workspace in the Workspace field.

    You cannot use an existing local workspace for a remote connection. If needed, you can create another folder in Talend Studio alongside the default workspace folder.

    Information noteWarning: Make sure that the path of your workspace directory contains no space or special characters, which may cause Talend Studio to fail to work because of JVM compatibility issues.
  9. If you select Cloud - Custom from the Repository list, enter the server URL in the Web-app URL field.
  10. Click Check URL to validate the connectivity.
    Information noteTip:

    If Talend Studio fails to connect to the remote server, a dialog box is displayed to allow you to:

    • Retry connecting to the remote server.
    • Modify the connection timeout time to allow more retries. The value 0 means no connection timeout.

    If needed, click Cancel to close the dialog box and check your connection details.

  11. To import projects or project items exported from earlier versions of Talend Studio, click Set migration token and in the pop-up dialog box, enter your migration token.
    If you do not have a migration token, contact Talend support to request it.
  12. If needed, click Preferences and in the Preferences dialog box that opens, configure the network connections, the timeout settings, or the update settings for Talend Studio.
    For more information about the update settings, see Configuring update repositories.
  13. Click OK.

    You can now select the newly created connection from the On connection drop-down list in the Talend Studio login window to connect to a collaborative project.

    If you connect to a remote project hosted on Talend Management Console, Talend Studio is automatically connected to Talend Cloud, which allows you to publish artifacts designed in Talend Studio to Talend Cloud. Once the connection is established, any update in your artifacts from Talend Studio can be pushed to Talend Cloud right away.

    If you connect to a local project, you need to set up the connection to Talend Cloud manually. For more information, see Connecting Talend Studio to Talend Cloud.

Setting up a remote connection to Talend Administration Center

You can set up a connection to Talend Administration Center in Talend Studio.

Procedure

  1. Launch Talend Studio.
  2. In the Talend Studio login window, click Manage Connections to open the Connections window.
  3. In the Connections window, click the + button to create a new connection.
  4. From the Repository list, select Remote TAC.
  5. Enter the name for the connection in the Name field.
  6. If needed, enter the description for the connection in the Description field.
  7. Enter your login credentials created in Talend Administration Center in the corresponding User name and User password fields.

    The login credential information is case sensitive.

    If SSO is enabled in Talend Administration Center, you need to enter SSO username and password in the User name and User password fields. For more information, contact your administrator.

  8. Specify the directory for your workspace in the Workspace field.

    You cannot use an existing local workspace for a remote connection. If needed, you can create another folder in Talend Studio alongside the default workspace folder.

    Information noteWarning: Make sure that the path of your workspace directory contains no space or special characters, which may cause Talend Studio to fail to work because of JVM compatibility issues.
  9. Enter the URL for Talend Administration Center in the Web-app URL field.
  10. Click Check URL to validate the connectivity.
    Information noteTip:

    If Talend Studio fails to connect to the remote server, a dialog box is displayed to allow you to:

    • Retry connecting to the remote server.
    • Modify the connection timeout time to allow more retries. The value 0 means no connection timeout.

    If needed, click Cancel to close the dialog box and check your connection details.

  11. Optional: If you do not want to save your Talend Administration Center credentials in Talend Studio, select the Don't save TAC credentials in Studio check box.
    The next time you launch Talend Studio, you will be prompted to enter your Talend Administration Center credentials.
  12. To import projects or project items exported from earlier versions of Talend Studio, click Set migration token and in the pop-up dialog box, enter your migration token.
    If you do not have a migration token, contact Talend support to request it.
  13. If needed, click Preferences and in the Preferences dialog box that opens, configure the network connections, the timeout settings, or the update settings for Talend Studio.
    For more information about the update settings, see Configuring update repositories.
  14. Click OK.

    You can now select the newly created connection from the On connection drop-down list in the Talend Studio login window to connect to a collaborative project.

Setting up multiple connections in Talend Studio using a script

Talend Studio allows you to create multiple connections in one go using a script.

The following example demonstrates how to create a local connection and a Talend Administration Center connection in one go using a script.

Procedure

  1. Create a script file to define the connection details in JSON format.

    In this example, name the script myConnections.json and put it in the Talend Studio installation directory.

    [
                                {
                                "name": "localConnection",
                                "description": "My local connection",
                                "local": true,
                                "user": "doc@company.com",
                                "workSpace": "D:\\Talend\\workspacelocal"
                                },
                                {
                                "name": "remoteConnection",
                                "description": "My remote connection",
                                "local": false,
                                "user": "dev@company.com",
                                "password": "mypassword",
                                "workSpace": "D:\\Talend\\workspaceremote",
                                "url": "http://192.128.8.88:8081/org.talend.administrator"
                                }
                                ]
    Information noteWarning: Make sure that the path of your workspace directory contains no space or special characters, which may cause Talend Studio to fail to work because of JVM compatibility issues.
  2. In the Talend Studio installation directory, run the following command:
    Talend-Studio-win-x86_64.exe -nosplash -application org.talend.commandline.GenerateConnection -consoleLog -data commandline-workspace -f myConnections.json
    Information noteNote: This example assumes you are using Talend Studio on Microsoft Windows. If you are working on another Operating System, use the executable file of Talend Studio corresponding to your Operating System.
  3. Launch Talend Studio.
  4. In the Talend Studio login window, click Manage Connections to open the Connections window and check your connections.
    The connections defined in the script file are created and shown in the Connections window.

Connecting Talend Studio to Talend Cloud

Talend Studio automatically connects to Talend Cloud if it has already connected to a remote project hosted there. If you have only set up local projects, follow this procedure to establish the cloud connection. Otherwise, ignore this section.

To allow web users in your organization to work with Artifacts you design in Talend Studio, you must publish them to Talend Cloud. Once the connection is established, any update in your scenario from Talend Studio can be pushed to the cloud right away.

Procedure

  1. In the Talend Studio menu bar, select Window > Preferences.
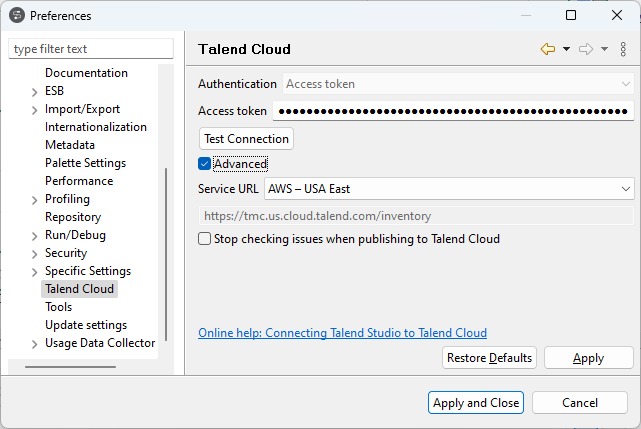
  2. From the preferences list, select Talend > Talend Cloud .
  3. Enter your access token.
    You can generate an access token from your profile preferences in Talend Cloud. For more information, see Generating a Personal Access Token.

    The Talend Cloud URL is https://<env>.cloud.talend.com where <env> is the name of your Cloud region. If you do not know what your region name is, see Talend Cloud regions and URLs.

  4. Select the Stop checking issues when publishing to Talend Cloud check box when you want to stop checking the following issues in a Job, Route, or Data Service when publishing it to Talend Cloud.
    • The Job, Route, or Data Service contains changes not pushed to the remote Git repository.
    • The Job or Route contains a context variable of any numeric data type, whose value does not match its type.

    By default, the check box is cleared. If there are any above issues in a Job, Route, or Data Service, a dialog box pops up to give a warning message when publishing it to Talend Cloud. For more information, see Publishing to Talend Cloud.

    Note that Talend Studio only checks the Git commit and push status of the Job, Route, or Data Service itself when publishing it to Talend Cloud.

  5. Select the Advanced check box and choose your data center from the Service URL drop-down list.

    Example

    Preferences dialog box with Talend Cloud tab opened.

    The Accelerate publish check box is selected by default for optimal performance when publishing artifacts to the cloud.

  6. Click Test Connection to test the connection to the Talend Management Console web application.
  7. Click Apply to save your settings.
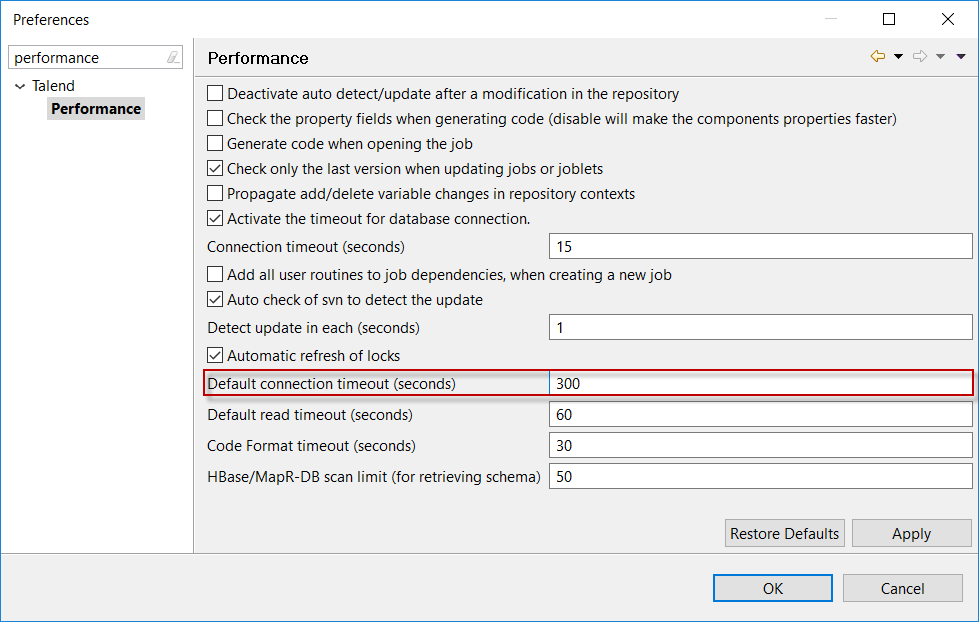
  8. From the preferences list, select Talend > Performance.
  9. Adjust the Default connection timeout (seconds).
    The timeout value is set to 5 seconds by default. However, on a slower network that may not be enough. It is recommended to set the value to 300 seconds.
    Preferences dialog box with Performance tab opened
  10. Click Apply to save your settings and close the Preferences window.
    The connection has been established and you are now able to publish Artifact to Talend Management Console.

Enabling connection with Talend Administration Center via a proxy server with basic authentication

When working on a remote project behind a proxy server with basic authentication, you need to complete some specific settings in Talend Studio to enable a secure connection with Talend Administration Center.

This topic provides settings for both HTTP and HTTPS proxy servers. You can make your own choice based on the type of your proxy server.

For more information about how to configure a secure connection with Talend Administration Center using SSL, see Setting up a root Certificate Authority chain or How to configure a bidirectional secure connection between Talend Studio and Talend Administration Center .

Procedure

  1. From the menu bar, click Window > Preferences to open the Preferences dialog box.
  2. On the tree view in the Preferences dialog box, expand General > Network Connections to display the relevant view.
  3. Specify your proxy settings.
    Alternatively, or if you are using Talend CommandLine, you can configure the proxy by adding the following lines in the .ini file under the Talend Studio installation directory.
    -Dhttp.proxySet=true
                                -Dhttp.proxyHost=<proxy_server_host>
                                -Dhttp.proxyPort=<proxy_server_port>
                                -Dhttp.nonProxyHosts=localhost
                                -Dhttp.proxyUser=<proxy_server_user>
                                -Dhttp.proxyPassword=<proxy_server_password>
                                -Dhttps.proxyHost=<proxy_server_host>
                                -Dhttps.proxyPort=<proxy_server_port>
                                -Dhttps.proxyUser=<proxy_server_user>
                                -Dhttps.proxyPassword=<proxy_server_password>
  4. Update the .gitconfig file as follows:
    git config --global http.proxy http://<git_username>:<git_password>@<proxy_server_host>
                                git config --global https.proxy http://<git_username>:<git_password>@<proxy_server_host>

Results

After restarting Talend Studio, you will be able to connect to Talend Administration Center via a proxy server with basic authentication.

Did this page help you?

If you find any issues with this page or its content – a typo, a missing step, or a technical error – please let us know!