Skip to main content Skip to complementary content

Designing a workflow using the workflow wizard

Availability-noteDeprecated

Talend Studio enables you to automatically generate one or more workflows on the same business entity through a workflow wizard. You may also create a workflow from scratch.

The advantages of the workflow wizard over designing a workflow from scratch is that it automatically:

  • generates the MDM connector necessary to establish the connection between the generated workflow task that needs human or automatic intervention and the data records to be updated on the MDM server,

  • defines the workflow actors (which are mapped to MDM user roles you have chosen) that are required to intervene at one or several task(s).

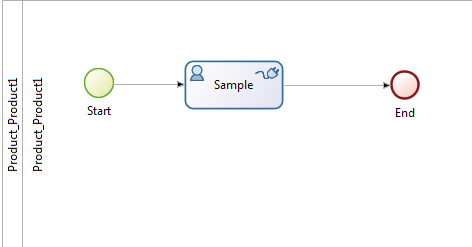
The generated workflow will have a start and an end node in addition to a Sample task with an MDM connector. You can then add more tasks to your workflow and define task links according to your needs.

Before you begin

You have already connected to the MDM server from Talend Studio. At least one data model exists.

About this task

To automatically generate a workflow on a specific business entity, do the following:
Information noteNote: This procedure is based on the imported MDM Demo project.

Procedure

  1. In the MDM Repository tree view, expand the Data Model node and double-click the name of the data model that holds the entity on which you want to generate a workflow.
    An editor opens on the selected data model.
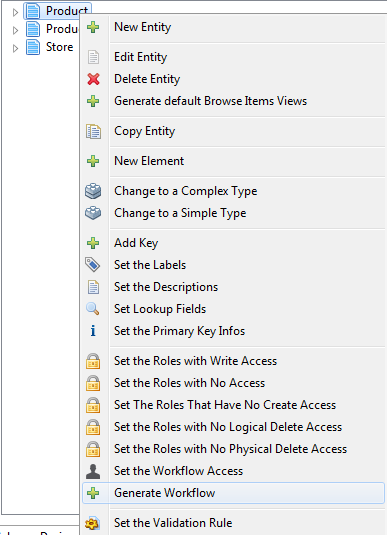
  2. Right-click the entity on which you want to generate the workflow.
    A contextual menu appears.

    The workflow you want to generate in this example will enable authorized business users to update/validate the master data records that are held in the Product business entity.

  3. Select Generate Workflow.
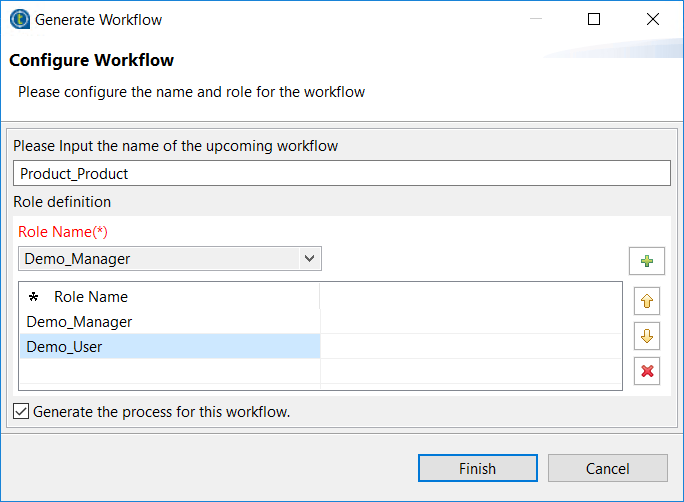
    The workflow wizard displays a default name for the new workflow.
    Information noteNote: If you have already created another workflow on the selected entity, make sure to change the default workflow name displayed in the corresponding field. Otherwise, your new workflow will overwrite the previous one.
  4. In the Role definition area and from the Role Name list, select the role to which you want to give the privilege to approve the commission code. Repeat the procedure to add as many roles as needed.
    Information noteNote: The Role Name list includes all default roles and also those defined by the administrator.
  5. If required, select the Generate the process for this workflow check box in order to generate a Process for the workflow.
  6. Click Finish to validate your changes and close the wizard.
    A progress information bar is displayed followed by a confirmation message.
  7. Click OK to close the message.
    The generated workflow opens on the workspace.

    This workflow has a start and an end node in addition to a Sample task for which the MDM connector and actor(s) have been automatically defined according to the parameters you set in the workflow wizard.

  8. Switch to the BPM perspective.
    From this perspective, you can now add more tasks and do necessary modifications to complete the workflow according to your needs.

Did this page help you?

If you find any issues with this page or its content – a typo, a missing step, or a technical error – please let us know!