
This scenario describes how to setup a typical internal production deployment that allows app development on dedicated nodes and uses synchronization rules to reduced the synchronization traffic.
Both reloads and user load can be scaled up. Additional developer, reload, consume, and proxy nodes can be added as long as the total number is in line with the recommendations.
Node layout
Each node within the site only contains the services and data that it needs to perform its role.
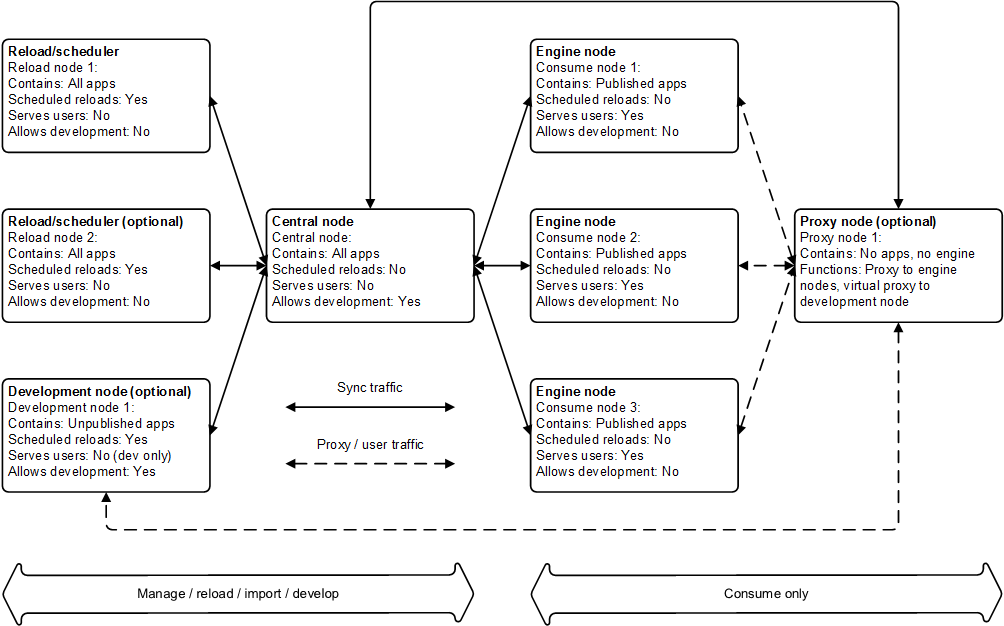
Services on each node
The table below lists the Qlik Sense services that are deployed on each node in the site.
| Node name | Qlik Sense Repository Service (mandatory) | Qlik Sense Engine Service | Qlik Sense Scheduler Service | Qlik Sense Proxy Service |
|---|---|---|---|---|
| Central node | x | x | x | x |
| Reload/scheduler node(s) | x | x | x | |
| Consume node(s) | x | x | ||
| Proxy node | x | x | ||
| Development node | x | x |
Configuration steps
Basic installation
Proceed as follows to perform the basic installation:
- Starting with the central node, install the Qlik Sense software and services as described in the table above.
- Add each rim node via the Qlik Management Console (QMC) on the central node.
- When all rim nodes have been added, check that they are displayed as being online in the QMC on the central node.
See: Installing and upgrading Qlik Sense
See: Configuring the node
See: Authorizing the certificate on the node
Load balancing: Consume nodes
Proceed as follows to configure the load balancing:
- Select Virtual proxies in the Qlik Management Console on the central node.
- Edit the settings for the proxy node.
- Check that the hub is accessible on the proxy node. In addition, check that the hub lists the apps.
Under Load balancing nodes, specify that the consume nodes should be used.
Load balancing: Development node
In this example, a virtual proxy is used to route traffic to the development node. The means that a slightly different URL, https://<server address>/DEV/hub, is used access the development section of the site. The DEV prefix also means that the development traffic can be handled differently compared to the normal user traffic.
Proceed as follows to configure the load balancing:
- Select Proxies in the Qlik Management Console (QMC) on the central node.
- Edit the settings for the proxy node.
- Select Virtual proxies, click Add, and then select Create new.
- Provide a description and the DEV prefix. As cookie names have to be unique, add DEV to the end of the session cookie field.
- Under Load balancing nodes, specify that the development node should be used.
- Check that the development node is available using the following URL:
https://<server address>/DEV/hub
Configuring custom properties
Custom properties can be used in the synchronization rules to dictate the nodes to which to synchronize apps.
Proceed as follows to configure the custom properties:
- Select Custom properties in the Qlik Management Console (QMC).
- Add the following custom property:
- Name: NodeType
- Resource types: Nodes
- Values: Dev, Consume, Reload
- Select Nodes in the QMC.
- For each node in the site, set the appropriate value for NodeType under Custom properties.
Configuring synchronization rules
The synchronization rules are used to synchronize the apps to the right nodes.
Proceed as follows to disable the default synchronization rule, which allows all apps to be synchronized to all nodes:
- Select Sync rules in the Qlik Management Console (QMC).
- Disable the default sync rule, ResourcesToNonCentralNodes.
After a few seconds, all apps disappear from the proxy node as they are only available on the central node.
New rules are needed to synchronize the apps to the correct nodes and prevent unnecessary synchronization. For example, even though users cannot see an unpublished app (that is, an app under development) until it is published, the unpublished copy is by default synchronized to all nodes. In this example, rules are setup to stop unpublished apps from being synchronized to the nodes used by consumer users and to ensure that the reload nodes only get what they need for their workload. Ideally, the apps should be distributed as follows:
- Reload nodes: Apps to reload
- Consume nodes: Published apps
- Development node: Unpublished apps
Proceed as follows to configure the new synchronization rules:
- Create a rule to synchronize unpublished apps to the development node:
- Create a new synchronization rule in the QMC.
- Name the new rule unpublished apps to dev nodes and then select the Advanced option.
- Enter the following in the Conditions field and then save the rule:
- Browse to the development node proxy and check the results.
(node.@NodeType="Dev" and resource.stream.name.Empty())
The condition states that if the app is not in a stream (and thus is not yet published), synchronize it to a node with the NodeType set to Dev.
- Create a rule to synchronize published apps to the consume nodes:
- Create a new synchronization rule in the QMC.
- Name the new rule published apps to consumer nodes and then select the Advanced option.
- Enter the following in the Conditions field and then save the rule:
- Browse to the main proxy server URL and check the results.
(node.@NodeType="Consume" and !resource.stream.name.Empty())
The condition states that if the stream value is not empty (meaning that the app is published), synchronize the app to a node with the NodeType set to Consume.
- Create a rule to synchronize apps to the reload nodes:
- Create a new synchronization rule in the QMC.
- Name the new rule apps to reload nodes and then select the Advanced option.
- Enter the following in the Conditions field and then save the rule:
(node.@NodeType="Reload")
The condition states that if the NodeType is set to Reload, all apps are synchronized to the node.
To limit the traffic to these nodes, apply custom properties to the apps that should be synchronized to the nodes. For example, create a custom property called apptype and use a rule like the following:
(node.@NodeType="Reload" and (resource.@AppType="QVDLoader" or !resource.stream.name.Empty()))
This rule synchronizes all published apps and apps tagged as QVD loaders (that is, all the apps to run scheduled reloads on) to the reload nodes.
Qlik Sense Scheduler Service
Proceed as follows to configure the Qlik Sense Scheduler Service (QSS):
- Configure the QSS on the central node to run as master only (that is, do not run reloads on the central node). The reload node should be set as slave, which means it will handle all reloads.
License Monitor and Operations Monitor
In multi-node environments, the License monitor and Operations monitor apps can be reloaded on any node.
Proceed as follows:
-
Share the Qlik Sense folder on the central node.
The default location is %ProgramData%\Qlik\Sense.
- Update the data connections ServerLogFolder and ArchivedLogFolder by replacing %ProgramData%\Qlik\Sense with the path to the shared folder.
- Reload the apps on the rim nodes.
Because of the way multi-node environments are synchronized and the way logs are archived, the results of reloads may not be completely current. Reloads include all logs from the ArchivedLogFolder folder on the central node and the active .txt log files stored in the Sense\Log folder on the central node.