
Setting up an SSH Tunnel for a self-hosted database
Last updated: 9/15/2026If a database is not publicly accessible, you can use an SSH tunnel to connect Stitch. The approach in this tutorial will use a publicly accessible instance, or SSH server, instance to create the connection. The SSH server will act as an intermediary, forwarding the traffic from Stitch through an encrypted tunnel to the database in the private subnet.
The approach outlined in this guide is applicable to the integrations and destinations listed in the next section.
Before you get started, note that an SSH tunnel isn’t necessarily more secure than a direct connection. An SSH tunnel is only as secure as the monitoring and hardening you perform on the SSH server hosting the tunnel.
If you have questions or concerns about Stitch security, refer to the Security FAQ.
Databases this guide applies to
This guide is applicable to the following integrations and destinations:
| Integrations | Destinations |
For SSH for Amazon-hosted databases, refer to the SSH for Amazon guide.
For SSH for Microsoft Azure databases, refer to the SSH for Microsoft Azure guide.
Prerequisites
An up and running, publicly accessible SSH server. This tutorial will walk you through configuring the server to allow Stitch to access it, but creating the server is outside the scope of this guide. Loop in a member of your technical team for assistance.
Additionally, the server should be accessible from the internet.
The public IP address of the SSH server. This is the IP address that allowed traffic from the internet can use to access the server.
-
Some familiarity with Linux and the command line. In this tutorial, you’ll create a Linux user for Stitch to ensure access via SSH. While we’ve provided the commands you’ll need to create the user, you should know how to access a server using the command line and feel comfortable running commands.
-
An SSH client, if using a Windows operating system. Some versions of Windows don’t include SSH commands, so you may need to install a Windows-based SSH client before proceeding. Windows 10, however, does include OpenSSH, which is suitable for this tutorial.
Step 1: Configure the SSH server to allow Stitch access
First, you’ll configure the SSH server to allow traffic from Stitch to access the server. You’ll need to whitelist Stitch’s IP addresses on the SSH server’s SSH port (typically 22) to grant access.
The IP addresses you’ll whitelist depend on the Data pipeline region your account is in.
- Sign into your Stitch account, if you haven’t already.
- Click User menu (your icon) > Edit User Settings and locate the Data pipeline region section to verify your account’s region.
-
Locate the list of IP addresses for your region:
- Whitelist the appropriate IP addresses.
Step 2: Configure the database to allow SSH server traffic
Next, you’ll configure the database to allow traffic from the SSH server.
In your database’s firewall, whitelist the SSH server’s private IP address to allow it to access the database’s port. For example: For PostgreSQL databases, the default port is 5432.
Step 3: Retrieve your Public Key
The Stitch public key is used to authorize the Stitch SSH user. This key is specific to your Stitch account.
Note: If the key isn’t properly installed, Stitch will be unable to access the server.
To retrieve your public key, use the instructions below:
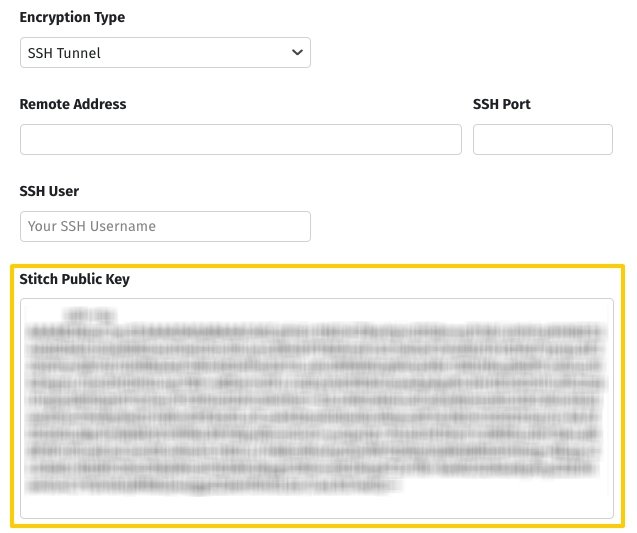
- Sign into your Stitch account, if you haven’t already.
- Click the Destination tab at the top of the page.
- Click the icon of the destination you’re connecting.
- In the Destination Settings page, click the Encryption Type menu, then the SSH Tunnel option. This will display the SSH fields.
-
In the Integration Settings page, you’ll see one of two options:
- SSH Tunnel: Click the checkbox to display the SSH fields.
- Encryption Type: Click the dropdown and select the SSH Tunnel option to display the SSH fields.
- Locate the Public Key field.
Leave this page open for now - you’ll need it the next step.
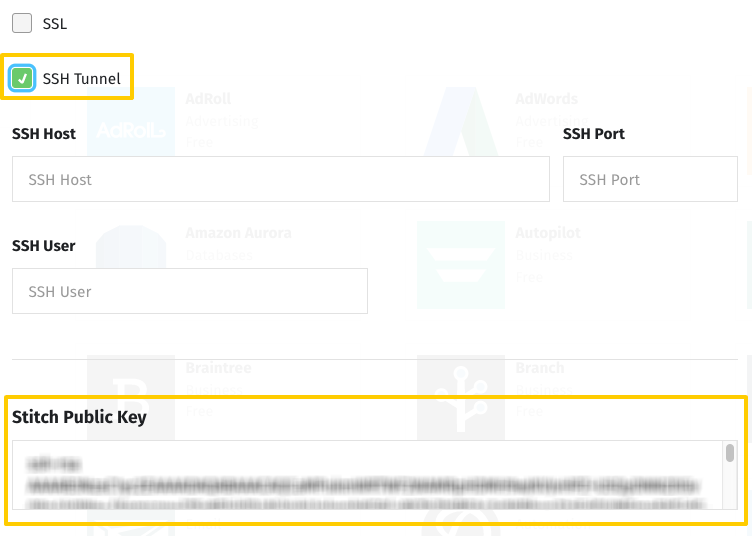
- Sign into your Stitch account, if you haven’t already.
- Next:
-
For new integrations: Click Add Integration, locate the type of database you’re connecting on the Integrations page, and click its icon.
-
For existing integrations: Locate and click the integration on the Stitch Dashboard page, then click the Settings tab.
-
-
In the Integration Settings page, you’ll see one of two options:
- SSH Tunnel: Click the checkbox to display the SSH fields.
- Encryption Type: Click the dropdown and select the SSH Tunnel option to display the SSH fields.
- Locate the Public Key field.
Leave this page open for now - you’ll need it the next step.
Step 4: Create the Stitch SSH user
Next, you’ll create a Stitch user on the SSH server. This will allow Stitch to authenticate via a public key and connect to the server.
-
Open a new terminal window and log into your SSH server.
-
Create a group named
stitch:sudo groupadd stitch -
Create a user named
stitch:sudo useradd -m -g stitch stitch -
Switch to the
stitchuser:sudo su - stitch -
Create the
.sshdirectory:mkdir ~/.ssh -
Using
chmod, alter the permissions of the directory to allow access:chmod 700 ~/.ssh -
Navigate to the
.sshdirectory:cd ~/.ssh -
Using
touch, create theauthorized_keysfile:touch authorized_keys -
Set the permissions for
authorized_keys:chmod 600 authorized_keys -
Import the Stitch public key into
authorized_keys, replacing<PUBLIC KEY>with the public key. Verify after replacing the key that it is on one line and doesn’t contain line breaks:echo "<PUBLIC KEY>" >> ~/.ssh/authorized_keys
Step 5: Complete the setup for Stitch
The last step is to complete the setup steps required to connect the database to Stitch. The instructions vary from database to database, and whether the database is an integration (where data is extracted) or a destination (where data is loaded).
Note: Amazon-based databases aren’t listed as this guide isn’t applicable to them. Refer to the Setting up an SSH Tunnel for a database in Amazon Web Services guide for more info.