
Connecting an Amazon Aurora PostgreSQL-RDS Destination to Stitch
Last updated: 9/15/2026Amazon Relational Database Services (RDS) is a managed database service that runs on familiar database engines like PostgreSQL.
In this tutorial, we’ll walk you through how to connect an Amazon Aurora PostgreSQL RDS database to Stitch as a destination.
Prerequisites
-
An up-and-running Amazon Aurora PostgreSQL instance. Instructions for creating a Amazon Aurora PostgreSQL destination are outside the scope of this tutorial; our instructions assume that you have an instance up and running. For help getting started with Amazon Aurora PostgreSQL, refer to Amazon’s documentation.
Note: The database must be running version 9.3 or higher.
Permissions in Amazon Web Services (AWS) that allow you to:
- Create/manage Security Groups, which is required to whitelist Stitch’s IP addresses.
- View database details, which is required for retrieving the database’s connection details.
Database privileges that allow you to create users and grant privileges. This is required to create a database user for Stitch.
Step 1: Verify your Stitch account's data pipeline region
First, you’ll log into Stitch and verify the data pipeline region your account is using. Later in this guide, you’ll need to grant Stitch access by whitelisting our IP addresses.
The IP addresses you’ll whitelist depend on the Data pipeline region your account is in.
- Sign into your Stitch account, if you haven’t already.
- Click User menu (your icon) > Edit User Settings and locate the Data pipeline region section to verify your account’s region.
-
Locate the list of IP addresses for your region:
Keep this list handy - you’ll need it later.
Step 2: Configure database connection settings
In this step, you’ll configure the database server to allow traffic from Stitch to access it. There are two ways to connect your database:
- A direct connection will work if your database is publicly accessible.
- An SSH tunnel is required if your database isn’t publicly accessible. This method uses a publicly accessible instance, or an SSH server, to act as an intermediary between Stitch and your database. The SSH server will forward traffic from Stitch through an encrypted tunnel to the private database.
Click the option you’re using below and follow the instructions.
- Follow the steps in the Setting up an SSH Tunnel for a database in Amazon Web Services guide to set up an SSH tunnel for Amazon Aurora PostgreSQL.
- Complete the steps in this guide after the SSH setup is complete.
For Stitch to successfully connect with your database instance, you’ll need to add our IP addresses to the appropriate Security Group via the AWS management console.
Security Groups must reside in the same VPC as the instance. Use the instructions below to create a security group for Stitch and grant access to the VPC.
- Log into your AWS account.
- Navigate to the Security Group Management page, typically Services > Compute > EC2.
- Click the Security Groups option, under Network & Security in the menu on the left side of the page.
- Click Create Security Group.
- In the window that displays, fill in the fields as follows:
- Security group name: Enter a unique name for the Security Group. For example:
Stitch - Description: Enter a description for the security group.
- VPC: Select the VPC that contains the database you want to connect to Stitch. Note: The Security Group and database must be in the same VPC, or the connection will fail.
- Security group name: Enter a unique name for the Security Group. For example:
- In the Inbound tab, click Add Rule.
- Fill in the fields as follows:
- Type: Select
Custom TCP Rule - Port Range: Enter the port your database uses. (
5432by default) - CIDR, IP or Security Group: Paste one of the Stitch IP addresses for your Stitch data pipeline region that you retrieved in Step 1.
- Type: Select
- Click Add Rule to add an additional Inbound rule.
-
Repeat steps 6-8 until all the IP addresses for your Stitch data pipeline region have been added.
This is what a Security Group using Stitch’s North America IP addresses looks like:
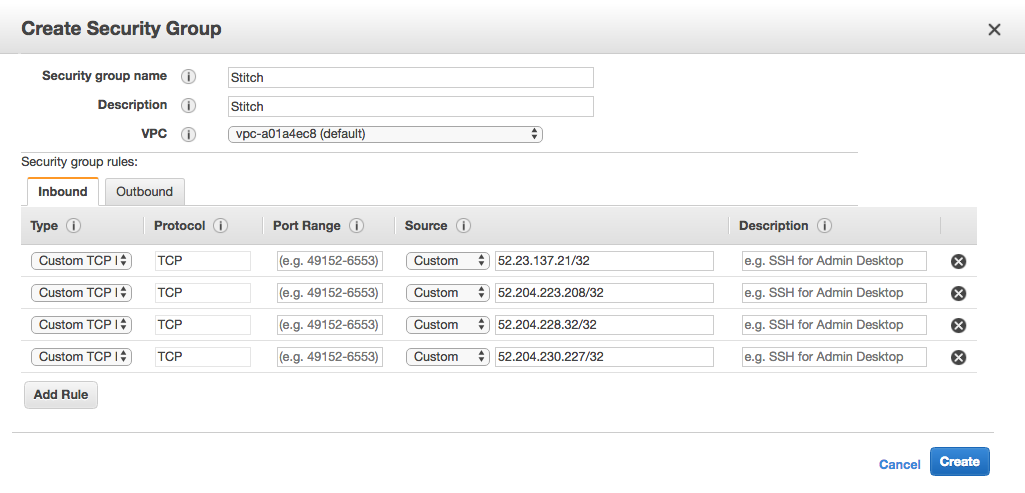
Whitelisting Stitch North America IP addresses through Inbound Security Group rules - When finished, click Create to create the Security Group.
Step 3: Create a Amazon Aurora PostgreSQL Stitch user
In the following tabs are the instructions for creating a Stitch Amazon Aurora PostgreSQL database user and explanations for the permissions Stitch requires.
-
If you haven’t already, connect to your Amazon Aurora PostgreSQL instance using your SQL client.
-
After connecting, run this command to create a user named
stitch. Replace<password>with a secure password:CREATE USER stitch WITH PASSWORD '<password>'; -
Next, you’ll assign the
CREATEpermissions to the Stitch user. For<database_name>, enter the name of the database where all Stitch-replicated data should be loaded.Note: This must be a pre-existing database.
GRANT CREATE ON DATABASE <database_name> TO stitch -
If you restricted access to the system tables, you’ll also need to run the following commands to grant the Stitch user
SELECTpermissions.GRANT SELECT ON ALL TABLES IN SCHEMA information_schema TO stitch GRANT SELECT ON ALL TABLES IN SCHEMA pg_catalog TO stitch
In the table below are the database user privileges Stitch requires to connect to and load data into Amazon Aurora PostgreSQL.
| Privilege name | Reason for requirement |
| CREATE ON DATABASE |
Required to create the necessary database objects to load and store your data.
Note: The |
| SELECT ON ALL TABLES IN information_schema |
Required to select rows from tables in the Note: Stitch will only ever read data from systems tables. |
| SELECT ON ALL TABLES IN pg_catalog |
Required to select rows from tables in the Note: Stitch will only ever read data from systems tables. |
Step 4: Connect Stitch
To complete the setup, you need to enter your Amazon Aurora PostgreSQL connection details into the Destination Settings page in Stitch.
Step 4.1: Locate the Amazon Aurora PostgreSQL connection details in AWS
- Sign into the AWS Console, if needed.
- Navigate to the RDS option.
-
On the RDS Dashboard page, click the Databases option on the left side of the page. This will open the RDS Databases page.
-
In the list of databases, locate and click on the instance you want to connect to Stitch. This will open the Database Details page.
-
On the Database Details page, scroll down to the Connectivity & security section.
- Locate the following fields:
- Endpoint
-
DB Name: This field contains the name of the database used to launch the instance. You’ll only need this info if you want to connect this specific database to Stitch.
You can connect this database to Stitch, or another database within Amazon Aurora PostgreSQL.
- Port: This is the port used by the database.
Leave this page open for now - you’ll need it to complete the setup.
Step 4.2: Define the connection details in Stitch
- If you aren’t signed into your Stitch account, sign in now.
-
Click the Destination tab.
- Locate and click the PostgreSQL icon.
-
Fill in the fields as follows:
-
Host (Endpoint): Paste the Endpoint address from the Amazon Aurora PostgreSQL Details page in AWS into this field. Don’t include the port number, if it’s appended to the end of the endpoint string - this will cause errors.
-
Port: Enter the port used by the Amazon Aurora PostgreSQL instance. The default is
5432. -
Username: Enter the Stitch Amazon Aurora PostgreSQL database user’s username.
-
Password: Enter the password for the Stitch Amazon Aurora PostgreSQL database user.
-
**: Enter the name of the Amazon Aurora PostgreSQL database you want to connect to Stitch.
-
Step 4.3: Define SSH connection details
If you’re using an SSH tunnel to connect your Amazon Aurora PostgreSQL database to Stitch, you’ll also need to define the SSH settings. Refer to the Setting up an SSH Tunnel for a database in Amazon Web Services guide for assistance with completing these fields.
- Click the Encryption Type menu.
-
Select SSH to display the SSH fields.
-
Fill in the fields as follows:
-
Remote Address: Paste the Public DNS of the SSH sever (EC2 instance) into this field. Refer to the Amazon SSH guide for instructions on retrieving this info.
-
SSH Port: Enter the SSH port of the SSH server (EC2 instance) into this field. This will usually be
22. -
SSH User: Enter the Stitch Linux (SSH) user’s username.
-
Step 4.4: Define SSL connection details
-
Check the Connect using SSL checkbox. Note: The database must support and allow SSL connections for this setting to work correctly.
-
Fill in the fields as follows:
-
SSL Certificate: Optional: Provide the certificate (typically a CA or server certificate) Stitch should verify the SSL connection against. The connection will succeed only if the server’s certificate verifies against the certificate provided here.
Note: Providing a certificate isn’t required to use SSL. This is only if Stitch should verify the connection against a specific certificate.
-
Step 4.5: Save the destination
When finished, click Check and Save.
Stitch will perform a connection test to the Amazon Aurora PostgreSQL database; if successful, a Success! message will display at the top of the screen. Note: This test may take a few minutes to complete.