
Tutorial - Alerts
You can monitor critical data without opening your Qlik Sense apps. Qlik Sense SaaS lets users set conditions based on measures or dimensions, and receive alerts when they are met. Alerts can be evaluated each time the app is reloaded or based on a schedule. You can share alerts with any user that has read permissions for the app.
What you will learn
This step-by-step guide will show you how to:
-
Create a simple alert.
-
Create a complex alert.
-
Manage an alert's life cycle.
Who should complete this tutorial
This tutorial is for users who are comfortable working in the Qlik Sense hub.
What you need to do before you start
Download tutorial app and data
Download the CreatingAlertsFiles.zip file. It contains the app and data files needed to complete this tutorial:
Upload the tutorial app
You need to unzip the folder and upload the app and data files to a space in Qlik Sense. The app is similar to the app from Tutorial - Beginning with the Basics, except a script was added to keep the dates current.
Do the following:
-
Unzip the CreatingAlertsFiles file.
-
Open the Qlik Sense hub.
-
Open a space, such as Personal.
You can pick a different space if you want other users to be able to access this app and data files.
-
Click Add new > Upload. A dialog box opens.
-
Select App.
-
Drag and drop the Creating alerts.qvf file. Click Upload.
-
Click Add new > Data file. A dialog box opens.
-
Click Upload data file.
-
Drag and drop the five Microsoft Excel files onto the dialogue box. Click Upload.
Create dynamic bookmarks
Qlik Sense apps often include data over multiple years. Alerts are usually set for the current time period (current week, month, or quarter). To imitate a realistic scenario, you need to create dynamic bookmarks.
Do the following:
- Open the app and open any sheet.
- Click
 .
. - The selections screen will appear. The App dimensions are at the bottom of the screen. Make sure that the Show fields check box is selected.
- In the search box on the right-hand side, type YearMonth.
- Find the Date.autoCalendar.YearMonth dimension and click
 .
. - In the search list box, type the following function =Date.autoCalendar.YearMonth=Monthstart(Now()). Press Enter. The current month is selected.
- Close the selections tool by clicking .
- Click
 Bookmark .
 - Click Create a new bookmark. Under Title, type Current month.
Using the same procedure, create the following bookmarks. Ensure you clear the previous selections before you make new ones:
- Last Month: =Date.autoCalendar.YearMonth=Monthstart(Now(),-1)
- Current Quarter: =Date.autoCalendar.YearMonth>=Quarterstart(Now(),-1) and Date.autoCalendar.YearMonth<Quarterstart(Now())
- Last Quarter: =Date.autoCalendar.YearMonth>=Quarterstart(Now(),-2) and Date.autoCalendar.YearMonth<Quarterstart(Now(),-1)
Enabling notifications
You can customize notifications in your Qlik Sense hub.
Do the following:
-
Open the hub, and open Profile settings.
-
Click on Notifications.
-
Under Alerts, you can choose to receive alerts via Web, Push, or Email.
For more information, see Managing your alerts
Creating a simple alert
You will create an alert that monitors the profit margin rate and sends a notification when it becomes less than 40 percent.
Creating a new alert
Do the following:
-
Open the app. Open the Dashboard sheet in Analyze view.
-
Right-click the Profit Margin gauge in the top-right corner.
-
From the menu, select Alerts > Create new alert.
A dialog box opens.
- In the detail section, insert:
- Title: Profit Margin Rate
- Description: Profit Margin should never fall below 40%
-
The measure of the gauge is already added: (Sum(Sales) - Sum(Cost)) / Sum(Sales).
Click Add additional measure and select Margin (%) under Master measures.
-
From the Selections dropdown, select Current Month as the bookmark to apply to the data.
Data preview shows the current measure value, taking into account the bookmark applied.
- Click Next.
- Under Condition 1, set the following:
- Measure: Margin (%)
- Operator: Less than
Compare with: Value
Value: 40
-
Click Next.
This dialogue box shows alert scheduling. Keep the default settings.
- Click Create.
Testing the alert
This alert evaluates when the app is reloaded.
Do the following:
- From the hub, click Alerts on the left-hand panel.
Alternatively, click on your user icon in the top right-hand corner of the page and select Alerts. - Find the Profit Margin Rate alert you created and click
 . Click Details.
 - Notice that this alert has never been evaluated. This is because the profit margins have not changed. We need to change the data to trigger the alert.
- From the context menu, click Edit alert in app. The Alert dialog box will open.
-
Raise the Margin (%) value to 43 (or higher than the actual value).
- Go back to the hub. Find the app and click . From the context menu, click Reload.
You will see a notification on the top menu. Click the alert. A dialog box opens showing that profit margins are below 43 %.
Your inbox may also contain an email from Qlik Sense, depending on your notification settings.
Creating a complex alert
We will create a monthly alert that monitors the last quartile product type margin rate in a specific sales range.
Creating a new alert
Do the following:
- Open the app in Qlik Sense. Open the Customer Details sheet in Analyze view.
-
Find the pivot table labeled "Customer KPIs" at the bottom of the page. Right-click it.
-
From the context menu, select Alerts > Create new alert.
A dialog box opens.
- In the detail section, insert:
- Title: Low margin products last month
- Description: Monthly products that need margin improvements
-
The measures used in the chart are automatically added.
-
Select Product type in Show by dimension.
-
From the Selections dropdown, select Last Month as the bookmark to apply to the data.
- Data preview shows the product type by sales and margin percent, taking into account the bookmark applied.
- Click Next.
-
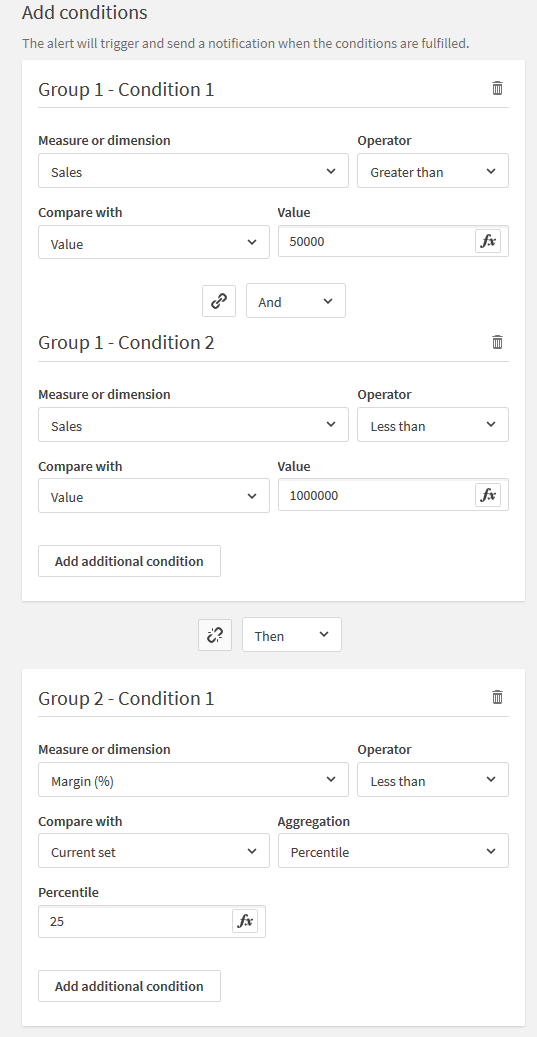
Under Condition 1 set:
- Measure or dimension: Sales
- Operator: Greater than
- Compare with: Value
- Value: 50000
- Click Add additional condition.
- Under Condition 2 set:
- Measure or dimension: Sales
- Operator: Less than
- Compare with: Value
- Value: 100000
Ensure that there is an And operator between the two conditions.
- Click Add additional condition.
- Under Condition 3 set:
- Measure or dimension: Margin (%)
- Operator: Less than
- Compare with: Current set
- Aggregation: Percentile
Percentile: 25 (this means the last quartile)
Click the
 between Condition 2 and Condition 3 to ungroup them. Ensure that there is a Then operator between the last two conditions.
-
Preview alert might be blank. If this is the case, increase the percentile value.
- Click Next.
-
Set Evaluate the alert to Monthly.
-
Click Create.
Testing the alert
This alert is set to evaluate once a month. However, if you own an alert, you can evaluate it at any time.
Do the following:
- From the hub, click Alerts on the left-hand panel.
Alternatively, click on your user icon in the top right-hand corner of the page and select Alerts. - Find the Low margin products last month alert and click .
- From the context menu, click Evaluate now.
You will see a notification on the top menu.
Alert life cycle
This section explains how to manage alerts after they are created.
Turn alerts on and off
Alerts are created based on visualizations but they are not linked to them. Deleting charts does not delete associated alerts. Only administrators and alert owners can turn alerts on and off.
Manage alerts as owner
Do the following:
- From the hub, click Alerts on the left-hand panel.
Alternatively, click on your user icon in the top right-hand corner of the page and select Alerts. - For each alert, the opens the context menu. From here you can disable and delete alerts.
Viewing alert details
Do the following:
You can check alert details, conditions, and execution history.
- From the hub, click Alerts on the left-hand panel.
Alternatively, click on your user icon in the top right-hand corner of the page and select Alerts. - Find the Low margin products last month alert.
- Click .
- From the context menu, click Details.
-
The left-hand side menu shows: Details, Data & conditions, History, Recipients, and Notifications.
These sections cannot be edited.
-
From the Details section, click View to display the most recent alert.
Modifying an alert
Do the following:
- From the hub, click Alerts on the left-hand panel.
Alternatively, click on your user icon in the top right-hand corner of the page and select Alerts. - Find the Low margin products last month alert.
- Click .
- From the context menu, click on Edit alert in app. The Alert dialog box will open.
- Leave the Details & data section as is. Click Next .
- Leave the Conditions section as is. Click Next.
- In the Distribution section, change Snooze notifications and set Off.
- Click Save.