Skip to main content Skip to complementary content

Installing a custom component

This example installs a custom component called tFileOutputPDF. You can also create your own component and import it into your Talend Studio.

Before you begin

Before installing the custom component tFileOutputPDF, you need to download it first. For more information about tFileOurputPDF, see Talend Exchange and Custom Components. You can also install a custom component of your own.

After you have downloaded the component or exported as a zip your own component, you can install it into your Talend Studio by taking the following steps.

Information noteNote: To install a mediation component, you need to edit <component>_java.xml in the component ZIP file by adding TYPE="CAMEL" to HEADER before proceeding with the following steps. For example,
<HEADER
    PLATEFORM="ALL"    SERIAL=""
    VERSION="0.102"    STATUS="ALPHA"    
    COMPATIBILITY="ALL"    AUTHOR="Talend"    RELEASE_DATE="20100401A"    STARTABLE="false"    SCHEMA_AUTO_PROPAGATE="false"    DATA_AUTO_PROPAGATE="false"    TYPE="CAMEL"  > 

Procedure

  1. Unzip the archive file and copy the "tFileOutputPDF".component folder to the Clipboard.

    Note the following directory structure, and make sure you copy the right folder.

    tFileoutputPDF // copy this folder

    --- iText-2.0.8.jar

    --- tFileOutputPDF_begin.javajet

    --- tFileOutputPDF_end.javajet

    --- other component's files

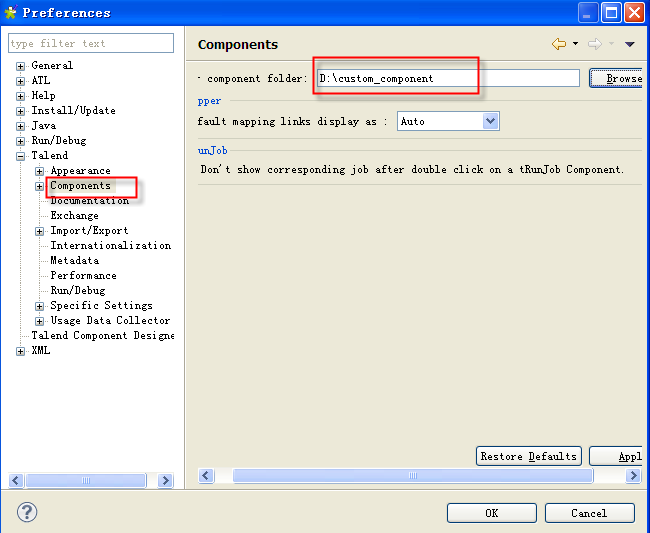
  2. Paste the component folder to a dedicated directory where you will store all custom components, for example D:\custom_component\.
  3. In Talend Studio, click Window in the toolbar, then Preferences > Talend > Component.
  4. Browse to the dedicated component directory where you store all your custom components.
  5. Click OK. Talend Studio will reload all the components including the custom components.

    This configuration is stored in the metadata of the workspace. If the workspace of Talend Studio changes, you have to reset this configuration again.

  6. Check that you have successfully installed the component by searching the component name tFileOutputPDF in the Palette.

    If the component does not appear in the Palette, there are several possible causes:

    1. The XML file of component is not well configured. For example: tFileOutputPDF_java.xml for the component presented in the previous example. Open the XML file of component and make sure of the following:
      • The XML file should be well-formed.
      • The Family element should not be missing as this element specifies the component group in the Palette where the custom component is filed under. For example: <FAMILY>File/Management</FAMILY>.
      • The right elements are used in the XML file. To check this, simply compare your custom component XML file with the XML file of an official Talend component. All official components are located in <Talend Studio installation dir>\plugins\org.talend.designer.components.localprovider_x.x.x.rxxxxx\components\.
    2. The component folder pasted into your dedicated custom component directory was wrong. In this case, carry out the installation procedure again.

    If you get a missing jars error, when using the component in a Job, try the following procedure:

    1. Install the component again (without uninstalling the component installed previously).
    2. Delete the file <Talend Studio installation dir>\configuration\ComponentCache.javacache and restart Talend Studio.

      The file ComponentCache.javacache caches the dependencies and information of all components after the first launch of a Talend Studio. It avoids reloading all components at each start of the Talend Studio, saving some time. In case you need to remove this cache, then all components will need to be loaded again at the next start of the Talend Studio in order to build this cache again.

Did this page help you?

If you find any issues with this page or its content – a typo, a missing step, or a technical error – please let us know!