Skip to main content Skip to complementary content

Import the Job in Talend Studio

A sample Job has been provided to test the whole architecture.

This is a very simple Job which performs the following:

  • Connect to S3 using provided access key credentials
  • Create temporary files
  • Download the S3 CSV file from folder input to a local temporary file
  • Read the temporary CSV file then convert it to a temporary local XML file
  • Upload the temporary XML file back to S3 into folder output
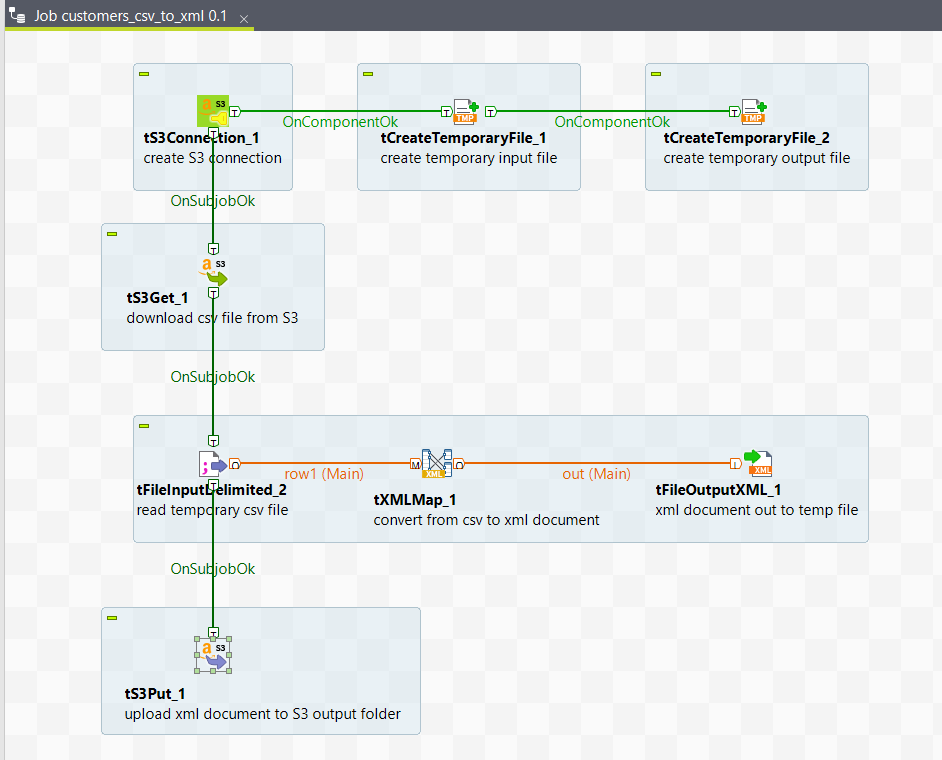
Let's test the Job in the local studio before deploying it in the Cloud.

Procedure

  1. Download the file customers_csv_to_xml.zip from the Downloads tab in the left panel of this page.
  2. Launch Talend Studio.
  3. Create a project with the name Demos in the Studio.
  4. Import the Job in Talend Studio using the zip file customers_csv_to_xml.zip.
  5. Open the Job customers_csv_to_xml once imported.
  6. Download the CSV file customers.csv from the Downloads tab in the left panel of this page and upload it to S3 in the folder input of the talend-lambda-demos bucket.
  7. In Talend Studio, set the Job context parameters:
    • context.s3_file = input/customers.csv
    • context.aws_access_key_id = <your aws access key id>
    • context.aws_secret_access_key = <your aws secret access key>

    Read the documentation at http://docs.aws.amazon.com/en_en/general/latest/gr/managing-aws-access-keys.html to know how to create/manage/download aws access keys.

  8. Execute the Job.
    • The CSV file is downloaded, transformed into an xml file, then uploaded in S3 output folder.
    • Check the output folder in S3. It should contain a new xml file as below:

    You have successfully tested the Job with Talend Studio. Next step is to build the Job then deploy it with Talend Administration Center on AWS.

Did this page help you?

If you find any issues with this page or its content – a typo, a missing step, or a technical error – please let us know!