# Angular leonardo-ui components

Warning noteThis feature is delivered as EXPERIMENTAL in this release.

This section describes the Angular leonardo-ui components that are delivered with this version of Qlik Sense.


## Overview

leonardo-ui is a UI component framework, designed to be used as a complement to other frameworks. It is non-obtrusive in the sense that it contains no global styling but will use your page defaults. You can also use it standalone with a CSS reset to get consistent styling of your components.

Most components are exposing a single element directive (like the checkbox which exposes &lt;lui-checkbox ...&gt;) but may also expose services and/or sub-directives like the dialog.

## Limitations

These limitations apply both for the example page and inside the client:

* Variant will not update on most components
* x-change events fires before x-model has changed its value (this is because of isolate scope)

## Dialog component

Use the lui-dialog component to create custom dialogs.

lui-dialoglui-dialog options

| Name | Type | Description | Parameters |
| --- | --- | --- | --- |
| luiDialog | Service | Modal dialog service. | <ul> <li><span>template</span> </li> <li><span>controller</span> </li> <li><span>variant</span> </li> <li><span>closeOnEscape</span> </li> <li><span>input</span> </li> </ul> |
| lui-dialog | Element directive | Dialog content.<br><br>Use any of the header, body and footer directives as content or none to control the appearance manually. | <ul> <li><span>x-variant</span> </li> </ul> |
| lui-dialog-header | Element directive | Dialog header. | - |
| lui-dialog-body | Element directive | Dialog body with default scroll behavior. | - |
| lui-dialog-footer | Element directive | Dialog footer. | - |
| lui-dialog-trigger | Attribute directive | Helper directive that shows a dialog when clicking on the element with this directive.<br><br>Restores focus to the opening element after the dialog has been closed. | <ul> <li><span>template</span> </li> <li><span>controller</span> </li> <li><span>variant</span> </li> <li><span>closeOnEscape</span> </li> </ul> |

### Examples

```
<div>
	<div>
		<button class="lui-button" lui-dialog-trigger x-template="$ctrl.dialogTemplate">
			Open dialog (trigger)
		</button>
	</div>
	<div>
		<button class="lui-button" lui-dialog-trigger x-template="$ctrl.dialogTemplate" x-variant="inverse">
			Open dialog (trigger, inverse)
		</button>
	</div>
	<div>
		<button class="lui-button" ng-click="$ctrl.openDialog()">Open dialog (service)</button>
	</div>
	<div>
		<button class="lui-button" ng-click="$ctrl.openDialog('inverse')">Open dialog (service, inverse)</button>
	</div>
</div>
```

## Popover component

Use the lui-popover component to create custom popovers.
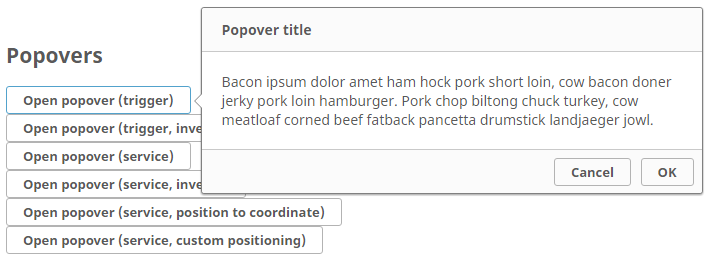
![An image of an interface item called "Open popover (trigger)" activated. As a result of the activation, there is a pop-up box titled "Popover title" with lorum ipsum text as the body text of the pop up.](https://help.qlik.com/en-US/sense-developer/May2025/Subsystems/APIs/Content/Resources/Images/ex-lui-popover-example.png)

lui-popoverlui-popover options

| Name | Type | Description | Parameters |
| --- | --- | --- | --- |
| luiPopover.show | Service | Popover service - show function. | <ul> <li><span>template</span> </li> <li><span>controller</span> </li> <li><span>input</span> </li> <li><span>alignTo</span> </li> <li><span>dock</span> </li> <li><span>variant</span> </li> <li><span>closeOnEscape</span> </li> </ul> |
| luiPopover.showToPosition | Service | Popover service - showToPosition function. | <ul> <li><span>template</span> </li> <li><span>controller</span> </li> <li><span>input</span> </li> <li><span>x</span> </li> <li><span>y</span> </li> <li><span>dock</span> </li> <li><span>variant</span> </li> <li><span>closeOnEscape</span> </li> </ul> |
| luiPopover.showCustom | Service | Popover service - showCustom function. | <ul> <li><span>template</span> </li> <li><span>controller</span> </li> <li><span>input</span> </li> <li><span>position</span> (function)</li> <li><span>variant</span> </li> <li><span>closeOnEscape</span> </li> </ul> |
| lui-popover | Element directive | Popover content.<br><br>Use any of the header, body and footer directives as content or none to control the appearance manually. | <ul> <li><span>x-variant</span> </li> </ul> |
| lui-popover-header | Element directive | Popover header. | - |
| lui-popover-body | Element directive | Popover body with default scroll behavior. | - |
| lui-popover-footer | Element directive | Popover footer. | - |
| lui-popover-trigger | Attribute directive | Helper directive that shows a popover when clicking on the element with this directive.<br><br>Restores focus to the opening element after the popover has been closed. | <ul> <li><span>template</span> </li> <li><span>controller</span> </li> <li><span>variant</span> </li> <li><span>dock</span> </li> <li><span>closeOnEscape</span> </li> </ul> |

### Examples

```
<div>
	<div>
		<button class="lui-button" lui-popover-trigger x-dock="right" x-template="$ctrl.popoverTemplate">Open popover (trigger)</button>
	</div>
	<div>
		<button class="lui-button" lui-popover-trigger x-dock="right" x-template="$ctrl.popoverTemplate" x-variant="inverse">Open popover (trigger, inverse)</button>
	</div>
	<div>
		<button class="lui-button" ng-click="$ctrl.openPopover($event)">Open popover (service)</button>
	</div>
	<div>
		<button class="lui-button" ng-click="$ctrl.openPopover($event, 'inverse')">Open popover (service, inverse)</button>
	</div>
	<div>
		<button class="lui-button" ng-click="$ctrl.openToPosition($event)">Open popover (service, position to coordinate)</button>
	</div>
	<div>
		<button class="lui-button" ng-click="$ctrl.openCustom($event)">Open popover (service, custom positioning)</button>
	</div>
</div>
```

## Tooltip component

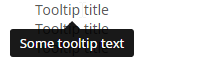
Use the lui-tooltip component to create custom tooltips.
![Two lines of text, both called "Tooltip title". The first "Tooltip title" has a tooltip popup that says "Some tooltip text".](https://help.qlik.com/en-US/sense-developer/May2025/Subsystems/APIs/Content/Resources/Images/ex-lui-tooltip-example.png)

lui-tooltiplui-tooltip options

| Name | Type | Description | Parameters |
| --- | --- | --- | --- |
| luiTooltip.show | Service | Tooltip service - show function. | <ul> <li><span>template</span> </li> <li><span>controller</span> </li> <li><span>input</span> </li> <li><span>alignTo</span> </li> <li><span>dock</span> </li> </ul> |
| luiTooltip.showToPosition | Service | Tooltip service - showToPosition function. | <ul> <li><span>template</span> </li> <li><span>controller</span> </li> <li><span>input</span> </li> <li><span>x</span> </li> <li><span>y</span> </li> <li><span>dock</span> </li> </ul> |
| luiTooltip.showCustom | Service | Tooltip service - showCustom function. | <ul> <li><span>template</span> </li> <li><span>controller</span> </li> <li><span>input</span> </li> <li><span>position</span> (function)</li> <li><span>dock</span> </li> </ul> |
| lui-tooltip | Element directive | Tooltip content. | <ul> <li><span>x-variant</span> </li> </ul> |
| lui-tooltip-trigger | Attribute directive | Helper directive that shows a tooltip when hovering on the element with this directive. | <ul> <li><span>template</span> </li> <li><span>controller</span> </li> <li><span>dock</span> </li> </ul> |
| lui-title-tooltip | Attribute directive | Helper directive that shows a tooltip when hovering on the element with this directive, using the value of its title attribute as tooltip content. | <ul> <li><span>template</span> </li> <li><span>controller</span> </li> <li><span>dock</span> </li> </ul> |

### Examples

```
<div>
	<div>
		<span title="S" lui-title-tooltip>Tooltip title</span>
	</div>
	<div>
		<span title="Some tooltip text" lui-title-tooltip>Tooltip title</span>
	</div>
	<div>
		<span title="Some tooltip text" lui-title-tooltip>Tooltip title</span>
	</div>
	<div>
		<span title="Some tooltip text" lui-title-tooltip>Tooltip title</span>
	</div>
	<div>
		<span title="Some tooltip text" lui-title-tooltip>Tooltip title</span>
	</div>
	<div>
		<span title="Some <b>tooltip</b> text" lui-title-tooltip>Tooltip title (injection test)</span>
	</div>
	<div>
		<span title="Some tooltip text" lui-title-tooltip x-dock="top">Tooltip title - top</span>
	</div>
	<div>
		<span title="Some tooltip text" lui-title-tooltip x-dock="right">Tooltip title - right</span>
	</div>
	<div>
		<span title="Some tooltip text" lui-title-tooltip x-dock="bottom">Tooltip title - bottom</span>
	</div>
	<div>
		<span title="Some tooltip text" lui-title-tooltip x-dock="left">Tooltip title - left</span>
	</div>
	<div>
		<span lui-tooltip-trigger x-dock="left" x-template="$ctrl.tooltipTemplate">Tooltip (trigger)</span>
	</div>
	<div>
		<span ng-mouseenter="$ctrl.openTooltip($event)" ng-mouseleave="$ctrl.closeTooltip()">Tooltip (service)</span>
	</div>
	<div>
		<span ng-mouseenter="$ctrl.openToPosition($event)" ng-mouseleave="$ctrl.closeTooltip()">Tooltip (service, position to coordinate)</span>
	</div>
	<div>
		<span ng-mouseenter="$ctrl.openCustom($event)" ng-mouseleave="$ctrl.closeTooltip()">Tooltip (service, custom positioning)</span>
	</div>
</div>
```

## Tab-view component

Use the lui-tab-view component to create custom tabs or tab-sets.

![Three tabs called "Tab1", "Tab2", and "Tab3". "Tab1" is selected, and the text "Tab1 content" is below the three tabs.](https://help.qlik.com/en-US/sense-developer/May2025/Subsystems/APIs/Content/Resources/Images/ex-lui-tabview-example.png)

lui-tab-viewlui-tab-view options

| Name | Type | Description | Parameters |
| --- | --- | --- | --- |
| lui-tab-view | Element directive | Root directive for lui-tabset and lui-tab-content directives. | - |
| lui-tabset | Element directive | Container directive for tabs.<br><br>Requires lui-tab-view as parent directive. | <ul> <li><span>fill</span> </li> <li> <span>active-tab</span></li> </ul> |
| lui-tab | Element directive | A single tab element.<br><br>Requires lui-tabset as parent directive.<br><br>Setting the attribute ref will automatically toggle any lui-tab-content element with an equal ref attribute upon activation. | <ul> <li><span>variant</span> </li> <li><span>disabled</span> </li> <li><span>ref</span> </li> <li><span>on-tab-selected</span> </li> <li><span>on-tab-deselected</span> </li> <li><span>on-tab-added</span> </li> <li><span>on-tab-removed</span> </li> </ul> |
| lui-tab-content | Element directive | Content of a tab.<br><br>Requires lui-tab-view as parent directive.<br><br>Set attribute ref for automatic toggling of content when a tab with same ref attribute is activated. | <ul> <li><span>ref</span> </li> </ul> |
| lui-tab-aside | Element directive | Tab aside element.<br><br>A click-able element for adding additional custom functionality to each tab. | <ul> <li><span>icon</span> </li> <li><span>on-activated</span> </li> </ul> |

### Examples

#### Basic tab-view

```
<lui-tab-view>
	<lui-tabset>
		<lui-tab ref="tab1">Tab1</lui-tab>
		<lui-tab ref="tab2">Tab2</lui-tab>
		<lui-tab ref="tab3" disabled="true">Tab3</lui-tab>
	</lui-tabset>
	<lui-tab-content ref="tab1">Tab1 content</lui-tab-content>
	<lui-tab-content ref="tab2">Tab2 content</lui-tab-content>
	<lui-tab-content ref="tab3">Tab3 content</lui-tab-content>
</lui-tab-view>
```

#### Inverse tab-view

```
<lui-tab-view>
	<lui-tabset>
		<lui-tab variant="inverse" ref="tab1">Tab1</lui-tab>
		<lui-tab variant="inverse" ref="tab2">Tab2</lui-tab>
		<lui-tab variant="inverse" ref="tab3" disabled="true">Tab3</lui-tab>
	</lui-tabset>
	<lui-tab-content ref="tab1">Tab1 content</lui-tab-content>
	<lui-tab-content ref="tab2">Tab2 content</lui-tab-content>
	<lui-tab-content ref="tab3">Tab3 content</lui-tab-content>
</lui-tab-view>
```

#### Filled tab-view

```
<lui-tab-view>
	<lui-tabset fill="true">
		<lui-tab ref="tab1">Tab1</lui-tab>
		<lui-tab ref="tab2">Tab2</lui-tab>
		<lui-tab ref="tab3" disabled="true">Tab3</lui-tab>
	</lui-tabset>
	<lui-tab-content ref="tab1">Tab1 content</lui-tab-content>
	<lui-tab-content ref="tab2">Tab2 content</lui-tab-content>
	<lui-tab-content ref="tab3">Tab3 content</lui-tab-content>
</lui-tab-view>
```

#### Inverse filled tab-view

```
<lui-tab-view>
	<lui-tabset fill="true">
		<lui-tab variant="inverse" ref="tab1">Tab1</lui-tab>
		<lui-tab variant="inverse" ref="tab2">Tab2</lui-tab>
		<lui-tab variant="inverse" ref="tab3" disabled="true">Tab3</lui-tab>
	</lui-tabset>
	<lui-tab-content ref="tab1">Tab1 content</lui-tab-content>
	<lui-tab-content ref="tab2">Tab2 content</lui-tab-content>
	<lui-tab-content ref="tab3">Tab3 content</lui-tab-content>
</lui-tab-view>
```

#### Dynamic tab-view

tabviews.js

```
/**
 * Leonardo UI examples. This is how the client uses the leonardo UI library and contains all config and overrides
 * provided by the client. Note that maintenance on this module might be lagging behind.
 */
import angular from "angular";

import template from "./tabviews.ng.html";

const module = angular.module( "docs.tabview-examples", [] );

module.component( "tabviewExamples", {
	template: template,
	controller: ["$scope", function ( $scope ) {

		$scope.tabview = {
			tabs: [{name: "Add Tabs", content: "Add more tabs", disabled: false, aside: false},
				{name: "Tab1", content: "Tab 1 content", disabled: false, aside: true},
				{name: "Tab2", content: "Tab 2 content", disabled: false, aside: true},
				{name: "Tab3", content: "Tab 3 content", disabled: false, aside: true}
			],
			activeTab: "Add Tabs"
		};

		$scope.asideActivated = function ( index ) {
			$scope.tabview.tabs.splice( index, 1 );
		};

		$scope.addTab = function ( index ) {
			$scope.tabview.tabs.push( {
				name: "Tab" + index,
				content: "Tab " + index + " content",
				disabled: false,
				aside: true
			} );
		};
	}],
	bindings: {
		variant: "="
	}
} );
```

tabviews.ng.html

```
<div>
	<!-- Example 1, Dynamic tabs -->
	<lui-tab-view>
		<lui-tabset active-tab="tabview.activeTab">
			<lui-tab ng-repeat="tab in tabview.tabs" x-ref="{{tab.name}}" x-disabled="tab.disabled">
				<span class="lui-tab__text">{{tab.name}}</span>
				<lui-tab-aside ng-if="tab.aside" x-icon="close" on-activated="asideActivated($index)"></lui-tab-aside>
			</lui-tab>
		</lui-tabset>
		<lui-tab-content style="margin-top: 20px;margin-bottom:10px;" ng-repeat="tab in tabview.tabs" x-ref="{{tab.name}}">{{tab.content}}</lui-tab-content>
		<lui-tab-content x-ref="Add Tabs" ng-init="tabIndex = 4"><lui-button x-variant="success" ng-click="addTab(tabIndex); tabIndex = tabIndex +1">Add a tab</lui-button></lui-tab-content>
	</lui-tab-view>
</div>
```

## Button component

Use the lui-button component to create custom buttons.

![Several button called "Default", "Toolbar", "Info", "Danger", "Warning", and "Success"](https://help.qlik.com/en-US/sense-developer/May2025/Subsystems/APIs/Content/Resources/Images/ex-lui-buttons-example.png)

lui-buttonlui-button options

| Name | Type | Description | Parameters |
| --- | --- | --- | --- |
| lui-button | Element directive | Button content. | <ul> <li><span>x-variant</span> </li> <li><span>active</span> </li> <li><span>full-width</span> </li> </ul> |

### Examples

#### Standard buttons

```
<lui-button>Default</lui-button>
<lui-button x-variant="toolbar">Toolbar</lui-button>
<lui-button x-variant="info">Info</lui-button>
<lui-button x-variant="danger">Danger</lui-button>
<lui-button x-variant="warning">Warning</lui-button>
<lui-button x-variant="success">Success</lui-button>
```

#### Inverse buttons

```
<lui-button x-variant="inverse">Inverse</lui-button>
<lui-button x-variant="toolbar-inverse">Toolbar inverse</lui-button>
<lui-button x-variant="info">Info</lui-button>
<lui-button x-variant="danger">Danger</lui-button>
<lui-button x-variant="warning">Warning</lui-button>
<lui-button x-variant="success">Success</lui-button>
```

#### More buttons

```
<lui-button active="true">Active</lui-button>
<lui-button full-width="true">Full width</lui-button>
```

## Select component

Use the lui-select component to create custom drop-down lists.

![A drop-down list containing "First", "Second", "Third" options.](https://help.qlik.com/en-US/sense-developer/May2025/Subsystems/APIs/Content/Resources/Images/ex-lui-select-example.png)

lui-selectlui-select options

| Name | Type | Description | Parameters |
| --- | --- | --- | --- |
| lui-select | Element directive | Select content. | <ul> <li><span>x-model</span> </li> <li><span>x-variant</span> </li> </ul> |

### Examples

#### Select

```
<lui-select x-model="value">
	<option value="1">First</option>
	<option value="2">Second</option>
	<option value="3">Third</option>
</lui-select>
```

#### Inverse select

```
<lui-select x-variant="toolbar" x-model="value">
	<option value="1">First</option>
	<option value="2">Second</option>
	<option value="3">Third</option>
</lui-select>
```

#### Select toolbar style

```
<lui-select x-variant="inverse" x-model="value">
	<option value="1">First</option>
	<option value="2">Second</option>
	<option value="3">Third</option>
</lui-select>
```

#### Select inverse toolbar style

```
<lui-select x-variant="toolbar-inverse" x-model="value">
	<option value="1">First</option>
	<option value="2">Second</option>
	<option value="3">Third</option>
</lui-select>
```

## Search component

Use the lui-search component to add custom search dialogs.

![A search box with a magnifying glass on the left, and replaceable text reading "my search string"](https://help.qlik.com/en-US/sense-developer/May2025/Subsystems/APIs/Content/Resources/Images/ex-lui-search-example.png)

lui-searchlui-search options

| Name | Type | Description | Parameters |
| --- | --- | --- | --- |
| lui-search | Element directive | Search content. | <ul> <li><span>x-query</span> </li> <li><span>x-variant</span> </li> </ul> |

### Examples

#### Basic search

```
<lui-search x-query="search"></lui-search>
```

#### Inverse search

```
<lui-search x-query="search" x-variant="inverse"></lui-search>
```

## Checkbox component

Use the lui-checkbox component to add custom check-boxes.

![Two checkboxes called "Label". The top checkbox is orange and checked, and the bottom checkbox is greyed out and checked. They both have the text "Label"](https://help.qlik.com/en-US/sense-developer/May2025/Subsystems/APIs/Content/Resources/Images/ex-lui-checkbox-example.png)

lui-checkboxlui-checkbox options

| Name | Type | Description | Parameters |
| --- | --- | --- | --- |
| lui-checkbox | Element directive | Checkbox content. | <ul> <li><span>x-model</span> </li> <li><span>x-variant</span> </li> <li><span>x-disabled</span> </li> </ul> |

### Examples

#### Basic check-box

```
<lui-checkbox x-model="checkbox">Label</lui-checkbox>
<lui-checkbox x-model="checkbox" x-disabled="true" "="">Label</lui-checkbox>
```

#### Inverse check-box

```
<lui-checkbox x-model="checkbox" x-variant="inverse">Label</lui-checkbox>
<lui-checkbox x-model="checkbox" x-variant="inverse" x-disabled="true">Label</lui-checkbox>
```

## Switch component

Use the lui-switch component to add switches.

![Two slider switches. One has a white background and the other has a grey background.](https://help.qlik.com/en-US/sense-developer/May2025/Subsystems/APIs/Content/Resources/Images/ex-lui-switch-example.png)

lui-switchlui-switch options

| Name | Type | Description | Parameters |
| --- | --- | --- | --- |
| lui-switch | Element directive | Switch content. | <ul> <li><span>x-model</span> </li> <li><span>x-variant</span> </li> <li><span>x-disabled</span> </li> </ul> |

### Examples

#### Basic switch

```
<lui-switch x-model="switch"></lui-switch>
<lui-switch x-model="switch" x-disabled="true"></lui-switch>
```

#### Inverse switch

```
<lui-switch x-variant="inverse" x-model="switch"></lui-switch>
<lui-switch x-variant="inverse" x-model="switch" x-disabled="true"></lui-switch>
```

## Radiobutton component

Use the lui-radiobutton component to add radio-buttons.

![Two radio buttons called "A" and "B". "A" is orange and "B" is grey.](https://help.qlik.com/en-US/sense-developer/May2025/Subsystems/APIs/Content/Resources/Images/ex-lui-radiobutton-example.png)

lui-radiobuttonlui-radiobutton options

| Name | Type | Description | Parameters |
| --- | --- | --- | --- |
| lui-radiobutton | Element directive | Radiobutton content. | <ul> <li><span>x-model</span> </li> <li><span>x-variant</span> </li> <li><span>x-disabled</span> </li> </ul> |

### Examples

#### Basic radiobutton

```
<lui-radiobutton x-model="radio1">A</lui-radiobutton>
<lui-radiobutton x-model="radio1" x-disabled="true">B</lui-radiobutton>
```

#### Inverse radiobutton

```
<lui-radiobutton x-variant="inverse" x-model="radio2">A</lui-radiobutton>
<lui-radiobutton x-variant="inverse" x-model="radio2" x-disabled="true">B</lui-radiobutton>
```