
Preparing your Amazon AWS platform to install Qlik Sense Enterprise on Windows
This section describes how to set up and configure a single Amazon Elastic Cloud Compute (EC2) instance on the AWS cloud platform before installing Qlik Sense Enterprise on Windows as a single-node site. To deploy Qlik Sense Enterprise on Windows in a production-ready, multi-node environment, you need to deploy your Qlik Sense Enterprise on Windows across several virtual machines.
Before you begin
- Download Qlik Sense Enterprise on Windows from the Qlik Download Site. For more information, see Downloading installation files.
- Obtain a Qlik product license. To learn about the licensing options, see Qlik product licenses.
- Log into your AWS Management Console.
Considerations for a multi-node deployment
Your business requirement will determine the best way to deploy Qlik Sense Enterprise on Windows on Amazon EC2. These instructions describe the basic configuration for a single AWS virtual machine. For larger multi-node sites, you should determine the architecture requirements of your multi-node deployment before you begin. Here are some important things to consider when planning a multi-node deployment:
- Ensure your AWS regions are geographically close to your on-premises network and data sources when possible. This reduces network latency.
- Deploy your AWS cluster across availability zones. This helps you build a highly available solution. To see how to create a highly available EC2 cluster, see Tutorial: Increase the availability of your application on Amazon EC2.
-
Take advantage of the native AWS features, such as Amazon Elastic Block Storage (EBS), for your Qlik Sense Enterprise on Windows deployment, This reduces your administrative overhead. See, Amazon Elastic Block Store (Amazon EBS).
Information noteStorage layer resiliency is a requirement for central node failover with Qlik Sense Enterprise on Windows. See Storage layer resiliency to understand the requirement.
Create a security group
Security groups filter traffic to and from your Amazon EC2 instance. When you launch an instance, you specify a security group that is associated with it. For more information about security groups, see Amazon EC2 security groups for Windows instances.
- From the AWS Management Console, click EC2 to open the Amazon EC2 dashboard.
- Create a security group for Qlik Sense.
-
In the EC2 dashboard navigation pane, under Network & Security, click Security Groups.
- Click Create security group.
-
Under Basic details, enter a name and description for this security group.
- From the VPC drop-down menu, choose a virtual private cloud (VPC) to which this security group will be applied.
-
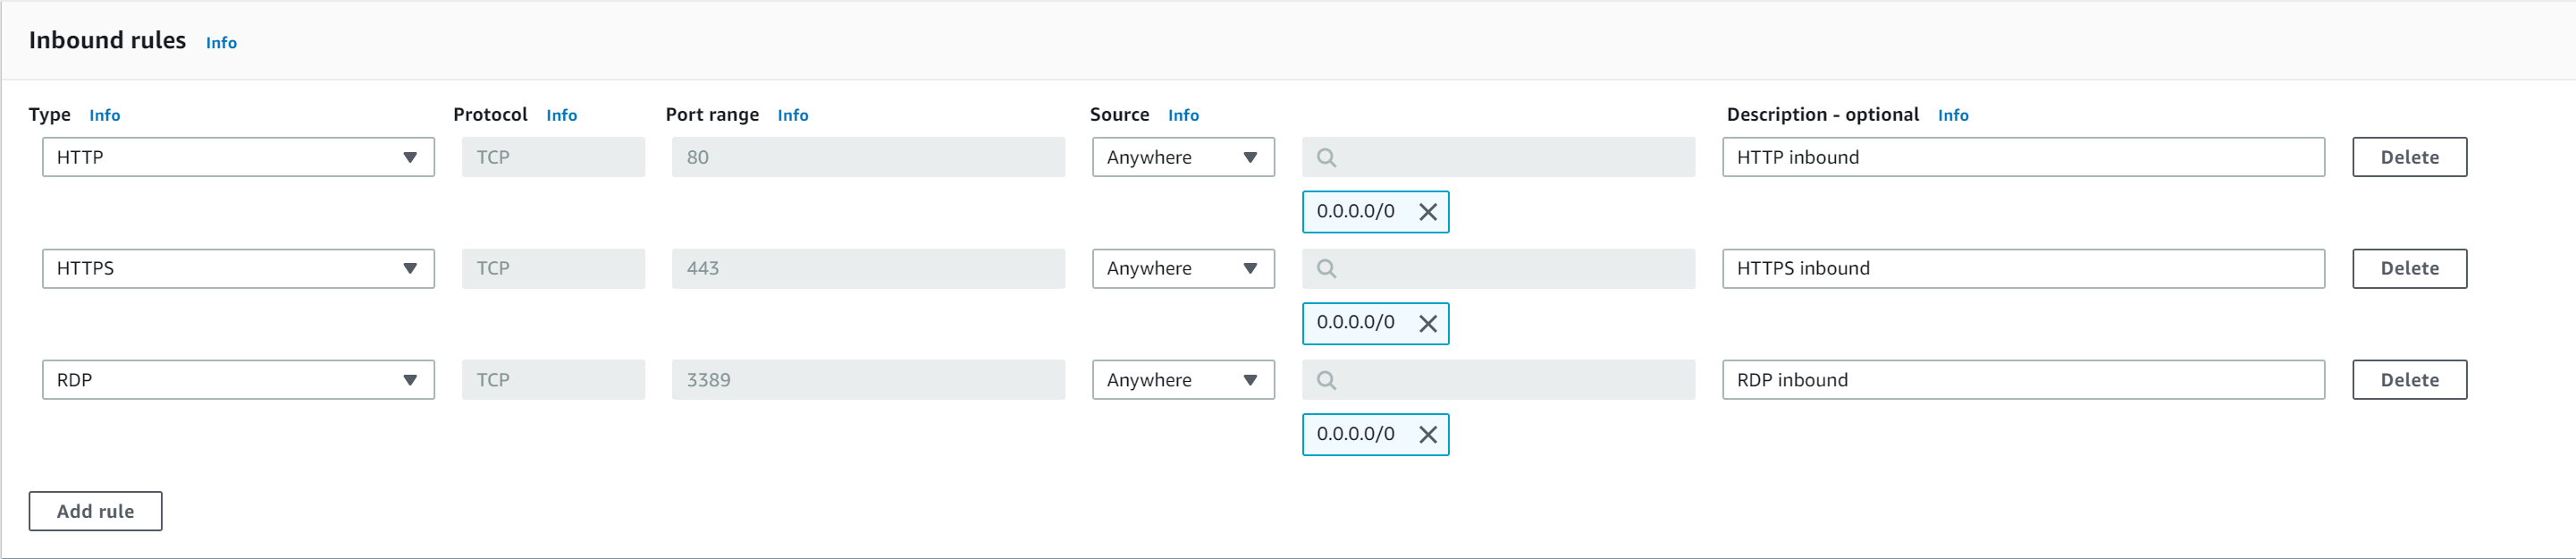
Under Inbound rules, add the following rules to the security group, as shown below.
Information noteInbound rules control traffic to the Amazon EC2 instance. If you leave Source as Anywhere, then all traffic from the specified protocol is allowed. You can change the Source to Custom or MyIP to limit inbound traffic.Type Protocol Port Range Source HTTP TCP 80 Anywhere
HTTPS TCP 443 Anywhere RDP TCP 3389 Anywhere
When finished, your security rule should look like this:
- Click Create security group to finish.
Create a key pair
A key pair comprises a public key to encrypt the data and a private key to decrypt the data. The public key is stored on the EC2 instance and the private key is stored locally. For more information about key pairs, see Amazon EC2 key pairs and Windows instances.
- From the EC2 dashboard, under Network & Security, click Key Pairs.
- Click Create key pair.
- Enter a name for the key pair. Amazon EC2 associates the key pair name with the public key.
- Select the appropriate file format for the key pair. To use this key with OpenSSH, save the key as a pem file. To use the key with PuTTY, save the key as a ppk file.
- Optionally add a tag to your key pair. Tags can help you organize your resources.
- Click Create key pair. The file is automatically downloaded by the browser. Qlik recommends that you save the file to a secure location on your computer because you need this key to access the EC2 virtual machine.
Launch a Windows Server Base instance on AWS
Launch a Windows Server Base instance (virtual machine) that meets your business requirements and meets the minimum system requirements for running Qlik Sense Enterprise on Windows. For more information about launching an instance, see Launching an instance using the Launch Instance Wizard.
Before choosing your Windows Amazon Machine Image, check the System requirements for Qlik Sense Enterprise.
-
From the EC2 dashboard, click Instances then Launch Instance.
-
Select an Amazon Machine Image (AMI) that meets the system requirements for your Qlik Sense Enterprise on Windows deployment.
-
Choose an Instance Type. This refers to the hardware configuration of the instance.
Information noteIf you used the security rules above, you will receive a security warning when you click Review and Launch. This is because we added the RDP inbound rule that is exposed to the internet. For a production environment, you might want to use a VPN or private connection instead.
-
Click Next: Configure Instance Details. Here, you can change the default settings, for example, if you want to launch multi AMIs or assign a different VPC to a virtual machine.
-
Click Next: Add Storage. Each AMI includes a root storage volume. You can change the size of the root storage, and you can add additional storage volumes, like Amazon EBS storage.
 Information noteFor setting up a production deployment, make sure you understand your storage requirements. For instructions on how to add Amazon Elastic Block Storage (EBS) to your production instance, see Amazon EBS features and Attaching an Amazon EBS volume to an instance.
 -
Click Next: Tag Instance. You can optionally tag the instance. This lets you categorize your AWS resources. For more information on how to use tags, see Tagging your Amazon EC2 resources.
-
Click Next: Configure Security Group. Select the security group you created earlier to associate it with this instance. You can also create new security groups and add new rules if needed.
-
Click Review and Launch. Verify that your instance is configured correctly, then click Launch.
-
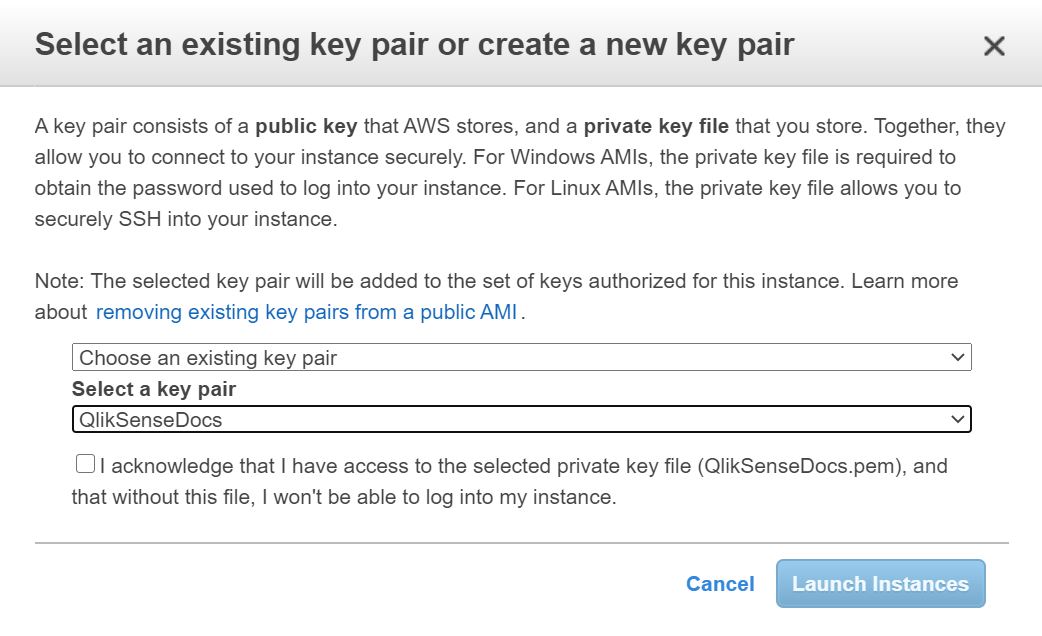
Select the key pair you created earlier to associate it with the instance, then click Launch Instances.
Now that the instance is launched, you can optionally create an Elastic IP so that the server IP address does not change. To learn about Elastic IP addresses, see Elastic IP addresses.
Click View Instances to go back to the EC2 dashboard. It will take some time for the instance to be fully provisioned.

Connect to the Amazon EC2 virtual machine through a Remote Desktop Protocol (RDP)
You can access the Amazon EC2 instance though an RDP client.
-
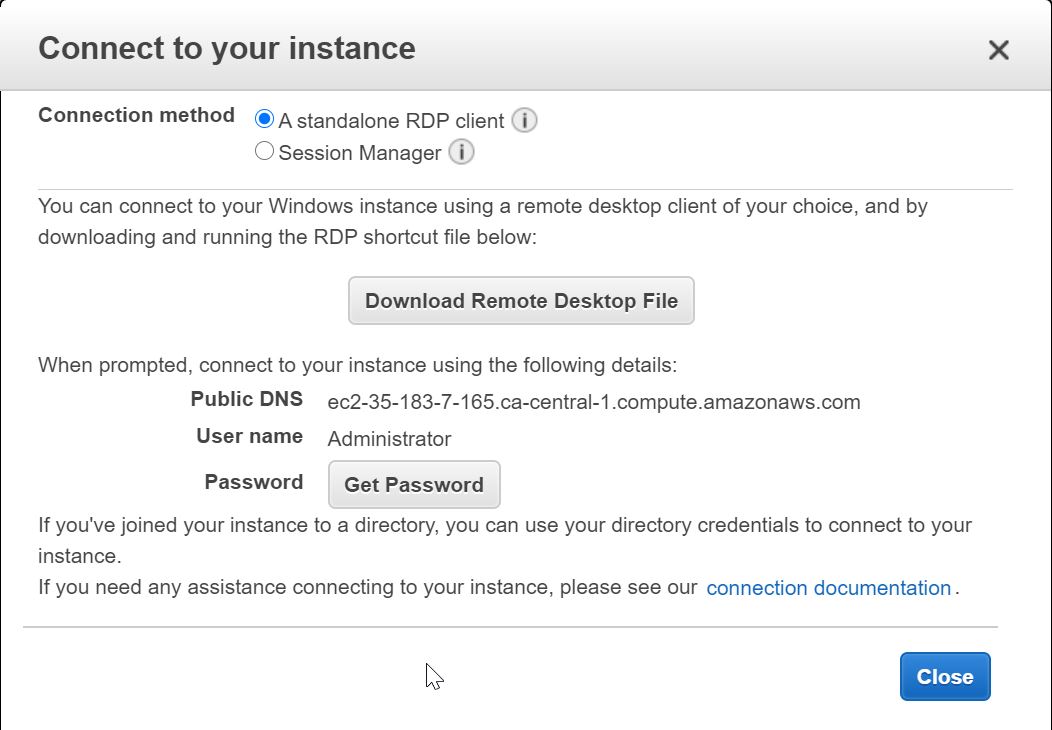
Select the box beside the instance that is now running, then click Connect.
-
Click Download Remote Desktop File. This saves a remote desktop file that you can open with your RDP client.
-
Click Get Password to retrieve the RDP password. Use the dialog to open the private key file you created with your key pair. The private key content is copied to the text box.
- Click Decrypt password. Then, save the decrypted password, along with the other instance information, before closing this window.
- Open the remote desktop file that you downloaded with an RDP client. Enter the username and password, then click connect.
Create Windows user accounts
On your virtual machine, you must set up an administrator service account to install and run Qlik Sense. You can also create additional local user accounts to access Qlik Sense Enterprise on Windows after installation.
- From the Windows virtual machine you created, open the Computer Management application.
- Under Local Users and Groups, right-click on Users, then select New User.
- Enter a user name and a password. Optionally add a full name and description.
- Clear User must change password at next logon.
-
Select Password never expires.
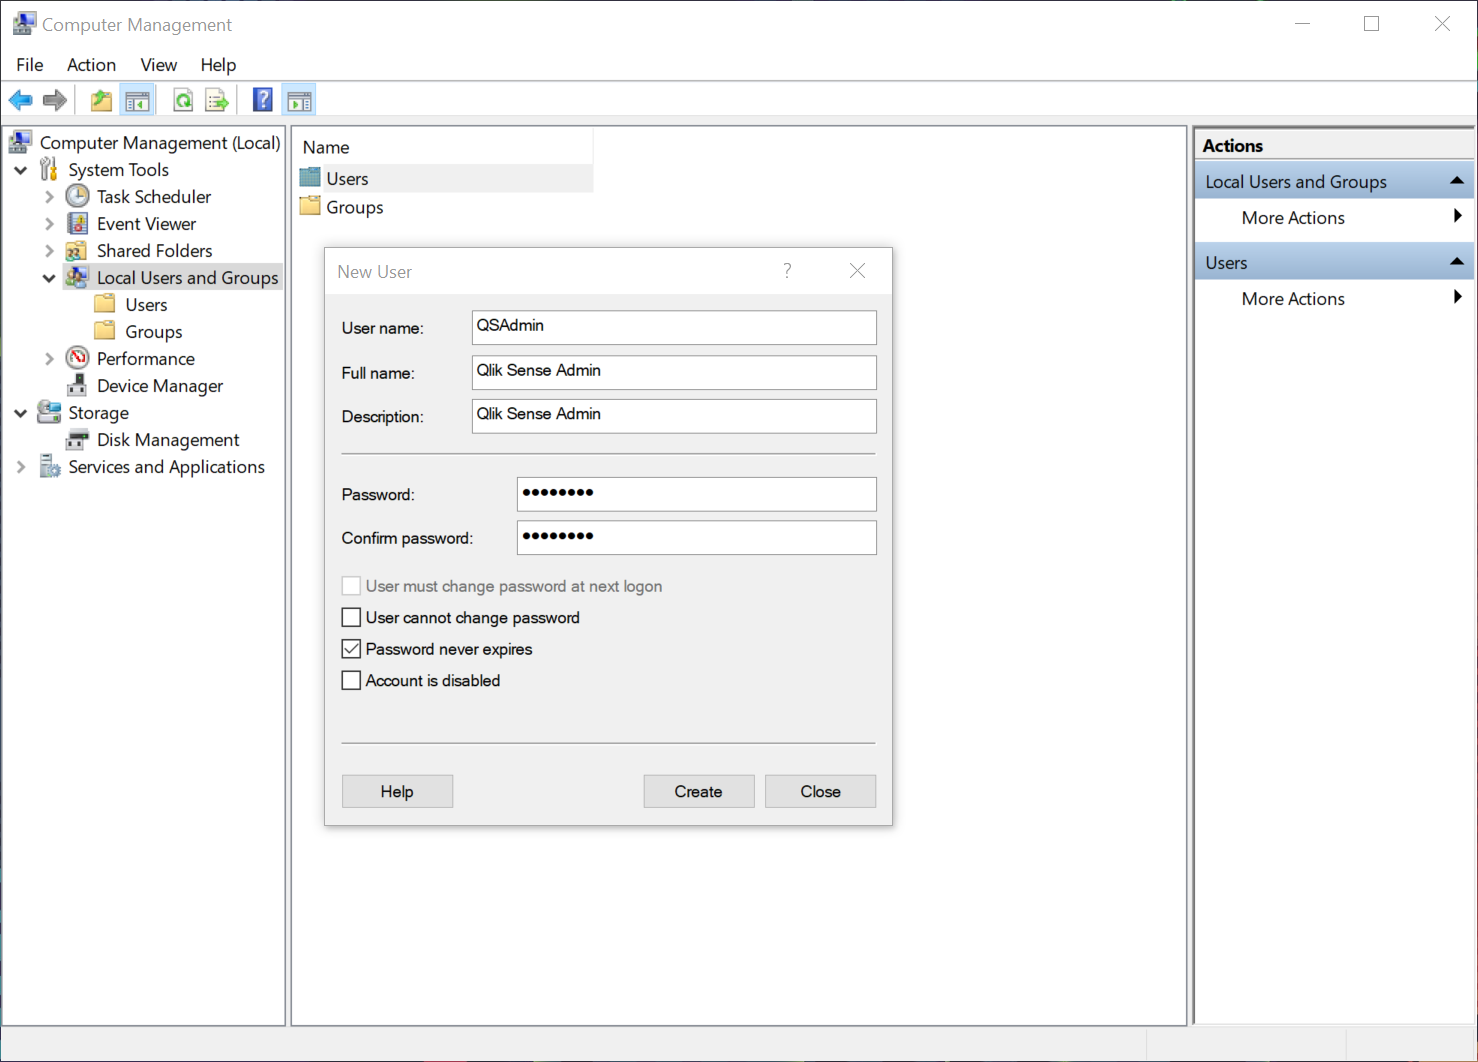
- Click Create.
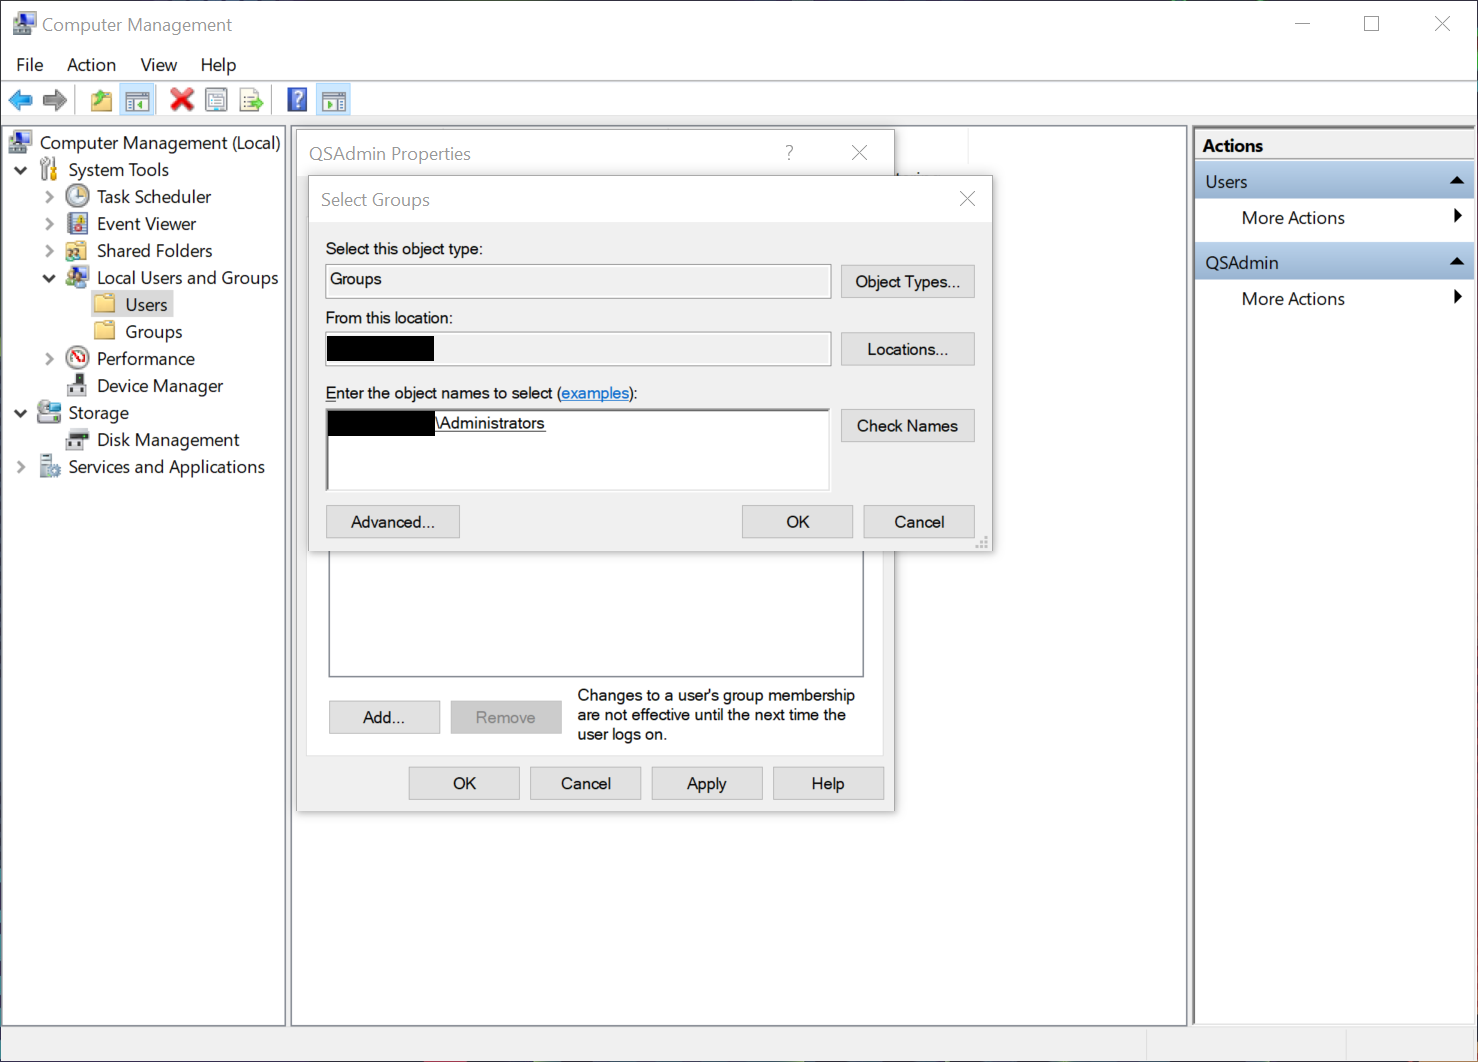
- Right-click the user your created, then select Properties.
- Click Member Of.
- Click Add.
- Type Administrators, then click Check Names. The field will populate with the Administrators group.
-
Click OK.
-
Under Member of, Click Users.
-
Click Remove.
-
Click OK.
Install Qlik Sense Enterprise on Windows on the AWS server
After the Amazon EC2 instance is configured, and the user accounts are created on the virtual machine, you can install Qlik Sense Enterprise on Windows.
Install Qlik Sense Enterprise on Windows following the instructions here: Installing Qlik Sense Enterprise on Windows on a single node.
When installing Qlik Sense Enterprise on Windows on AWS, you are prompted to enter the server name or address. The correct server name should appear in the field automatically. Do not use a fully qualified domain name.