
You create distribution policies to determine how apps are distributed to your cloud deployments. Distribution policies are mandatory when you want to distribute apps from Qlik Sense Enterprise on Windows to Qlik Sense Enterprise SaaS. Once created, any published app that matches the criteria in the distribution policy is distributed to the defined targets.
The first time an app is distributed to cloud, both app data (if any) and metadata, such as name, owner, stream, and custom properties, is distributed. On subsequent distributions, app data is only distributed if it has been changed more recently than the latest reload, otherwise only metadata is distributed. The app data in the cloud app then remains unchanged. Changes made to app content and app objects do not trigger a distribution of app data, but publishing or reloading an app does. To trigger app distributions, you can create distribution tasks for apps, see Creating and editing distribution tasks.
Prerequisites
- A license that includes multi-cloud. Either of the following:
- The same signed license key for Qlik Sense Enterprise on Windows and Qlik Sense Enterprise SaaS.
- Different license keys, where the cloud attributes are enabled and on-prem is activated through a signed license.
- You have two tenants that you can distribute apps to.
- For each tenant you have completed the following:
Once those steps are completed, proceed to Creating a distribution policy for distributing apps to different deployments
Setting up a deployment
Do the following:
-
In the Qlik Management Console (QMC) of your Qlik Sense Enterprise on Windows server, open Cloud distribution.
-
Select Distribution policies.
-
Click Set up new in the bottom-left corner.
-
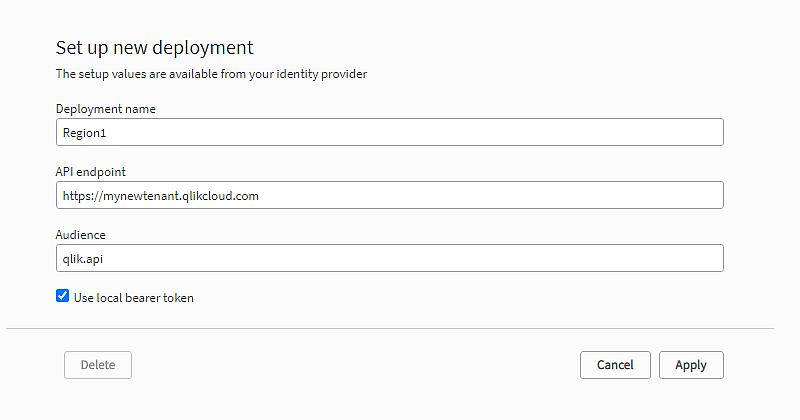
Enter a deployment name. Use Region1 for the first deployment and Region2 for the second one.
You will use these names as values in the custom property.
-
Enter the API endpoint, that is, your tenant address.
Example: https://my-tenant.eu.qlikcloud.com.
-
For Audience, enter qlik.api.
-
Select Use local bearer token.
Information noteUsing a local bearer token simplifies setup. If you do not use it, you need to enter Client ID, Client secret, and Token endpoint instead. -
Click Copy to clipboard.
You need the local bearer token in the identity provider configuration.
- Click Apply.
Creating the identity provider configuration
Do the following:
-
Open the Management Console in your cloud tenant and select Identity provider in the menu to the left.
-
Click Create new.
The Create identity provider configuration window is opened.
-
Under Type, select Multi-cloud.
-
Optionally, enter a description.
-
In the Local bearer token box, paste the token you copied in the deployment setup.
Creating a distribution policy for distributing apps to different deployments
You create the distribution policy in the QMC. When you publish apps, you can use custom properties to define where to distribute the apps.
Begin by creating a custom property and then use it in the distribution policy.
Creating a custom property for deployments
The custom property will have deployment names as values.
Do the following:
-
In the QMC, open the Custom properties section.
-
Click
 Create new.
 -
Name the custom property deployments.
Information noteIf you want tags to be displayed under Details in the cloud app, the name of the custom property must be Tags. The custom property values that are selected as tags when publishing the app will then be displayed under Details in the cloud app. -
Under Resource types, select Apps.
-
Under Values, click
Create new. -
Type Region1 as a value.
-
Add the value Region2 in the same way.
-
Click Apply.
Now you have two custom property values that you can use in the distribution policy.
Creating the distribution policy
Distribution policies are used to determine whether a published app can be distributed to one or more of the deployments in Qlik Cloud. Only published apps can be distributed.
Do the following:
-
In the QMC, open the Cloud distribution section and select Distribution policies.
-
Click
Create new. -
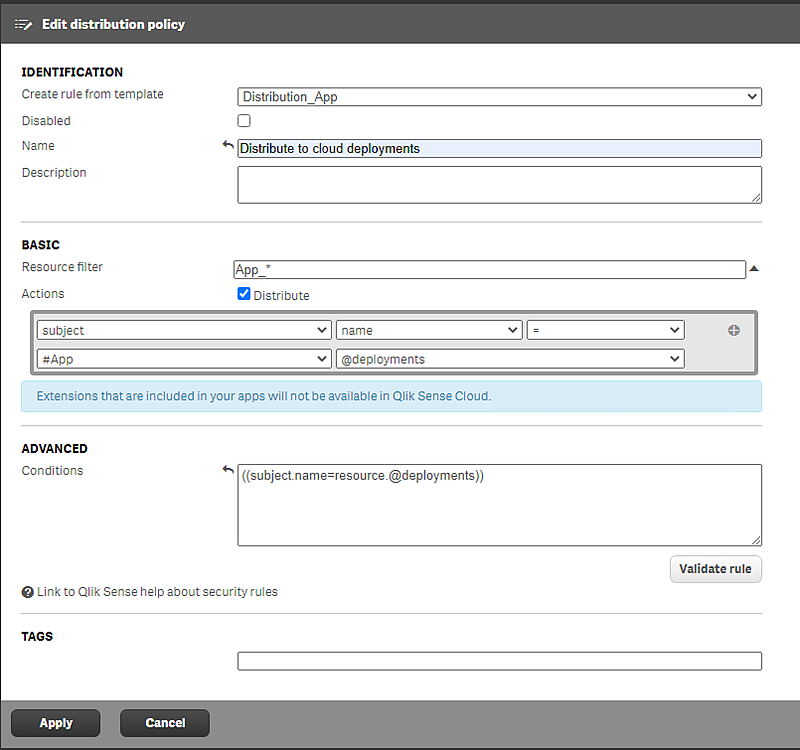
In the Create rule from template list, select Distribution_App.
-
Name the distribution policy Distribute to cloud deployments.
-
Under Basic, verify that the resource filter value is App_* and the action Distribute is selected.
-
In the rule editor, keep the values subject and name. On the second row, in the first drop-down list, select #App. In the last field add: @deployments.
The Conditions box in the Advanced section should have the following string: ((subject.name=resource.@deployments)). This could be read as follows:
"If the deployment name equals the custom property value applied to the app, the app will be distributed to that deployment."
-
Click Validate rule.
The rule syntax is checked, and, if valid, a confirmation is displayed.
-
Click Apply to save the rule.
With this setup you can distribute apps to either one of the deployments, or both, depending on which tags are used when publishing the apps in the hub.