
In Qlik Sense Enterprise on Windows you can use security rules to grant users access to resources such as apps and streams. All security rules are inclusive by nature, that is, you always grant users access to a resource, you never create a rule to deny users access. The purpose of a security rule is usually to only allow some users access to a resource. Making sure that only the right users have access to a resource is a task for a security rules admin (SecurityAdmin).
Two simple security rules
As a light start, let's look at two of the security rules that are included in an installation of Qlik Sense Enterprise on Windows, StreamEveryone and StreamEveryoneAnonymous.
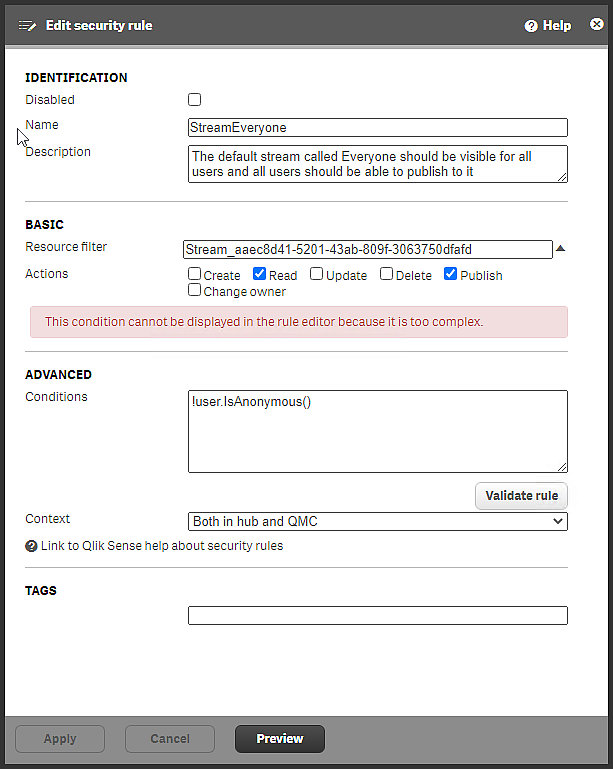
In the Identification section, you can see that the rule is active, because it is not disabled. The purpose of the rule is stated in the Description box.
In the Basic section, the resource filter pinpoints a specific stream. The first part of the filter identifies the resource type, Stream, the second part is a globally unique identifier (GUID). The resource filter indicates the scope of the rule. This is where you define what type of entity that the rule covers. The resource filter makes it possible to, for instance, have a different set of rules that affect which data connections a user is allowed to see compared to the rules defining which apps that users can see.
See: Defining resource filters
The actions that users can perform are Read and Publish. All users can access content in the stream, such as apps and app objects. Users can also publish apps and app objects to the stream.
In the Advanced section, the condition is !userIsAnonymous(). This rule excludes anonymous users and therefore the statement in Description is not true for exactly all users. See IsAnonymous for details about the IsAnonymous() function.
Context: The rule applies both to users accessing the Everyone stream from the hub and from the QMC.
Because anonymous users will not have access to the stream Everyone through the rule StreamEveryone, a separate rule is needed.
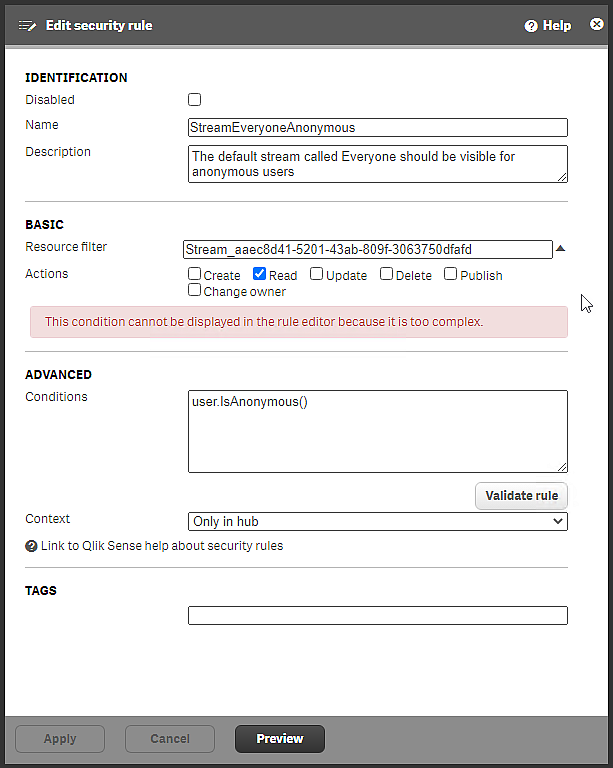
The rule is StreamEveryoneAnonymous is similar to the StreamEveryone rule, with three exceptions:
-
The only action that can be performed is Read, Publish is not possible.
-
The condition is userIsAnonymous(), which means that the rule only applies to anonymous users.
-
The context is Only in hub. Anonymous users don't have access to the QMC.
The need for two rules for the Everyone stream is due to the differences in actions and context. Had it not been for those differences, StreamEveryone would have been sufficient.
Creating a stream and a security rule with custom properties
Even if there are many rules installed with Qlik Sense Enterprise on Windows, you will have to create new security rules that meet the specific needs of your organization. When you create security rules, you can facilitate administration by either using custom properties or user roles. Here custom properties are introduced. For user roles, see Defining user roles for security rules.
With custom properties, you can easily add or remove user access without changing the security rule. In this example there are no custom properties defined yet.
Defining custom properties
Assume that two groups of users, Finance and Sales, need access to a stream called Quarterly Report, where quarterly reports apps are published. These groups are not yet defined in the user directory, and so, you need to define them. You do that by creating a custom property with the values Finance and Sales.
Creating the custom property
Create a custom property called Department, with the values Finance and Sales.
-
On the QMC start page, select Custom properties.
-
Click Create new.
The custom property edit page opens.
-
Enter the name Department.
-
For Resource types, select Streams and Users.
These are the resources that are needed for the security rule.
-
Under Values, click Create new.
-
Add value Finance and click Create new.
-
Add value Sales.
-
Click Apply.
A new custom property called Department is created with two values, Finance and Sales, which you assign to users of the respective groups.
Assigning the custom properties values to users
-
In the QMC, open Users.
-
Open the Column selector (
 ) and select @Department, which might be the last item in the list.
 -
Select the users that you want to add to the Finance group, multi-select is possible.
-
Select Edit.
-
In the Properties section, ensure that Custom properties is selected.
The Custom properties section is displayed and Department is an option.
-
Click the box for Department and select the value Finance.
-
Repeat the steps until all users in Finance have the value Finance.
-
Click Apply.
-
Perform the corresponding actions for members of the Sales group.
You now have two custom property groups, Finance and Sales, that can be used in several different security rules. Users can easily be added or removed. You can also add additional departments as values for the custom property.
Creating the stream and security rule
You now have your custom property values and can create the stream Quarterly Report and the security rule that grants the user groups access to the stream.
-
From the QMC start page, go to Streams and click Create new.
-
Name the stream Quarterly Report.
-
Click Apply.
The security rule editor appears. If you decide to cancel the creation of a security rule, the stream will not have any security rule and all users will have access to that stream. That is most likely not what you want.
-
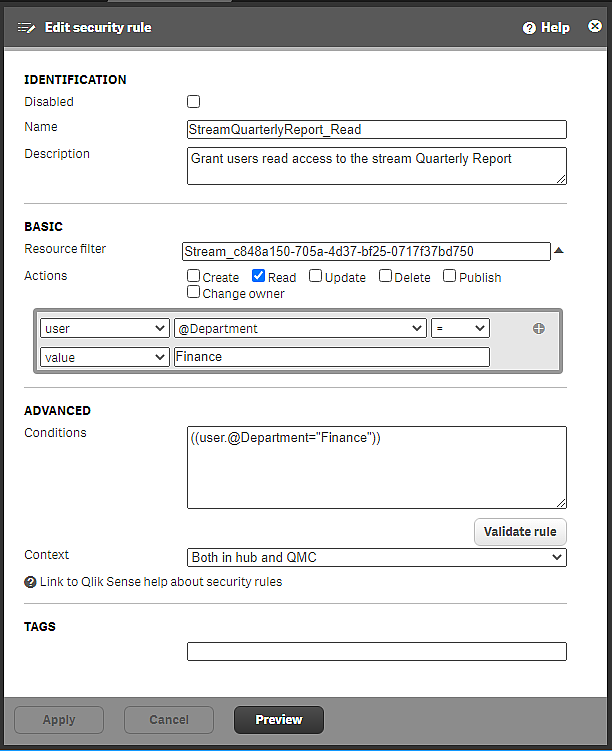
Name the security rule StreamQuarterlyReport_Read. (Section Identification needs to be selected.)
-
Optionally, add a description.
-
The Resource filter is already present with a unique stream ID.
-
For Actions, keep Read and clear the Publish selection.
-
In the rule editor, select user, @Department, =, value, Finance, as shown in the image.
 Security rule StreamQuarterlyReport_Read
 - Click Validate rule to check that the rule syntax is correct. The logic of the rule is not tested.
-
Click Apply to save the rule.
You might be wondering about what happened to the Sales group. There are different ways of adding that user group. You can make the change directly in the Conditions box, but the safest way is to use the rule editor.
- Under Associated items, select Security rules.
- Double-click StreamQuarterlyReport_Read.
-
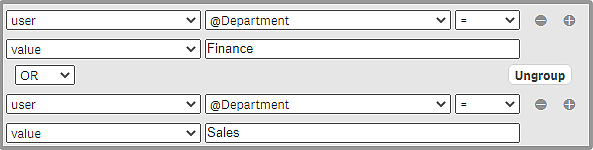
In the Basic section, click + in the rule editor.
-
Select the operator OR and then user, @Department, =, value, Sales, as shown in the image.
 Rule editor with updated conditions
The string in the Conditions box is updated to reflect the change in the rule editor and now looks as follows: ((user.@Department="Finance" or user.@Department="Sales")). If you instead had made the change directly in the Conditions box, the rule editor would have been updated accordingly.
-
Click Apply.
Another option for the Sales group could be to create a separate security rule with the actions Read, Publish, and Update that could be relevant to the Sales group.
Auditing the new rule
It is important to verify that the new security rule grants the right sort of access to the right users.
-
Still on the page Stream: associated items, click Audit rule to open the page for editing and auditing the your newly created rule.
-
Auditing of your stream is set up, you just need to click Audit.
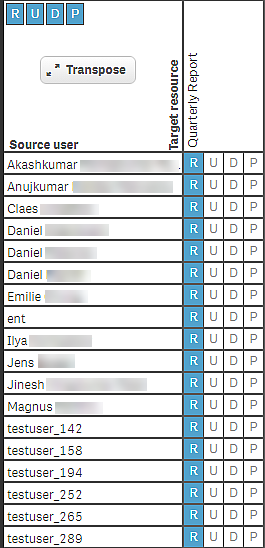
The new security rule is now tested against the user directory and should result in a list of people from Sales and Finance having R indicating that they have read rights to the stream.
Creating a stream and a security rule with a custom property for an existing group
Often a company has a user directory, such as Active Directory, which can be used in a custom property to grant all its users access to a stream.
Creating the custom property
Create a custom property called ADGroupStream_Read.
-
On the QMC start page, select Custom properties.
-
Click Create new.
The custom property edit page opens.
-
Enter the name ADGroupStream_Read.
-
For Resource types, select Streams and Users.
These are the resources that are needed for the security rule.
-
Click Apply.
In this case, no specific custom property values are required. All users belong to the same user directory, and therefore the custom property name can be used in the security rule. Being a member of that directory grants access to the stream.
For more information about directory services properties, see Properties
Creating the security rule
You now have the custom property and can create the security rule that grants users access to the stream Quarterly Report.
-
From the QMC start page, go to Security rules and click Create new.
-
Name the security rule ADGroupStreamQuarterlyReport_Read.
-
For Resource filter, enter Stream_*.
-
For Actions, select Read.
-
In the rule editor, Select #Stream, @ADGroupStream_Read, =, user, group, as shown in the image.
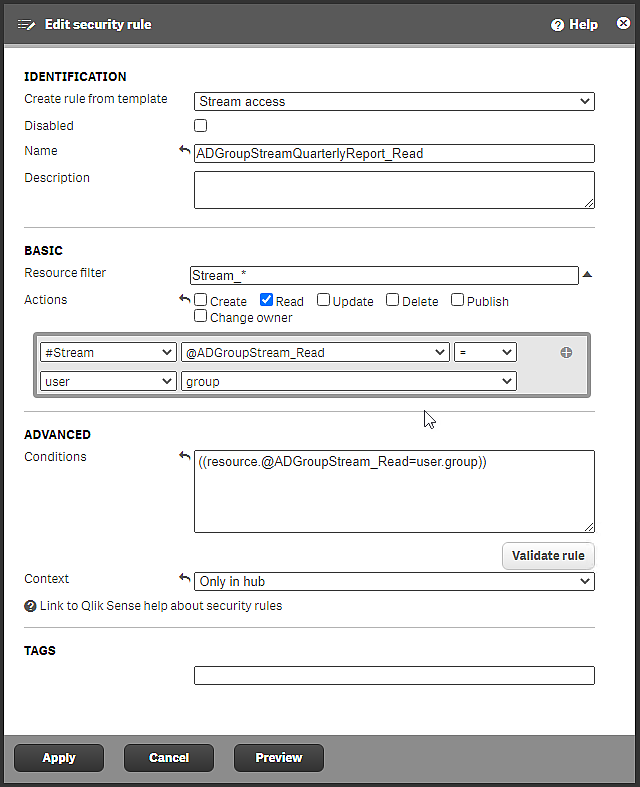 Security rule ADGroupStreamQuarterlyReport_Read
 -
For Context, select Only in hub.
This rule only applies to users who access the stream from the hub.
-
Click Apply to save the rule.
The new security rule is created and all users in the Active Directory group have read access to the stream Quarterly Report.
Defining user roles for security rules
User roles is a way to facilitate rule administration without using custom properties. You define roles and assign them to users. A role can be used in several security rules to grant access to all users with that role.
Creating a stream and security rules with user roles
Let's assume that you want to have two user roles, one for developers and one for testers. These roles have different access needs, so two security rules are required.
Defining security rules for testers and developers
Assume also that it is enough for testers to have read access to the stream.
-
From the QMC start page, go to Streams and click Create new.
-
Name the stream TestStream1.
-
Click Apply.
The Edit security rule page appears. If you decide to cancel the creation of a security rule, the stream will not have any security rule and all users will have access to that stream. That is most likely not what you want.
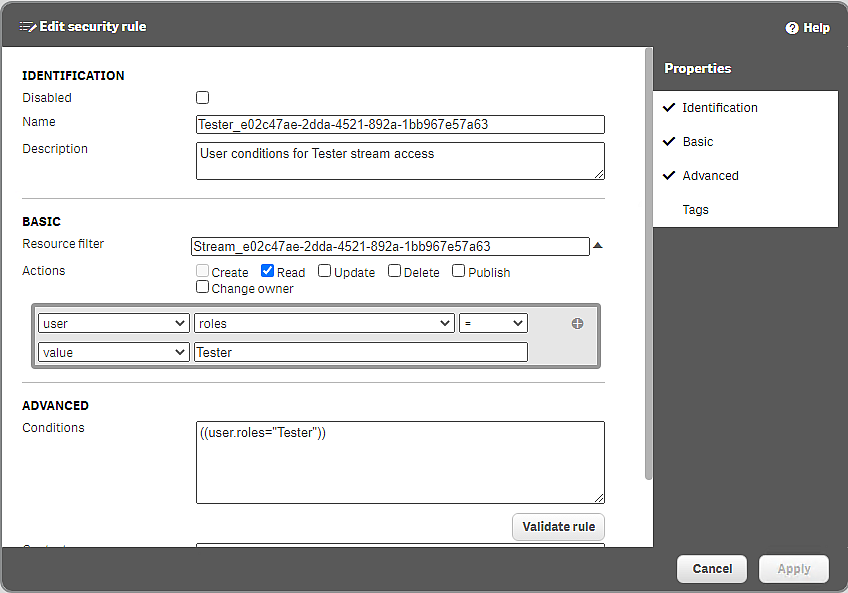 Security rule for Tester access to TestStream1
 - In Properties, select Identification.
-
For Name, enter Tester_<GUID of the stream>, (GUID from the Resource filter).
-
For Actions, keep Read and clear the Publish selection.
-
In the rule editor, select user, roles, =, value, and manually enter Tester, as shown in the image.
The access rights defined in the Resource filter, Conditions, and Actions fields are applied to the user role Tester. This role will now be available to apply to users.
-
Click Validate rule to check that the rule syntax is correct. The logic of the rule is not tested.
-
Click Apply to save the rule.
-
Under Associated items, click Security rules.
Information noteHere you find all the security rules that are associated with this specific stream. -
Click Create associated rule to create another rule for the same stream, this time for developers.
-
For Name, enter Developer_<GUID of the stream>, (GUID from the Resource filter).
-
For Actions, Read, Update, Delete, and Publish should all be selected.
-
In the rule editor, select user, roles, =, value, and manually enter Developer as shown in the image.
This role will now be available to apply to users.
 Security rule for Developer access to TestStream1
 -
Click Validate rule to check that the rule syntax is correct. The logic of the rule is not tested.
-
Click Apply to save the rule.
You now have two user roles, Tester and Developer, that can be used in several different security rules. Users can easily be added or removed. Additional user roles can be created in the same way.
Assigning the roles to users
-
In the QMC, open Users.
-
Select the users that you want to have the role Tester, multi-select is possible.
-
Click Edit.
-
Click Add role and select Tester from the list.
-
Click Apply.
-
Click Users to open the user overview.
Verify that the users have the role Tester in the Admin role column.
-
Perform the corresponding actions for users who should have the role Developer.
Auditing the new rules
It is important to verify that the new security rule grants the right sort of access to the right users.
-
Go to Streams and double-click TestStream1.
The Edit stream page appears.
-
Under Associated items, click Security rules.
The security rules associated with this stream are displayed.
-
Select Tester_<GUID> and click Audit rule.
(You could also select Developer_<GUID>, it's the same stream that is targeted.)
-
Click Audit.
The security rules for this stream are now tested against the user directory and should result in a list of people where testers only have R indicating read access, and developers with RUDP (Read, Update, Delete, and Publish).
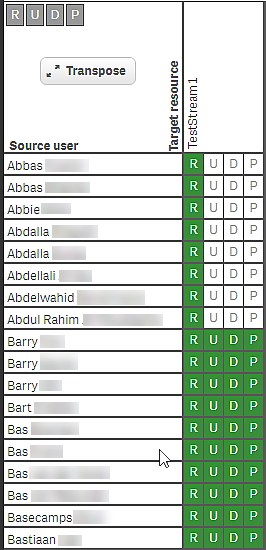 Audit result for users with the role Tester or Developer
Rules hierarchy
When designing security rules, it is important to understand the hierarchical relationships between different resource filters. Being unaware of such relationships might result in rules not working as intended. Access to items often involves more than one security rule. To be able to use an app, it is not sufficient to have read access to that app, you also need access to the stream where the app is published. Should you also want to edit an app object in the app, you would need an additional rule granting updating rights to that app object.
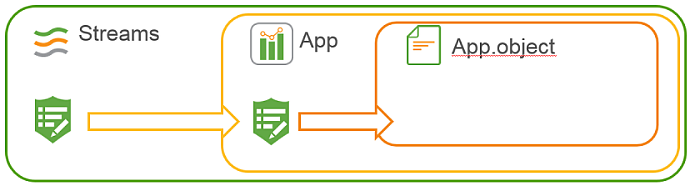
If you now consider what you have achieved so far, granting users access to the streams, it seems there are more security rules needed before users can open apps and see app object. However, that is not necessary and the reason is that such a rule already exists. As mentioned earlier, a number of security rules are installed with Qlik Sense Enterprise on Windows. Some of these rules are essential for the system to work and can therefore not be edited or deleted. Other rules are present for convenience, and in our case it is convenient that the security rule Stream exists. This is what the rule looks like.
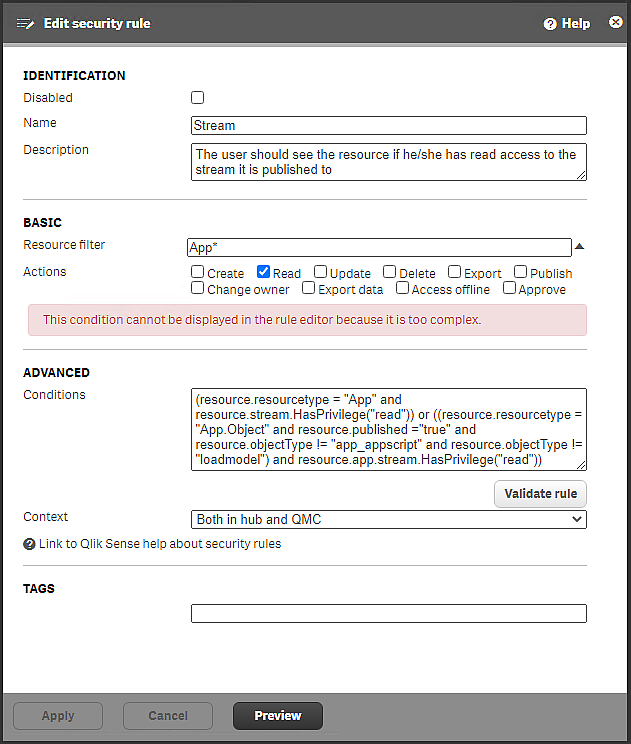
The rule description states the following: "The user should see the resource if he/she has read access to the stream it is published to". If you have read access to a stream you will, through this rule, also be able to see content that has been added to that stream. Because this rules exists, you needn't create the any rules that grant users read access to the apps and app objects, it's all been taken care of.
Note that the value for Resource filter is App*. The App* value covers both apps and app objects. The default value for app access when you create a rule from template is App_* and then only apps are covered, not app objects.
The conditions for the rule might look a little intimidating, but let's look at one part at a time:
First part: resource.resourcetype = "App" and resource.stream.HasPrivilege("read").
This condition requires that you have read access to the stream where the app is published. If you do, you will have read access to apps (as stated in the Actions section).
Second part: or ((resource.resourcetype = "App.Object" and resource.published ="true" and resource.objectType != "app_appscript" and resource.objectType != "loadmodel") and resource.app.stream.HasPrivilege("read"))
This part of the condition also relies on you having read rights to the stream where the app object is published. If you do, you will have read access to app objects (except app_appscript and loadmodel), given that the app object is published.
To have a general security rule such as Stream is a convenient solution to simplify granting access to content in streams. But if you want to limit access to an app or an app object you have to create a new rule with certain conditions and disable the already existing rule that grants access. Remember, it is enough that there is one security rule granting users access to a resource for them to have access. They will then have access to the resource even if there exists another rule by which they aren't granted access.
Creating a new rule based on an existing rule
Qlik Sense Enterprise on Windows comes with a number of security rules included by default. The rules are of two types: Default and Read only. Read only rules are required for the system to function and can therefore not be edited or deleted. Default rules can be edited, and when you do, the rule type is changed to a third type, Custom. If you want to edit an existing Default rule, it is strongly recommended that you make a copy and edit the copy. You might need the original later on.
Security rules included in Qlik Sense
Performance
It's important to think about performance when designing security rules. As the number of apps, streams, and security rules increases, performance can become an issue with slow start-up of the hub and long response times. To be able to design security rules that benefit performance, it's necessary to understand the rule evaluation process.
For an overview of the evaluation steps, see The evaluation flow.
For best practices in the QMC and guidelines for writing efficient security rules, see QMC performance – best practices.
For a deep-dive into the details around performance, see Optimizing Qlik Sense Enterprise with Rules.