
OpenID Connect (OIDC) is an authentication layer on top of OAuth 2.0, an authorization framework. OIDC enables single sign-on (SSO) to reduce the number of times a user has to log on to access websites and applications. OIDC can be configured for authentication with third-party products.
Configuring Auth0
Do the following:
-
Log in to https://auth0.com/ and create an account with your email address.
-
In the left menu in Auth0, open Applications.
- Click Create application.
-
Name the application, select Single Page Web Applications and click Create.
-
Optionally, select your web app technology.
- Select Settings.
-
In the box Allowed Callback URLs, add the URL to your host in the format https://<QSEhostname>/<VirtualProxyPrefix>/oidcauthn.
Information noteUse auth0 as the virtual proxy prefix. -
Scroll down and click Save changes.
-
Note down the Client ID and Client Secret values.
-
Scroll to the bottom and select Advanced Settings.
-
Select Endpoints.
-
Note down the OpenID configuration URL.
Creating and configuring the virtual proxy
Do the following:
-
In the Qlik Management Console (QMC), open Virtual proxies.
-
Click
 Create new.
 -
In Properties, to the right, ensure that the sections Identification, Authentication, Load balancing, and Advanced are selected.
-
Under Identification, enter auth0 for Description and Prefix.
-
For Session cookie header name, add -auth0 at the end of the existing name so that it reads X-Qlik-Session-auth0.
-
For Authentication method, select OIDC.
-
Enter the noted “OpenID Configuration” URL in the OpenID Connect metadata URI field. It will be in the following format: https://<Auth0hostname>/.well-known/openid-configuration.
-
Enter the noted Client ID and Client secret in the corresponding fields.
-
For Realm, enter auth0. Users added in the repository through OIDC authentication will have user directory name set to “auth0”.
Information noteIf the subject attribute value format is domainname\username, realm is optional. If not, realm is mandatory.
The attributes sub, name, and email are mandatory. Other attributes are not mandatory, but must have a value. A configuration with empty attributes will generate an error. -
In the client_id field, change the value to aud.
-
In the scope field, enter openid profile email.
Information noteThe openid part is mandatory. Other scopes can be added, but must match what is set on the identity provider side. -
Under Load balancing nodes, click Add new server node.
-
Select the engine nodes this virtual proxy will load balance connections to.
-
Under Advanced, in the Host allow list section, click Add new value.
-
Add the host name of the Auth0 tenant, that is, the same host name that you entered for OpenID Connect metadata URI.
-
Click Apply and then OK to restart the services.
-
In the Associated items menu to the right, select Proxies.
-
Click Link and link the virtual proxy to the proxy or proxies that will use this configuration.
The proxy service is restarted.
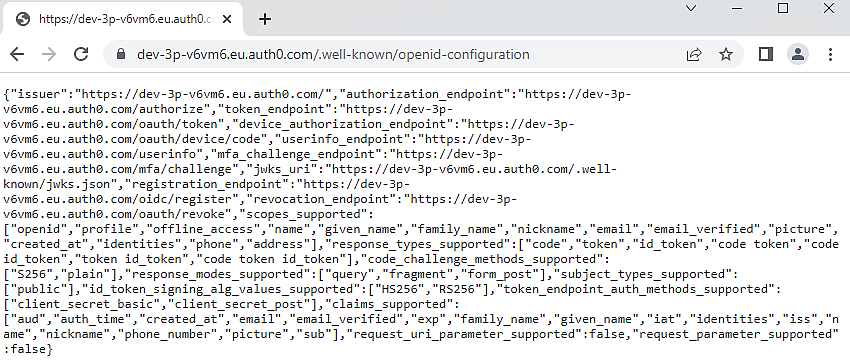
Verify that the claims and scopes that you have configured in the IdP server are returned in claims_supported and scopes_supported tags when you select the OpenID Connect Metadata URI, https://{IdP_hostname}/.well-known/openid-configuration.
This completes the Auth0 configuration.