
Using the Transform tab
In the Transform tab, you can define transformations using Replicate's built-in functionality.
Customers that requires functionality not provided by Replicate's built-in transformations can write their own transformations, and then access them from the Replicate Expression Builder. For an explanation of how to create user-defined transformations (requires basic programming skills), see User-defined transformations.
The Transform tab in the Table Settings window consists of the following elements:
-
Input: This lists the columns on which you can perform transformations.
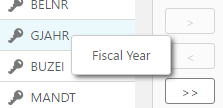
Information noteWhen creating a transformation for the SAP Application source endpoint, you can hover your mouse cursor over an Input column to see a tooltip with the table’s actual name:
-
Output: This table shows the defined output for the columns in the table where you are performing the transformation(s). See Transformation Options below for information on how to change the default output.
Limitations and considerations
- Dropping a column, saving your changes, and then adding a column with the same name and defining an expression corresponding to the dropped column's data, is not supported. If you mistakenly drop a column, simply add the column back again without an expression.
- If you stop a task and define a metadata transformation for one of the tables (such as dropping a column), make sure the DROP and CREATE table option is selected (the default) in the Task Settings' Full Load Settings tab before resuming the task.
- In homogeneous replication tasks (such as Oracle to Oracle), modifying a single table column (by changing the column data type or length for example), will break the homogeneity for the entire table.
Transformation options
The following table describes the transformation options available in the Transform tab.
| To | Do This |
|---|---|
|
Rename a column |
Select the Name column for the table column you want to change. Type in a new name. The top right corner turns blue when the name is changed. To view the original name, hover the mouse pointer over the field and the original name is displayed. |
|
Set a column as a primary key/unique key or disable a column's primary key/unique key |
|
|
Change the data type for a column |
Select the Type column for the table column you want to change and select a new data type from the drop-down list. Make sure that the data type you select is compatible with the data in that column. For a description of Qlik Replicate data types, see Replicate data types. For information about data-type mapping from the native endpoint to Qlik Replicate data types, see the chapter for the endpoint you are using. For a list of supported databases, see Supported Platforms and Endpoints. |
|
Change the data subtype for a column |
This option is available for the CLOB, NCLOB, STRING, and WSTRING data types only. Select the Subtype column for the table column whose data type you want to change, and then select either JSON or XML from the drop-down list. Make sure that the data in the column is compatible with the selected subtype. The default is Regular, which means that data type in the Type column will be used with no subtype. For a description of Qlik Replicate data types, see Replicate data types. For information about data-type mapping from the native endpoint to Qlik Replicate data types, see the chapter for the endpoint you are using. For a list of supported databases, see Supported Platforms and Endpoints. |
|
Click Add Column to add a new column. When you add a column, the Name is blank and the Type is listed as string(50). Type a name for the new column in the Name column. If needed (according to the column data), click in the Type column and select a data type from the list. |
|
|
Add an existing column |
From the Input pane, select one or more columns and click the right facing arrow button. To add all of the columns, click the right-facing double arrow. Information note
|
|
Delete a column |
From the Output list, select the row with the column you want to delete and click the left-facing arrow button. To remove all columns, click the left-facing double arrow. Note that all the columns except for columns defined as a primary key/unique index are deleted. |
|
A key icon indicates which target columns segments of the Unique Index. To add a Unique Index segment, click in the Key column to the left of target column to which you want to add the segment. A key icon will appear. To remove a Unique Index segment, click the key icon to the left of the target column from which you want to remove the segment. The key icon will disappear. |
|
|
Recalculate the data for a column in the target endpoint |
Click in the Expression column in the row with the table column you want to change the data for. Enter an expression using SQLite syntax. See Creating an expression for transformations and Using SQLite syntax with transformations for information on creating expressions. Once you add a calculated expression, you can test the expression. See Using the Expression Builder. |
|
Change the data type for a specific input column Information note
Supported with the IBM DB2 for iSeries and IBM DB2 for z/OS source endpoints only. |
This is required if a source column is defined as character type but the data stored in that column is binary or vice versa. Information note
When the source column type is STRING, WSTRING, CLOB, or NCLOB, you must also select a Character Set, otherwise an error will be shown and the OK button will be disabled. In the Input table, click the relevant cell in the Type column and then select either STRING or BYTES from the drop-down list as required. Information note
If you change a column's Type in the Input table, you also need to set the same Type for the corresponding column in the Output table. Note that if you select STRING, you can also change the character set, as explained below. Information note
Modified cells will display a triangle in the top right corner. To see the original value, click the triangle. |
|
Change the Character Set for a specific input column Information note
Supported with the IBM DB2 for iSeries and IBM DB2 for z/OS source endpoints only. |
This is required if a source character column is wrongly encoded. For example, if a source character column is described as encoded in CCSID X, but the data stored in that column is actually encoded in CCSID Y. You can also set a custom character set as described in Setting a custom character set below. In the Input table:
|
For a description of the various list actions that you can perform, see List actions.
Setting a custom character set
The following procedure is supported with the IBM DB2 for iSeries and IBM DB2 for z/OS source endpoints only.
Perform the steps below if the source table is defined with an incorrect CCSID and the correct definition is actually in a UCM file.
-
Create a mapping data file with the file extension .ucm.
Information noteIf you edit an existing UCM file, you must also change the values of the <code_set_name> and <icu:alias> properties. If the file does not contain an <icu:alias> property, then you only need to change the value of the <code_set_name> property.
-
Create a CNV file for the UCM file by running the following command:
<product_dir>\bin\makeconv.exe -v <file_name>.ucmExample:
"c:\Program Files\Attunity\Replicate\bin\makeconv.exe" -v 1047_EX.ucmThis will create a CNV file with the same name as the UCM file (for example, 1047_EX.cnv).
-
Create a new subfolder named icudt<XX>l under <product_dir>\bin where the XX is the same as the number in the icudt<XX>.dll file name.
For example, If the DLL file name is icudt69.dll, create a new subfolder named icudt69l.
-
Copy the CNV file to the subfolder you just created (<product_dir>\bin\icudt69l in the example above).
Information noteWhen using the Replicate File Channel, the file should be copied to the same location on both Replicate servers.
- Restart the Qlik Replicate UI Server service.
-
Select the custom character set from the Character Set drop-down list; it will appear as the CNV file name followed by the word "Custom" e.g. 1047_EX.cnv (Custom).
Using a column's before-image data in a transformation
You can use a column's before-image data in a transformation. This is useful if you need to store the before-image data on the target.
To do this, simply specify the source column name in Output table's Expression column, in the following format:
$BI__MyColumn
Where $BI__ is a mandatory prefix (that instructs Replicate to capture the before-image data) and MyColumn is the source column name.
Although you can store the before-image data in an existing target column, it is recommended to create a new target column (using the Add Column button) in which to store the before-image data.