
When you choose digital certificates as your Service Authentication method, the certificates create trust between the services running on QlikView server machines. The certificates are installed when you create a new instance of QlikView.
On a stand alone deployment, all services run on the same machine. If you install QlikView nodes in a multi-server environment, you should only install the services you want to enable on each server. If you perform a complete install each time you install a node, then you will create multiple instances of the QlikView Management Service (QMS). If you have more than one QMS service running this will cause a mismatch in your certificates, as the QMS is responsible for distributing certificates to the other nodes in the deployment. When you run the installer, always select custom install and only install the services that you need to enable.
Configuring security
To make your QlikView deployment as secure as possible, ensure that you configure secure socket layer (SSL) security on all your QlikView servers.
Enabling SSL on QlikView servers
To enable certificate service authentication between servers using SSL for Directory Service Connector (DSC), QlikView Web Server (QVWS), QlikView Management Service (QMS), QlikView Distribution Service (QDS), and QlikView Server (QVS):
- Stop the QlikView Management Service, which runs the QlikView Management Console.
- Run Notepad as an administrator.
- Open the QMS configuration file in Notepad.
- Change the key UseWinAuthentication value from true to false.
- Save your changes.
- Start the QMS service.
Backing up and restoring certificates
To verify that certificates are correctly set on the server that executes the QMS service run the Microsoft Management Console (MMC) from the Start menu.
Using Microsoft Management Console
Now repeat the steps above for the DSC, QDS, QVWS and IIS services in your system.
To configure certificate trust with IIS and QlikView Server use port 4750 (the same port as QVWS). The certificate trust used to enable HTTPS access for users of the web server is also used.
Enabling SSL for QlikView Server (QVS)
Complete the following additional step to configure SSL on the QlikView server service (QVS).
To edit the QVS service Settings.ini file:
- Stop the QVS service.
- Run Notepad as an administrator.
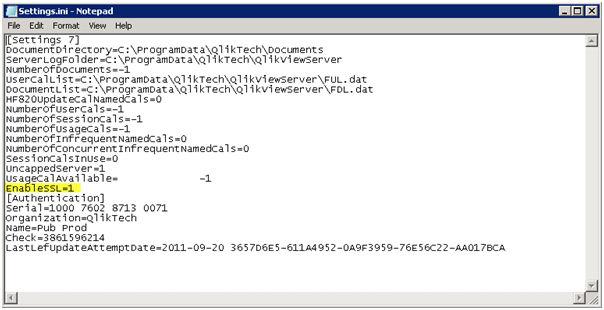
- In Notepad, open the Settings.ini file.
- Add EnableSSL=1 in the [Settings 7] section.
- Save your changes.
- Start the QVS service.
Backing up and restoring certificates
Enable SSL for the QlikView Service Dispatcher (License service)
You need to enable secure socket layer (SSL) security for the license service. The License service is managed via the Service Dispatcher.
-
Stop the Service Dispatcher.
-
Run Notepad as an administrator.
-
In Notepad, open the Services.conf file (C:\Program Files\QIikView\ServiceDispatcher\services.conf)
-
Under the [licenses.parameters] section, change
-qv-auth-mode=ntlmto
-qv-auth-mode=cert -
Save your changes.
-
Start the Service Dispatcher.
Adding QlikView services
To add QlikView services:
- Open the QlikView Management Console.
-
Click the System tab, and then click Setup to see all the QlikView services.
- To add a new service, click on the Add icon, to the right in the QlikView Servers pane.
- Enter the Service URL in the text box, and click Apply. The new entry will be available in the tree view in the left pane. Add each service as a new service and then delete the existing service.
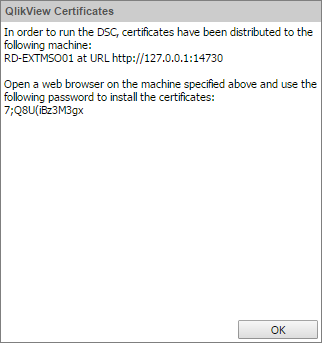
- When you add a service, the QlikView Certificates window is displayed.
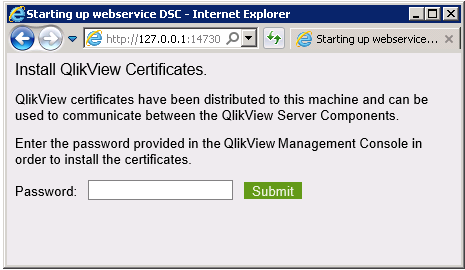
- On the server where you are adding the new service, open a web browser and enter the URL and port provided by the QlikView Management Console QlikView Certificates window (14720, 14730 or 14750).
- Enter the password provided by the QlikView Management Console QlikView Certificates window.
- If successful, a message is displayed that confirms the password is correct and that the QlikView service can gain access via that port.
At this point, you can check to see if the certificates are properly installed on the servers that execute the additional QlikView services by running the MMC from the Start menu.
Using Microsoft Management Console
Updating certificates
You need to generate a new set of certificates when your certificates have expired, are about to expire, or if you want to generate new encryption keys for your sensitive data. Remember to make a copy of your old certificates.
Certificates expire after 10 years, but you can update them at any time. The expiration date of the certificates is displayed in the QMC. When 30 days or less remain before the expiration date, the QlikView Management Console displays a warning.
Besides expiration of certificates, there may be other reasons to update, for example replacing a computer or changing a computer name, since one of the certificates is linked to the computer name.
To update certificates, follow these steps on each machine in the cluster:
- Shut down all QlikView services (in any order).
- If the machine currently has valid certificates that should be replaced, enable the configuration flag InstallingNewCertificatesAndCryptoKey for all QlikView services except the Qlik License Service.
- Start up all QlikView services (in any order).
- Click the System tab, and then click Setup.
- Select a service, and then click the General tab for the service.
- Click the Apply button in the bottom right of the window, and then follow the instructions to install the certificate.
- Repeat the above procedure for each service (in any order) that requires updated certificates.
- Shut down all QlikView services (in any order).
- If you enabled the configuration flag InstallingNewCertificatesAndCryptoKey in a previous step, now disable it for all services.
- Start up all services. Start the QlikView Management Service (QMS) first.
At start-up, having new certificates (containing a new encryption key), the services will re-encrypt all their sensitive data with the new encryption key.
Setting InstallingNewCertificatesAndCryptoKey flag
If you enable this flag, by setting it to true, any existing certificates installed on the server machine are ignored (except for extracting the CryptoAlgorithm). The flag is used by the DSC, QDS, and QVWS, but not by the QMS, and is disabled (set to false) by default.
Enable this flag when updating certificates, so you can receive new certificates. After the certificates have been updated, set the flag to false for all services.
To enable the flag, add the following line:
to the following configuration files:
- C:\Program Files\QlikView\Distribution Service\QVDistributionService.exe.config
- C:\Program Files\QlikView\Directory Service Connector\QVDirectoryServiceConnector.exe.config
- C:\Program Files\QlikView\Server\Web Server\QVWebServer.exe.config
Service failure due to undecryptable data
At start-up, each service validates all its encrypted data entries to ensure they are accessible. If the service encounters data that cannot be decrypted, it reports an error and stops execution.
There are two reasons why a service cannot decrypt data:
- The certificate is missing - The certificate containing the required encryption key is missing. To solve this problem, re-install the certificate from a backup, then re-start the service.
- The encrypted data is undecryptable - To solve this problem, erase the undecryptable data.
How to erase corrupted data
To erase undecryptable data by temporarily enabling the hidden configuration EraseUndecryptableData flag:
- Stop the service.
- Run Notepad as an administrator.
- Open the configuration file in Notepad.
- Add the EraseUndecryptableData entry and set it to true.
- Save the file.
- Restart the service.
- Stop the service, open the configuration file and remove the EraseUndecryptableData entry.
- Save the file and restart the service.
Backing up and restoring certificates
When the service starts, only the undecryptable part of the data is erased.
The service starts normally.
In the QMC, re-enter the erased data. All the undecryptable data entries have already been listed in the service log file, and this indicates what you need to re-enter in the QMC.