
Installing On-Demand Add-on on a Microsoft IIS hosted QlikView AccessPoint
You must install the Qlik NPrinting On-Demand Add-on on your QlikView Web Service to create On-Demand reports from the QlikView AccessPoint interface.
If your QlikView Servers are in a cluster, or you performed a custom installation of QlikView Server components, you must install On-Demand on each QlikView Web Service in the cluster.
Requirements
- QlikView Server May 2021 or later.
- QlikView Server is installed and configured to use Microsoft IIS with ASP.NET 4.5 (or higher) as web server.
- Qlik NPrinting is configured to use JWT authentication. See: JWT authentication.
The certificate with private key used to configure JWT authentication must be installed on the Microsoft IIS local machine personal certificate store. Certificates generated using CNG compatible algorithms are not compatible with the On-Demand Add-on.
-
Microsoft Internet Explorer is not supported by Qlik NPrinting. However, if Microsoft Internet Explorer Enhanced Security Configuration is turned on, it may cause errors. For more information, see Microsoft Internet Explorer Enhanced Security Configuration is blocking QV.exe (QlikView) and reporting_web_renderer.exe (Qlik Sense)
JWT settings
JWT must be configured as specified:
| Attribute | Configuration |
|---|---|
| JWT attribute mapping | Match user by Domain\Name |
| JWT attribute for user ID | uid |
| JWT attribute for user directory | dom |
Downloading the installation file
Download Qlik NPrinting On-Demand Add-on.exe from the Qlik Download Site and save it to a folder on the IIS server.
Installing On-Demand
Do the following:
- Double-click Qlik NPrinting On-Demand Add-on.exe to launch the installation.
- If the QlikView Server requirements are not met, you will see an error message. Check the logs for more information.
- Click Install to proceed.
- If the User Account Control window appears, click Yes.
- Click Next when the welcome message appears.
- Accept the terms and conditions.
- Click Next to proceed.
-
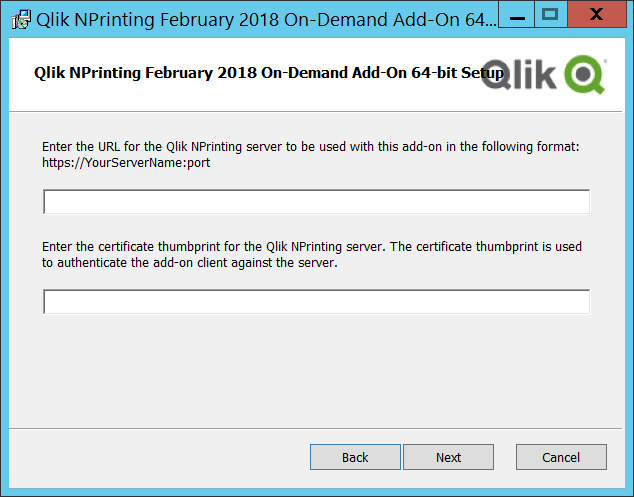
Enter your Qlik NPrinting Server URL in the following format: https://YourServerName:PortNumber.
Information noteMake sure there is no slash (the character “/”) following the port number. The default port number is 4993.Information noteIf your Qlik NPrinting Server and Qlik NPrinting Engine are installed on different computers, use the Qlik NPrinting Server URL. - Enter the certificate thumbprint used to configure JWT authentication on the Qlik NPrinting Server. To find the certificate thumbprint:
- Navigate to the location where the certificate is installed.
- Double-click on the certificate and go to the details page.
- Copy the value from the certificate thumbprint, and paste it into the field in the Qlik NPrinting On-Demand Add-on setup.
- Click Next.
- Click Install.
- Click Finish to close the setup window.
Configuring On-Demand settings on Qlik NPrinting Server
You must configure these settings on your Qlik NPrinting Server:
-
You must have a connection to a QlikView Server or a Qlik Sense server.
QlikView Server and QlikView Cluster connections are supported with On-Demand. Local connections are not supported. See: Creating connections.
- If you are connecting to a QlikView Server or Cluster with a QlikView Server Extranet License, the following options must be enabled when configuring the connection:
- Connection requires authentication
- Apply user section access for reports
- You must enable your Qlik NPrinting reports for On-Demand.
- You can limit On-Demand report creation through security roles. See: Role based security.
On-Demand is compatible with Chrome, Firefox, and Explorer. It will not run in Microsoft Edge, because the certificates will not download.
Enabling Qlik NPrinting reports for On-Demand creation
Qlik NPrinting reports must be manually enabled for On-Demand creation. Reports must be assigned to the QlikView document or Qlik Sense app with which you want to generate On-Demand reports. On-Demand creation can be enabled during the creation of a new report.
Do the following:
- In Qlik NPrinting web console, click Reports.
- Open a report or create a new report.
-
Select an app from the App drop-down list is connected to the QlikView document or Qlik Sense app for which you want to generate a report.
Information noteOn-Demand requests only work with reports based on a single connection. MultiDoc reports are not supported. - Select the Enable On-Demand check box.
- Click Save.
The report template is now available.