
Distributing reports by email
Emails can be customized so that your reporting is personalized, consistent, and easy to maintain. Recipients can access reports directly from their inbox, without having to log into the NewsStand.
You can distribute all report types as email attachments. HTML reports and QlikEntity reports can be embedded directly into the body of emails. This means users can quickly scan your report without having to download and open an attachment. You can also embed a summary of your data in the email body, and include the full report as an attachment.
Limitations
- You must configure your SMTP mail server in order to send emails from Qlik NPrinting. See: Configuring SMTP server.
- By default, the To, CC, and BCC fields can only contain 100 email addresses. You can change this limitation by editing the webengine.config file. See: Configuring the email address limits.
-
If you want to configure a custom sender address, your SMTP server settings must allow users to send emails using addresses other than their assigned ones.
- Users that are exclusively members of the Developer role cannot receive emails.
-
By default, Qlik NPrinting will attach all reports to email messages, including those with Attach to email disabled. To force Qlik NPrinting to only attach reports with the Attach to email check box selected, you must select Choose attachments in the Attachments drop-down list of the Email tab.
Information noteSome SMTP providers impose size limits on email attachments. The maximum allowed size varies among providers. If the size of an attached file exceeds the limit, the email is not delivered. A warning is added in the logs.Information noteDue to Windows file systems limitations, you cannot attach files with file names longer than 255 characters to Qlik NPrinting emails. If you attach a file with a name that is too long, recipients will see a message listing which reports failed to be generated. The following error message is added to the Qlik NPrinting logs: "Path with value name is exceeding windows limitations, the fully qualified file name must be less than 260 characters."
About dynamic text and variables in emails
Variables
You can add variables to the following fields:
- To
- CC
- BCC
- Subject
- Body
You can insert variables created in Qlik Sense or QlikView. The Qlik NPrinting app that contains the publish task must also contain connections to the Qlik Sense app or QlikView document that contains the variable. If you create a new variable, you will have to reload your connection metadata.
Variable strings are automatically replaced with the values of corresponding variables when emails are generated. This replacement happens after the filters associated with users and tasks have been applied.
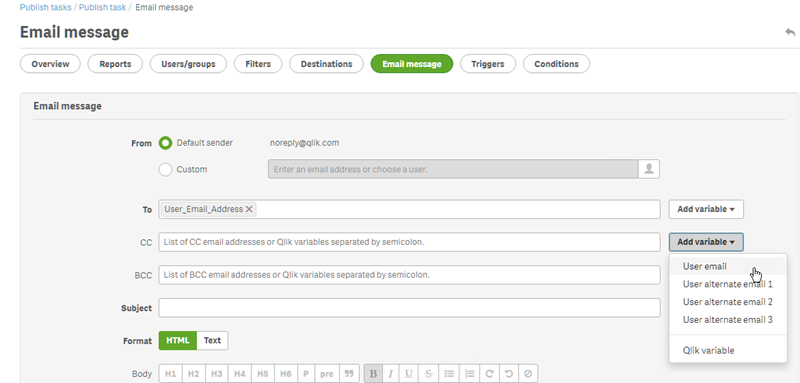
In Recipient fields
You can click the Add variable button next to the To, CC, and BCC fields. You can choose the following from the drop down:
- User email: Taken from user profiles.
- Alternate email 1: Taken from user profiles.
- Alternate email 2: Taken from user profiles.
- Alternate email 3: Taken from user profiles.
- Qlik variable: This will display variables created in Qlik Sense or QlikView. See: Variables
For information on creating or editing user profiles, see: Creating users.
In Subject and Body fields
When you add a variable to an email, you can use the search box to find a variable from the list. You can also apply a user or task filter to the variable.
For example:
You have a QlikView variable called vTotalSales with a value of =money(sum(Sales),'$ #,##0.00'). You add the variable %%Variable_User_SalesDemo_vTotalSales%% to an email message. When you send the email to your recipients, recipient filters will be applied before the value of the variable is calculated. If your recipients have filters based on their sales territories, then the expression =money(sum(Sales),'$ #,##0.00') will show sales in the appropriate territory for each sales person.
When a variable value is extracted from QlikView or Qlik Sense, the following settings are used depending on the selection made by the user:
| Variable filter settings | Applied filters | Applied identity |
|---|---|---|
| No filter | Empty filter sequence | Connection default identity. |
| Task filter | Task filters | Connection default identity. |
| User filter | Task filters and user filters |
If "use section access for reports" is selected: user domain account. Otherwise: connection default identity. |
You cannot add report filters, because multiple reports can be added to the same task.
Dynamic text
You can add dynamic text related to user profiles or report names to the email subject or body.
For example, if you add the User tag "User company", you will see this string: %%User_Company%%. It is replaced with the name of the recipient's company when the email is generated.
Report name tags are based on your report name settings. For example, you have a "Sales Demo" report that uses dynamic naming that includes report name, date, and user name. The dynamic name will look like this: %%Report_Name%%YYYY-MM-DD%%User_Name%%. You will see this string when you embed the report name in the email body: %%ReportName_SalesDemo_f7a6494a-d5d6-4d3f-a363-e5605fdb9d10%%. But your recipient Jane Doe will see "SalesDemo_20190524_JaneDoe" in the email. See: Dynamic report names.
Creating an email message
You can customize emails that are sent to users and groups. You can include dynamic text using tags and variables.
Do the following:
- From the top menu, select Tasks, and then select Publish tasks.
- Choose an existing publish task, or create a new one.
- Click Reports in the main task menu.
- Click Add report on the right.
- Select a report from the Choose reports drop-down list.
The Friendly name is the file name recipients see. It can be customized.
- Select an Output format. The drop-down list only displays formats that are compatible with the type of report selected.
- Use Quality to set the image resolution.
Leave the Attach to email check box selected.
Leave the Enabled check box selected.
If you clear the check box, the report will be added, but will be ignored by the scheduler.
- Click Add report to confirm.
- Click Email message in the main task menu.
- Under From, select one of the following:
- Default sender: Administrators can set the Default sender under Admin > Settings > Email.
- User: Select a sender email from the drop-down list. You can also use the search form to filter the list.
Custom: Enter a valid email address.
- Under To, CC, and BCC you can input email addresses manually, separated by a semicolon. Or you can click Add variable to add a dynamic email list or variable.
- Enter a Subject.
Select the email Format by clicking on HTML, which supports formatted text, or Text.
You must select HTMLif you want to add dynamic text, or variables, or if you want to embed HTML reports and QlikEntity reports.
- Under Body, you will see formatting tools, and the following options:
- Toggle HTML/Rich Text: switch between HTML and rich text editor.
- Insert image: insert an image into the email text. You can only insert an image as URL address.
- Insert/edit link: insert a URL address.
- Words and Characters count
- You can add dynamic tags and variables:
- Users: insert a dynamic User tag from a list.
- Reports: insert a dynamic Report name tag. Select one of the available tags under Embed report names.
- Variables: insert a variable from a Qlik Sense or QlikView connection that exists in your Qlik NPrinting app.
- Under Attachments, you can select:
- All reports attached
- No reports attached
- Selected attachments
Click the paperclip on the left to select which attachments to include. Click Close when finished. You will see the included attachments listed below.
Tip noteYou can insert dynamic tags and variables in the email subject. Once you select the desired tag or variable, copy it from the email body to the subject field. Make sure to include the %% deliminators. - Under From, select one of the following:
- Click Save.
You will now be in the Overview menu, where you can click the Run now button to publish your report.
Embedding HTML and QlikEntity reports in emails
You can embed HTML reports and QlikEntity reports directly in emails. The same report can be embedded several times. For example, you may want to embed a report in .jpg and .png, at different DPI levels.
Cycled reports can be embedded in emails. However, cycling can create a large number of reports, and embedding them may make email size too large for some email clients. See: Cycling your reports.
The procedure for creating emails with embedded objects is similar to the one above, with some exceptions.
Do the following:
- Select Tasks, and then select Publish tasks.
- Choose an existing publish task, or create a new one.
- Click Reports in the main task menu.
- Click Add report on the right.
- Select a report from the Choose reports drop-down list. You must select an HTML or QlikEntity report.
- The Friendly name is the file name recipients see. It can be customized.
- Select an Output format.
- For HTML reports: select HTML or HTM.
- For QlikEntity reports: select JPEG or PNG.
- Use Quality to set the image resolution.
- Leave the Attach to email check box selected if you also want to send this report as an email attachment. You may want to disable this if you are embedding a large report directly into the email body.
- Leave the Enabled check box selected.
- Click Add report to confirm.
- Click Email message in the main task menu.
- Fill out the fields the same as above. Make sure to select HTML under Format.
- Click on the body of your email where you would like to embed your report. Click the Reports button.
- Under Embed reports, click on the report that you want. This screen will only show compatible reports.
You will see a string of code in your email. This will either display as an image or HTML/HTM when the email is sent. You cannot format this string with the email formatting tools. For example, you cannot use the Center button to center a QlikEntity .jpeg.
- To embed the report name, click the Reports button again, and then click on Embed report name.
You will see a string of code in your email. This will be replaced by the report name.
- Under Attachments, your options are the same as above.
- Click Save.
You will now be on the Overview menu, where you can click the Run now button to publish your report.
Sending emails if reports fail
By default, if report generation fails, recipients still receive scheduled emails. Instead of the report, users see an error message and instructions to contact an administrator. Administrators can disable this behavior so that emails are not sent when reports fail. Report failure appears as an error in the log files.
If you disable this behavior, emails are still sent if at least one report was created successfully.
For example:
You have 3 users in a single task. The task has 2 reports for each user, which are sent via e-mail.
- User A: report generation successful.
- User B: one report fails to generate.
- User C: all reports fail to generate.
In this case:
- User A receives the email with the two attachments.
- User B receives the email with a single attachment. There will be no mention of the report that failed.
- User C will not receive any email.
Do the following:
- In the main menu, go to Admin > Settings.
- Click the Task button.
- Under Email distribution errors, go to When a publish task cannot generate one or more reports. Choose from the following options:
Recipients will receive successful reports, with a message listing reports that failed
Recipients will receive successful reports, with no error message
Information noteIf all reports fail, recipients will not receive an email.
- Click Update.
Configuring the email address limits
By default, you can only insert 100 email addresses in the To, CC, and BCC fields. You can change this by editing a config file.
Do the following:
-
Open the webengine.config file.
By default it is stored under: %Program Files%\NPrintingServer\NPrinting\WebEngine\webengine.config.
-
Find this section:
<!-- The maximum number of emails on email list input fields. The value 0 means unlimited. -->
<!--<add key="email-list-limit" value="100"/>-->
-
Change the number after value="
-
Save the file, and restart the web engine service.