Once a connection to Salesforce has been established, you can select data and load it into an app. You select data by selecting Salesforce objects/tables and fields in the Create Select Statement dialog or in the Select data to load step.
Qlik Sense: Select data from Salesforce
| Properties | Description |
|---|---|
| Tables |
Shows the tables that are available for this Salesforce account. Selecting a table will cause the table fields to be displayed in the Data preview tab. |
| Fields |
Shows the fields that are associated to the selected table. Field names can be changed by clicking on the existing name. An edit box opens around the name allowing you to change the name. The new name is then used as an alias for the original name the field has in the database. Fields with unsupported data types are not shown. |
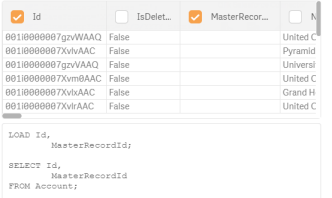
| Data preview |
Shows a preview of the fields and data of the selected table. You can select which data columns to include by checking the box beside the field name. You can also change the field name by clicking on the existing field name. The new name is then used as an alias for the name the field has in the database. |
| Metadata | Shows a table of the fields and whether they are primary keys. Primary-key fields are also labeled with a key icon |
| Include LOAD statement |
Adds a LOAD statement before the SELECT statement. |
| Add data |
Opens the Associations view of the Data manager. Allows you add more data sources, fix any errors in your data, and create table associations. This option is available only when you use Add data. |
| Insert script | Inserts the script displayed in the Data preview panel into the script editor. This option is available only when you use the Data load editor. |
QlikView: Select data from Salesforce
QlikViewThe Edit Script dialog displays two Select… buttons when you connect to a Salesforce data source but only the bottom button is enabled.
| Properties | Description |
|---|---|
| Objects |
Shows the objects that are available for this Salesforce account. Selecting an object will cause the table fields to be displayed in the Preview tab. |
| Fields |
Shows the fields that are associated to the selected table. Field names can be changed by clicking on the existing name. An edit box opens around the name allowing you to change the name. The new name is then used as an alias for the original name the field has in the database. Fields with unsupported data types are not shown. |
| Preview |
Shows a preview of the fields and data of the selected table. You can select which data columns to include by checking the box beside the field name. You can also change the field name by clicking on the existing field name. The new name is then used as an alias for the name the field has in the database. |
| Script | Displays the script generated by the object and field selections. |
| Preceding load |
Adds a LOAD statement before the SELECT statement. |
| OK | Inserts the script displayed in the Script panel into the script editor. |
The Salesforce Connector loads any Salesforce data fields without values as NULL values, rather than as empty strings.
Add a LOAD statement
You can add a LOAD statement to your script when you are loading Salesforce data using the Bulk API.
The LOAD statement before the SELECT statement allows the LOAD statement to use the SELECT statements as input. Basically, it is a LOAD statement that loads from the LOAD or SELECT statement below, without specifying a source qualifier, such as From or Resident, as you would normally. You can stack any number of LOAD statements this way. The statement at the bottom will be evaluated first, then the statement above, and so on until the top statement has been evaluated. Another advantage of the LOAD preceding SELECT is that you can keep a calculation in one place and reuse it in LOAD statements placed above. For example, when you load data from a database using a SELECT statement, you cannot use Qlik functions to interpret data in the SELECT statement. The solution is to add a LOAD statement and perform data transformations above the SELECT statement. In this example, string data is interpreted with the Qlik Date# interpretation function in a LOAD statement, using the previous SELECT statement as source:
The LOAD statement created in the script panel is a simple load.
To add the Date# function to the LOAD statement as in the example above, you would edit the script in the script panel.
Change the data selection manually
While the SELECT and LOAD statements are built automatically when you select tables and fields, you can make certain changes to those statements manually. You can make changes to SELECT and LOAD statements in the QlikView Edit Script dialog and the Qlik Sense Data load editor.
In Qlik Sense, field names can be changed in the Fields panel by clicking on the existing name. The changed name is then used as an alias for the original name when the field is loaded.
In QlikView, field names can be changed by defining an alias in the LOAD statement in the Edit Script dialog.
When SELECT statements are generated, they do not include a WHERE clause, but one can be added in the script panel. The statement for the Salesforce Connector supports the addition of WHERE clauses.
Changes entered manually in the script panel will be lost if new table or field selections are made. Changes are also lost when you select Preceding load or Include LOAD statement. Select all tables and fields, as well as Preceding load or Include LOAD statement before editing the script manually.
When a WHERE clause is used and the selected field uses a date or date-time data type, the date-time format YYYY-MM-DD hh:mm:ss is automatically converted to the SOQL date-time (YYYY-MM-DDThh:mm:ssZ) if ConvertSQLdates is selected in the Salesforce connection dialog. SOQL uses "Z" on the time to indicate that the time is to be read as absolute, with no time zone offset. In SOQL, “Z” can be substituted with an offset value. For example, the date “2009-02-24 23:01:01” in Eastern US time zone would be “2009-02-24T23:01:01-05:00” in SOQL. Because the YYYY-MM-DD hh:mm:ss format has no offset value, the date-time is converted to Coordinated Universal Time (UTC).
The SELECT statement for the Salesforce Connector also supports:
-
SELECT * statement: The Salesforce Connector allows you to use the SELECT * statement to select all fields in the table. You add the SELECT * statement manually in the script panel.
The SOQL query language does not support the SELECT * statement, but the Salesforce Connector has been enhanced to recognize that syntax. Only asterisks (*) and simple field names can be used in the SELECT * statement.
The SELECT * statement can only be used when Bulk API is selected in the Salesforce connection dialog.
-
String escape characters: The Salesforce Connector uses the single quotation mark character as an escape character instead of the back slash (\) used by SOQL. To include a single quotation mark in a query string, it must be prefaced by another single quotation mark. The Salesforce Connector uses the single quotation mark character as an escape character instead of the back slash (\) used by SOQL. To include a single quotation mark in a query string, it must be prefaced by another single quotation mark. For example, the following string encloses Captain Awesome in single quotation marks:
Devon ''Captain Awesome'' Woodcomb
The SELECT statement for the Salesforce Connector does not support:
- Qualified field names: Field names cannot be prefixed by object names. For example, “Contact.FirstName” is not permitted.
- Salesforce prefix: It is not permissible to prefix the table name with the string “Salesforce.” For example, “Salesforce.Contact” is not allowed.
-
Bracketed names: table and field names cannot be put in brackets. For example, the following SELECT statement is not valid:
SELECT [FirstName] FROM [Contact] -
SOQL aliases: The syntax for creating aliases in SOQL cannot be used. For example, the following SOQL syntax is not valid for the Salesforce Connector:
SELECT Id BusinessID FROM Contact
Load Salesforce objects with relationship queries
SELECT statements can be written to load Salesforce objects with relationship queries. To create a relationship query, you must add it manually, which requires that you use the Edit Script dialog or the Data load editor. Relationship query statements must be entered directly in the script panel. They cannot be created simply by selecting multiple tables and fields from the Objects/Tables and Fields lists.
SOAP API is required for relationship queries.
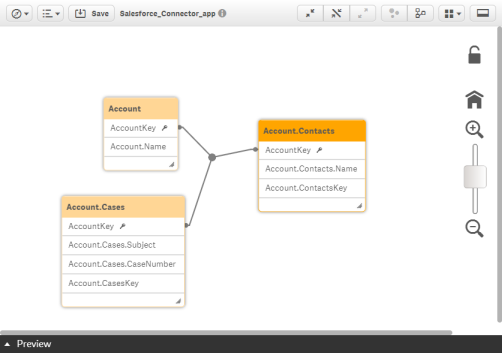
In the following example, the SELECT statement includes fields from multiple tables.
SELECT Name,
(SELECT Name FROM Contacts), (SELECT Subject, CaseNumber FROM Cases)
FROM Account;
From this SELECT statement, the connector creates separate load statements for each of the related tables/objects.
The resulting load produces three related tables.