
Using the SAP Report Connector
The SAP Report Connector works with QlikView.
Supported objects
The SAP Report connector supports the SAP Report object only.Establishing a connection
Do the following:
- Start QlikView.
- Open the Script Editor.
Select the Data tab, and then select the QvSAPReportConnector.dll option from the drop down list.
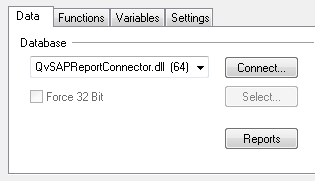
- Click Connect....
Enter the Application Server Host address, Client, and System Number of the target SAP system, or select the Message Server Host option and enter the Message Server Address, Client, System ID, and Group.
If passing through a message server, an entry may have to be added in the C:\WINDOWS\system32\drivers\etc\services file. Add sapmsxxx 36nn/tcp, where xxx is the system ID and nn is the system number. If it is the last line in the file, add a new line break after the entry.
If passing through an SAP router, paste the router string in the Application Server Host/Message Server Host address field.- Enter the Username and Password of the user that is to be used for this specific download.
Click Test Connection to verify that all fields are correctly filled in.
- Finally, click OK to get a connection string in the script.

Passing through a SAP Router
Do the following:
When you are creating the connection, go to the Application Server Host/Message Server Host field.
Input the following string: /H/<Host name or IP number of SAP Router>/S/3299/H/<Fully Qualified Domain Name of target system>
The port which the SAP Router is listening to is always 3299.
(Optional) Fill in the following connection string properties: SAPRouter, GatewayHost, and GatewayService. These are described below under "Connection string properties".
This step is not mandatory, but is useful if the connection needs to be made through a firewall via SAP router.
If passing through a Message server, please read that section below. Note that the services file must also be updated on the SAP Router server. In that case, the SAP Router needs to be restarted.
Passing through a Message server
If passing through a Message server, you may need an entry for the Message server port in the services file.
Do the following:
Locate the services file in: C:\Windows\System32\drivers\etc
Add sapmsxxx 36nn/tcp, where:
xxx is the system ID
nn is the system number (of the Message server).
If it is the last line in the file, add a new line break after the entry.
There is an alternative to updating the services file. When you create the connector connection, you can enter the Message server port number directly, instead of the System ID.
The port number is of the form 36nn, where nn is the system number.
Connection string properties
There are a number of properties that can be added to the connection string, if needed. Normally, the default values for the properties are sufficient. Separate properties with ; (semi colon) in the connection string:
ENotationLegacy=0/1(default/off = 0, on = 1): When the property is turned on, fields of the type CHAR that contain a value that can be interpreted as a Scientific Notation Number are converted to a number in QlikView. When the property is turned off, all values that can be interpreted as a Scientific Notation Number are handed as text values.
A value that can be interpreted as a Scientific Notation Number consists of numbers and the letter E, where E appears within the string of numbers. For example, 2E2, 0E123456, 1e2349.
Logpath=xxxx: Places log files in a subfolder named xxxx. The folder is created, if needed. xxxx can be any text string that can be a valid part of a folder name in Windows.
LogFile=zzzz: Names the log file zzzzdatetime-n.txt. zzzz can be any text string that can be a valid part of a filename in Windows.
SAPRouter: Use this field to specify the SAPRouter parameters if the connection needs to be made through a firewall via a SAP Router. Possible value is a string of host name and service name/ port in the following format: /H/hostname/S/portnumber
GatewayHost: The hostname of the Gateway at which you want to register. It must be the same as defined in SAP transaction SM59 (if the RFC destination defines an explicit gateway).
GatewayService: The Service name (as defined in etc/services) or the port number under which the gateway is listening. Possible values are: sapgw00 - sapgw99, 3300 - 3399
Preparing an SAP Report
Some reports in the SAP system cannot be handled by the Qlik SAP Report Connector:
- Reports where the layout is too complex
- Reports that are too large (the maximum width is 1000 characters)
Reports that do not create a spool file (which is the output format that the connector retrieves). To check this, chose Execute and Print or Execute in Background when running the report and inspect the spool queue afterwards.

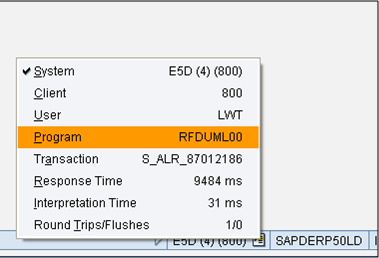
If only the transaction code is known, but not the report program name, the name can be found by clicking the system icon at the bottom of the SAPGui window, which shows the program name in the highlighted line.
Variants
The report can sometimes run without a variant, but in most cases a variant is needed to pre-fill mandatory variables, since these cannot be added through the report connector.
If the report is long-running, it is recommended to create a variant with a limited amount of pages to use during development.
Create a variant when the desired variable values have been entered.

It is strongly recommended to test the report in the SAPGui prior to testing it using QlikView.
Alternate method of loading a report
If you are using Report connector version 8.0.1 or later, you can choose to run reports using an older version of the UI.
You can load a Report with the Report Connector as version 7.0 by adding this connection string property to the script: DLLVERSION7 (1)
Put this string in the ‘Select’ statement:
Select SAPREPORT (REPORT (ZREPORT), VARIANT (ZTEST), DLLVERSION7 (1), …)Using the Select Dialog UI, the property can be enabled before selecting the report. It will then automatically be included in the script.
To enable it in the UI, select the Force DllVersion 7 box. Enter the Report name and Variant name and then press the Get button.
The Report will be loaded into the UI using version 7.0 of the Report Connector.
Defining a report
The report connector tries to retrieve a table that can be imported to QlikView from the spool file. Since reports can have different looks, the QlikView Developer has to assist the connector by defining how to interpret the spool file.
The recommended way of defining a report is by selecting the option Auto Detect Column Width, which locates the data columns automatically. When Auto Detect Column Width is selected, no other changes to the layout can be made.
Auto Detect Column Width also controls column widths in dynamic reports, changing the widths as necessary between data retrievals.
Do the following:
Click Reports in the Script Editor.
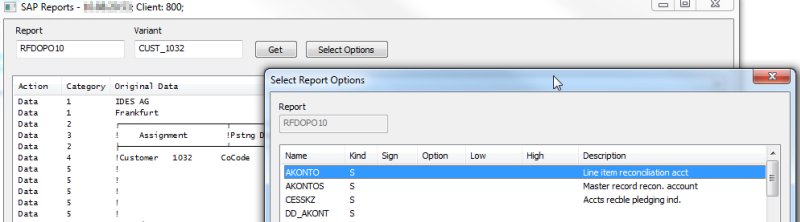
Enter the report program name in the Report field and, optionally, a variant in the Variant field.
It is not possible to search, so the name of the report must be known, and it is recommended to test the report in the SAPGui prior to testing it in QlikView.

Click Get/Select Options.
If no variants have been created for the report, it’s possible to use Select Option to do a selection when running the QlikView report. Do this by highlighting a field name and then tick the Edit box, add the required value and click Update.
The report is executed and shown in the two major areas of the window. The top area is used to define the rows to skip or consider as data lines or header lines. Sub-header lines can be defined to be added as columns in the major table.

By default, the Action column shows all lines as data lines. This can be changed by selecting a line and using the following options:
- The Category column can sometimes be used as an identifier for lines that are to be treated in the same way (skipped, header, or added as column), but scroll through the entire list to make sure all lines that have the same category can be treated in the same way.
- If the category cannot be used, look for substring values in certain positions that characterize the type of line.
Added as Columns can be used when there are data values in header lines that are to go into the table. In the screenshot above, Line 1 contains the company name, “IDES AG”, which probably changes to other company names in subsequent pages. By using the “add as columns” function and category 1, these lines are added as an extra column to the table.

Functionality exists for the Report Connector which will ‘Auto detect column width’. It is possible to use this functionality for ‘dynamic’ reports (using optimized column width) and also for some other reports. However for many reports, this cannot be used. The connector will enable the option in that case. Select the option Auto Detect Column Width and click OK.
The lower area shows the final result and also defines the columns.
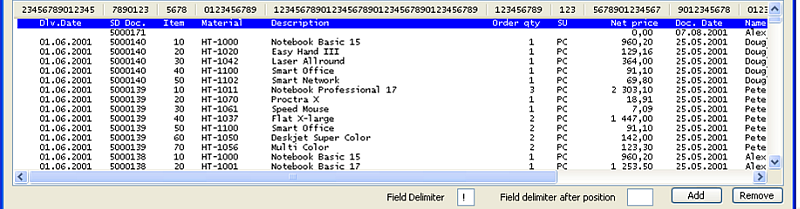
The field delimiter can only be used if the column position has the same value for all rows (usually an “!” character). The ruler line automatically shows that a separator has been found.
If a field separator cannot be found, the positions for the field separators have to be added manually using the Field delimiter after position field.
- Click OK to return to the Script Editor with the generated script.
Since all data comes from the spool file, the data types are not known to the connector, which means it cannot modify fields according to data type as the other connectors can. This means that negative field values are shown as in SAP with the minus sign at the end of the field (for example, 12256-) and that date fields are not recognized by QlikView as dates. This can be handled using scripting in the load statement.
- Move the minus sign to the front of the field:
Make a date field recognizable as a date:
date#([Field2_Doc. Date],'DD.MM.YYYY') as [Field2_Doc. Date],