
QlikView Data (QVD) file import
Qlik Catalog allows users to import QVDs from a mapped instance of Qlik Sense. The process of QVD Ingest requires administrators to provide information about Qlik Sense servers inside Qlik Catalog (Admin > Qlik Sense). Qlik Catalog queries the server and gets a list of connections and corresponding paths. Qlik Catalog dedupes the list and constructs a list of unique paths and the administrator must provide a unique source name for each one of those paths. Qlik Catalog stores this mapping between folders and source names in its metadata for use in entity creation.
QVD Catalog and Qlik Sense Integration Architecture

QVD import workflow
In order to import QVDs, Admins access one or more data connections in Qlik Sense. The following directions to import QVDs assume the environment has been configured according to the Qlik Catalog + Qlik Sense Integration Guide and all prerequisites have been met. For more information, see: Installation Guides.
If needed, refer to Qlik Sense documentation to create a connection and add data: Creating a connection and selecting data.
The following steps detail creation of a connector in Qlik Catalog and import of QVDs.
- Login to Qlik Catalog with valid credentials. User must have admin privileges to access and manage the Admin tab.
- Select Admin on top right-hand side of top task bar.
- Select the Qlik Sense tab.
-
Select Add New Connector.
-
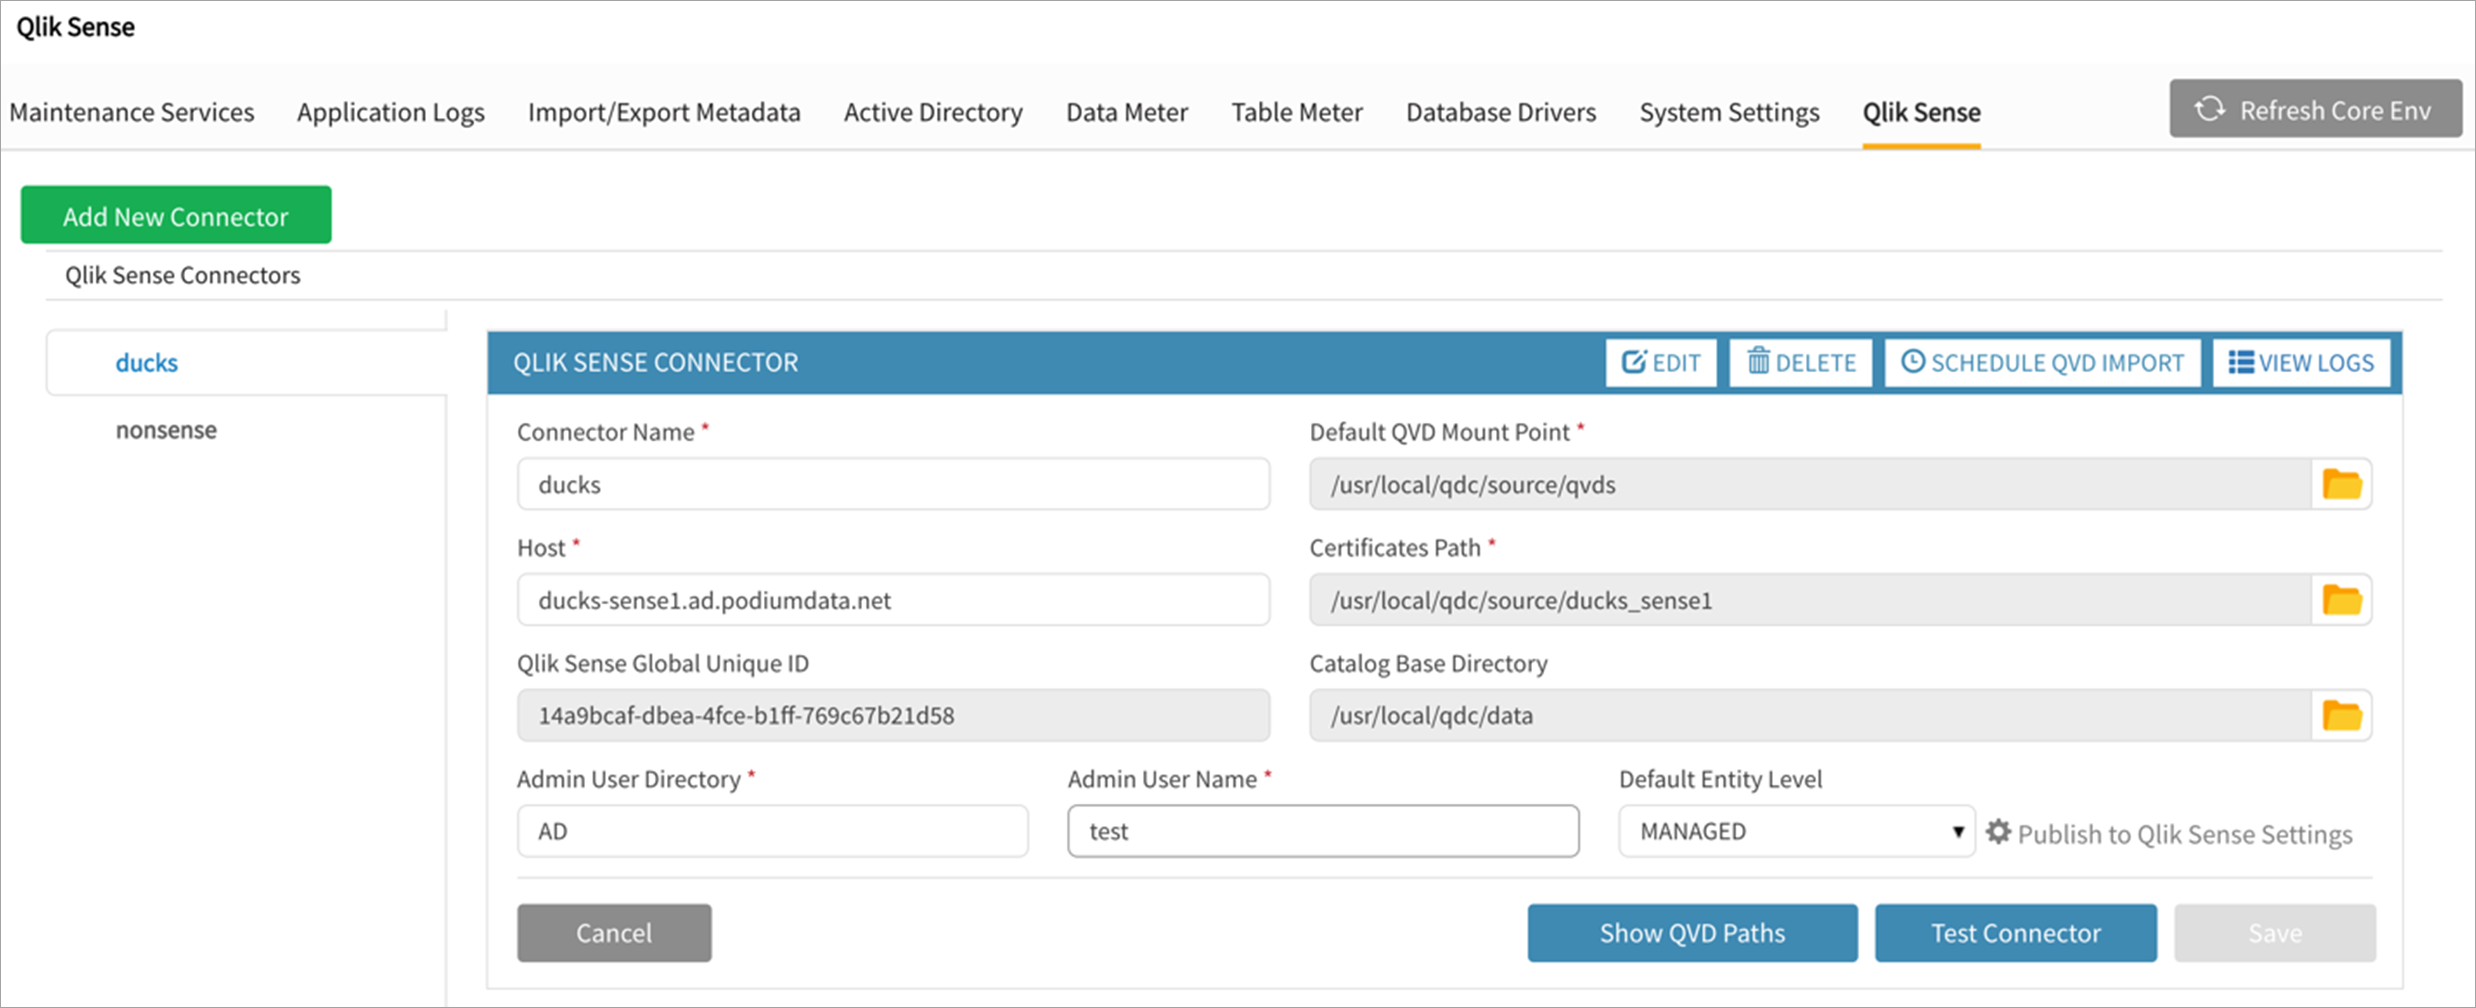
On the QLIK SENSE CONNECTOR configuration screen enter:
- Connector Name: Required, user-defined
- Default QVD Mount Point: Required. This value can be entered manually or selected through the file browser. [This value is specified in core_env property: localfile.base.dir.source.connection--the user cannot browse outside of this directory.]
- Host: Required, Qlik Sense host (ex., ducks-sense2.ad.qdcdata.net)
- Certificates Path: Location of Qlik Sense server certificates. If the QlikCatalogQlikSense_Integration_Guide has been followed, the installation default value will be in the QDC_HOME directory: /usr/local/qdc/certs/<sense_hostname>.
- Qlik Sense Global Unique ID: Auto-retrieved upon Test Connector, every installation of Qlik Sense has a Globally Unique Identifier (GUID).
[hyphens have been removed to comply with 32-character group name limit]. - Catalog Base Directory: This is where Qlik Catalog stores the data on the local file system. (Copy the base directory information from Support>About>Settings). Or copy the value from property loadingdock.base : (e.g., /usr/local/qdc/data/)
- Admin User Directory: Directory name (aka domain name) which is combined with Admin User Name.
- Admin User Name: Name of user (when combined with Admin User Directory name) that is an AuditAdmin in Sense.
- Default Entity Level: Populated from System Settings and can be overwritten (options are Managed or Registered).
- Click on Test Connector. Upon connection success, Save the connector. Note: the Publish to Qlik Sense Settings button need not be clicked to configure QVD Import.
- Click on Show QVD Paths to set up paths.
-
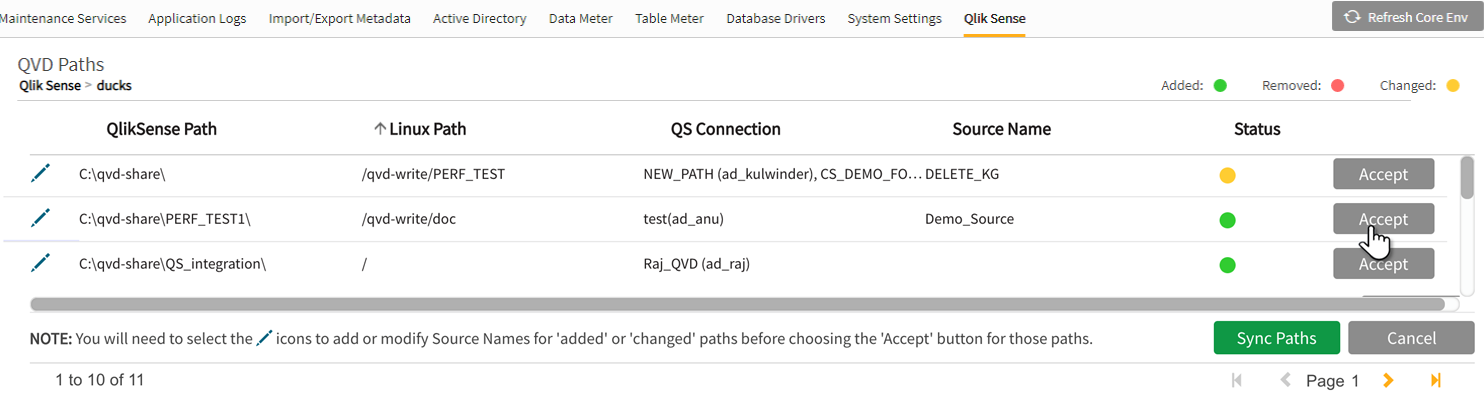
In the QVD Paths screen, select Sync Paths. All available Qlik Sense connections that have had the QVD Catalog tag applied during configuration in Qlik Sense are filtered and imported into Qlik Catalog. When the paths are synced, the Qlik Sense Windows folder must be mapped to the Linux path folder, thereby making Qlik Catalog aware of each QVD in these folders. Every QVD in Qlik Sense corresponds to a new QVD entity in Qlik Catalog.
Be sure that both paths in Qlik Sense and Qlik Catalog point to same endpoint folder name.

-
Click on the
 (view details) icon on any Qlik Sense path.
Select the Linux Path using the file browser (this is the mounted Linux path that maps to the Windows path counterpart), then give the Source a name. Catalog Base Directory and Default Entity Level will auto-populate from the connector values but can be overwritten.
Stored File Format is fixed as TEXT_TAB_DELIMITED in single node environments. In multi-node environments, storage options include: AVRO, ORC, ORC_ALL_STRING, PARQUET, and PARQUET_ALL_STRING.
Select Ok.
Information noteNote: Be sure that the Linux Path is the mount point for the QVD Windows Path network share containing the QVD files on the Qlik Sense server.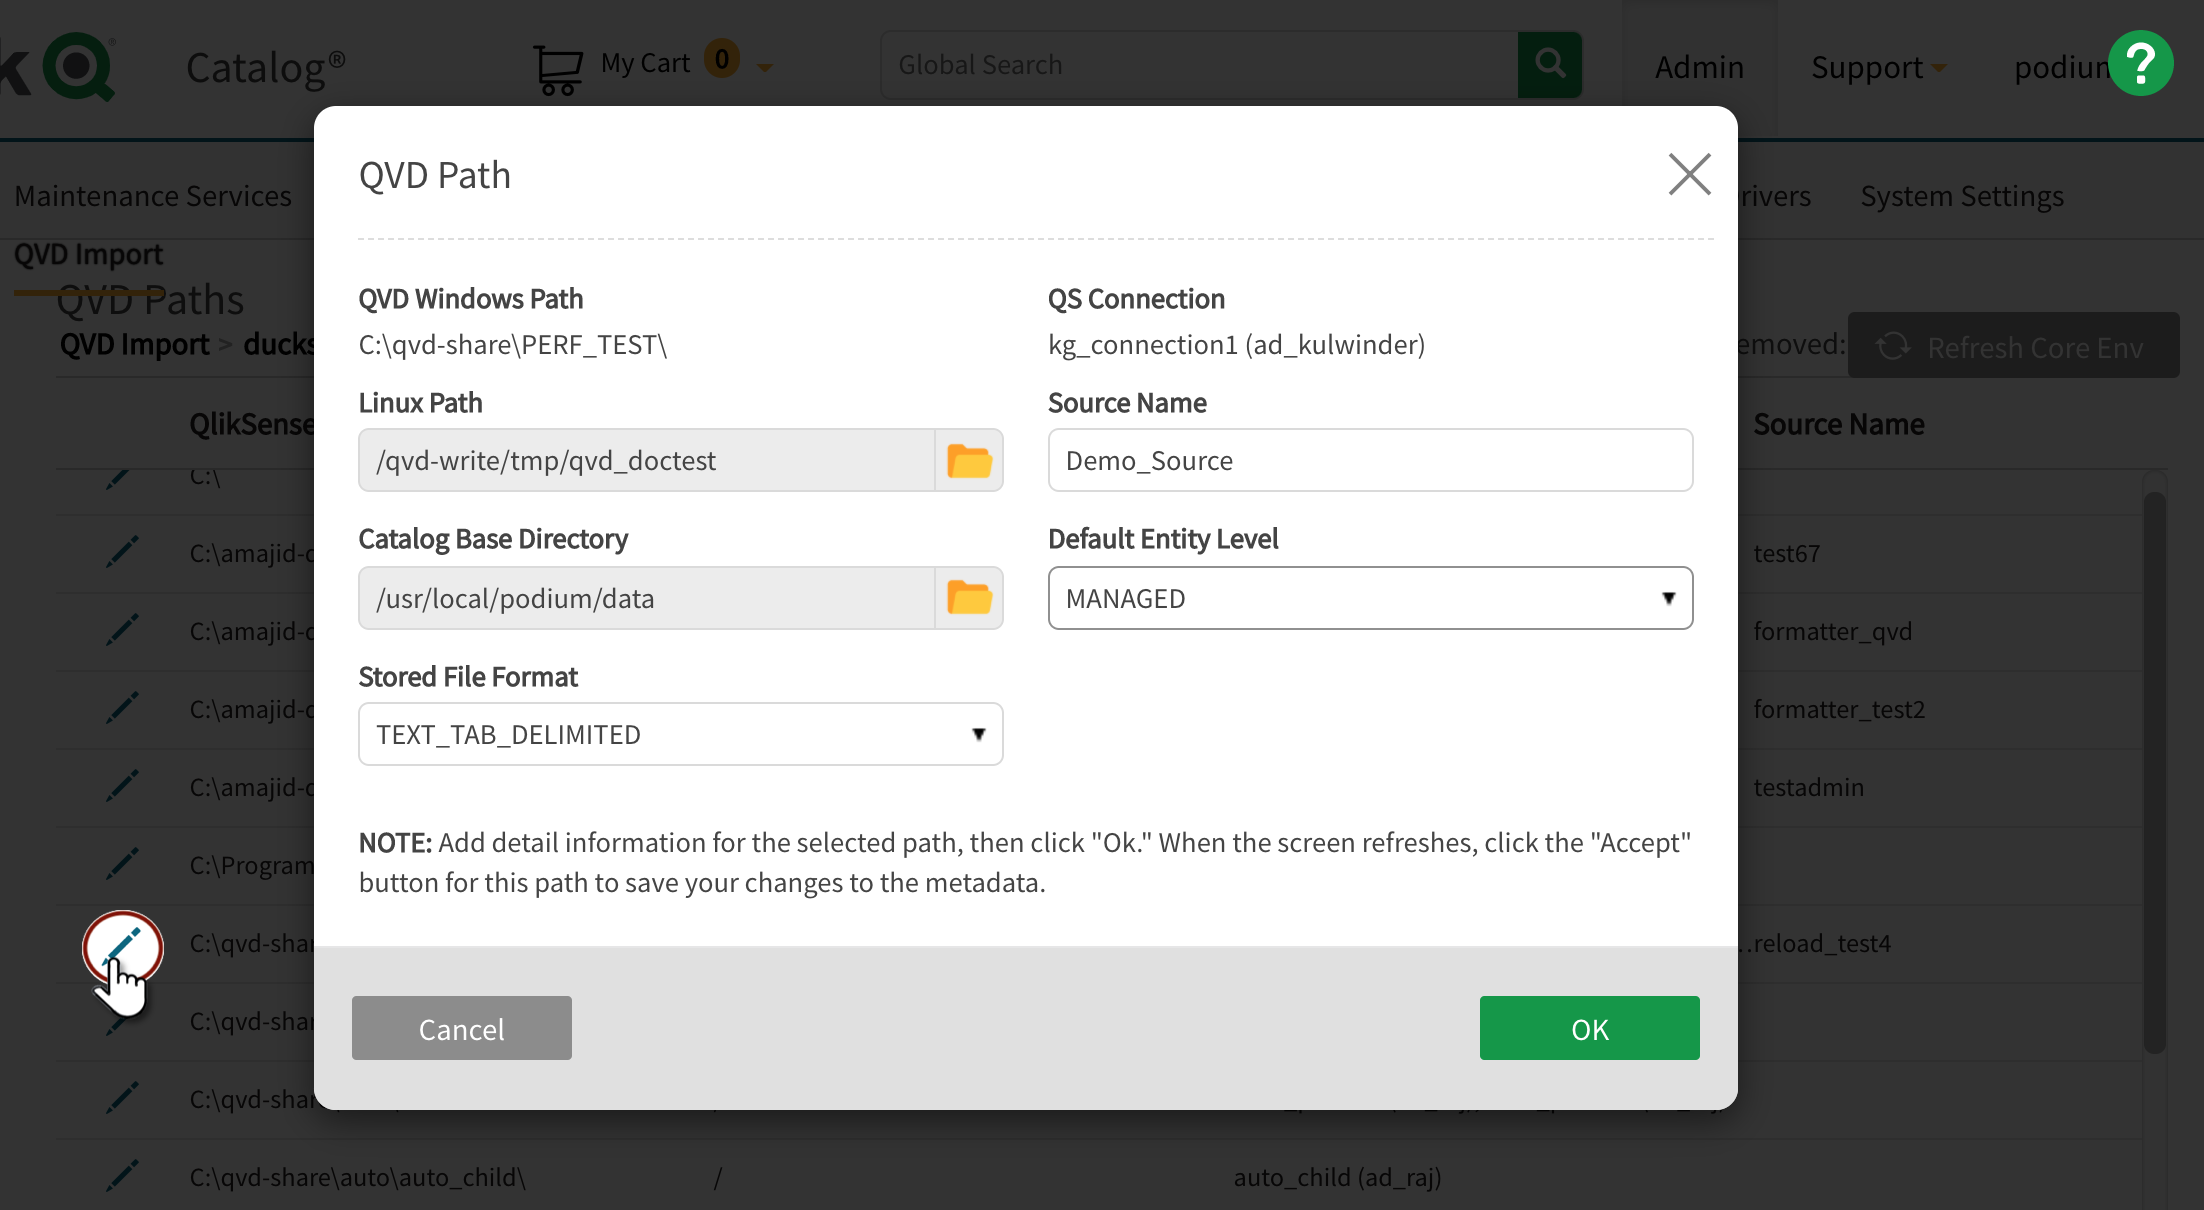
-
Upon Sync completion, status regarding any path/folder updates display as Added, Removed, or Changed.
Accept the path to save the metadata. An admin user must select Accept to the right of each path in order to persist the path and metadata in Qlik Catalog; the application then knows to scan the folder path to extract information.
-
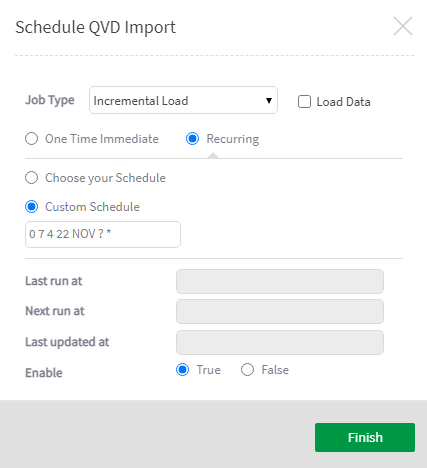
Go back to the Qlik Sense tab. Open the Connector and select Schedule QVD Import and Run. The mounted folder (Linux path) is scanned and the QVD entities are added to the created source ("Demo_Source" in pictured example) created on the Paths screen. When Run is initiated, Qlik Catalog scans the folder and finds,creates, updates, deletes QVDs in the source within Qlik Catalog. File attributes are read from the XML header of the originating source QVD, and information about the QVD required to build a metadata environment (table schema) for a QVD entity is extracted in this step.
QVD Scan Functionality by Type: Full Reload, Re-sync, Incremental QVD scan type Processes ONLY files updated since the last file scan
Processes all QVD files on disk (ignores scan history)
Deletes entity metadata
Merges entity metadata*
Deletes load data
Deletes load logs
Deletes previous
file scan historyLoads data (when Load check box is selected) Full Reload
- X
X
- X
X
X
X Re-sync
X
- X
X
X
X
X
- Incremental
X
-
-
-
-
-
-
X Information note*On an entity metadata merge, the entity is updated with the latest version of the QVD metadata, but metadata entered in the Catalog UI (like tags and business description) is retained.
Full Reload: Complete build and refresh; deletes any objects and data that had been in these sources. Use Full Reload with caution; if sources had entities with data in them before, then overwrites impacting those sources are made and the data will be lost. All history, logs, and information related to connectors are deleted.
Re-Sync: Syncs Qlik Catalog with Qlik Sense. QVDs that are not found upon sync with Qlik Sense are deleted, including any associated data and metadata. Net-new QVDs found in the file system are ingested. For QVDs that exist in Qlik Catalog and are still present in the Qlik Sense file system, metadata properties and attributes owned by Qlik Sense are refreshed and replaced.
Incremental Load: (recommended for initial load) After the first load, all subsequent data sets loaded are added to existing data if Load Data is checked. Incremental loads can be run One time Immediately or Custom scheduled with entry of a Quartz cron expression. Enable the Quartz cron expression to initialize a new schedule. To use a Quartz cron expression to create an automated schedule, choose Recurring, then select the radio button next to Custom Schedule. Complete the entry with the Quartz cron expression. Refer to the following link for guidelines on creation of a Quartz cron expression:
Creating a Quartz cron expression
Select Finish to initiate the load, re-sync, or exit the dialog in the case of scheduled future runs. Be sure to check Load Data to onboard data.
Upon Run, users are transitioned to QVD Import Logs screen where progress of the load can be monitored. Note that when source data load is initiated from this screen, all entity data is loaded. In single and multi-node environments, if the Load Data option is not checked, users are able to load entity data individually from the source module. The columns that display in the QVD Import Logs screen are configured for the QVD Logs grid in User Preferences.
QVD Import Logs Screen
